Replacing standing rigging, step by step
Issue 80 : Sept/Oct 2011
When our headstay almost parted in Panama, where there is no professional rigging service, we had to replace it ourselves. Since the standing rigging on our Mason 33, Carina, had been installed with Sta-Lok mechanical terminals, we used the same terminals on our new headstay. We found them easy to assemble using common hand tools, and that gave us the confidence to go ahead later and replace all the standing rigging, which we did while at anchor in Vava’u, Tonga. We hope our experience will be helpful to others who might wish or need to do the same.
One stay at a time
Plan on replacing only one wire rope at a time and make sure that throughout the rerigging procedure your mast is well braced with spare halyards.
When replacing an upper shroud, ease the tension on the port and starboard shrouds uniformly to avoid bending the mast. Although the mast should remain standing securely with just the lower shrouds, we always used halyards as guy lines for added security. Lubricate turnbuckle threads to avoid galling or other damage. We used Tri-Flow, which contains P.T.F.E. and is available as aliquid, since it leaves little residue that can later collect dirt.
Loosen the turnbuckle on the stay that is to be replaced until the stay is loose, but do not disconnect it completely. This will stabilize the bottom of the stay while you disconnect the top and lower the stay.
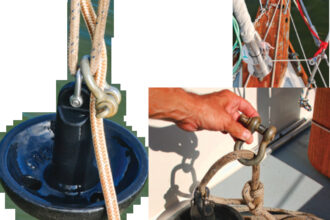
At the top of the stay, before removing the cotter and clevis pins, tie a line securely to the wire below the terminal using a rolling hitch (see Part One, in the July issue). Then slowly lower the stay to the deck.
At deck level, tie a line between the stay and the boat before detaching the lower end of the stay. This will prevent the stay from “snaking” over the side and into the deep blue while you’re manipulating it. If you’re at a dock, move the stay to the dock and lay it flat. If at anchor, bring both ends of the stay to your work area; we used our cockpit.

Removing an installed terminal
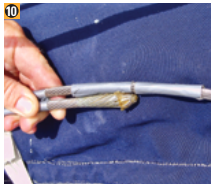
Our standing rigging was assembled with Sta-Lok terminals. The steps that follow will be similar in principle with other brands of mechanical terminals.
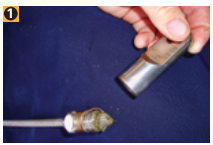
Unscrew the female portion of the terminal by holding the male portion with a box wrench and using a large screwdriver (for an eye) or second box wrench (for a stud).
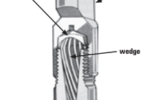
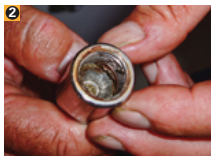
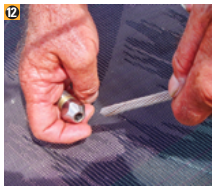
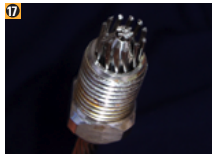
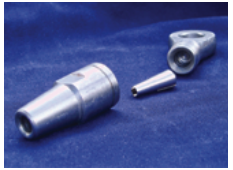
Inside the female half of the Sta-Lok is a “former,” a dome-shaped part that can be re-used if undamaged. The former may be difficult or impossible to remove from a used fitting, and you might damage it in attempting to remove it, so be sure to have spares.
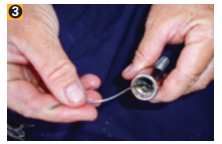
If the terminal was assembled using silicone sealant and a thread-locking compound, clean the fitting of the residual material. A single strand of 1 x 19 wire works well for removing residual sealant from the threads and former. Periodic spritzing with WD-40 and wiping by twisting a rag into the threads also helps to remove old thread compound and sealant.
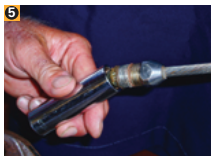

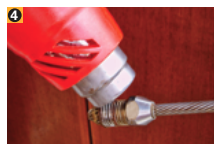
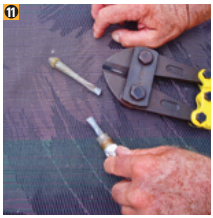
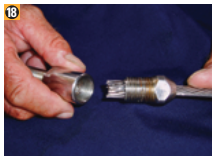
Disassembing the socket (male section) takes a little bit more effort, but only if the terminal was assembled with sealant. To avoid damage to the threads during disassembly, we used a long socket from our socket-wrench set. The socket should have a diameter smaller than the terminal cap but just large enough to pass freely over the threads.
Secure the wire in a vise or clamp it with locking pliers, such as Vise-Grip. Next, heat the fitting with a heat gun or propane torch just long enough to soften the sealant (approximately 1 minute with a heat gun on low setting). Slip the socket over the threads and use a hammer to dislodge the fitting from the wire.
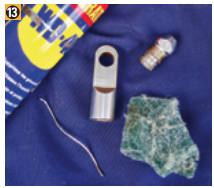
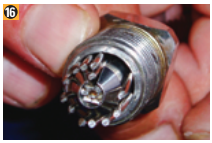
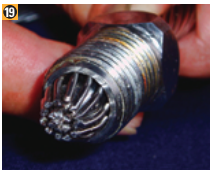
We found no rust inside our disassembled 11-year-old fittings, only silicone sealant and red thread-locking compound.
Once you have loosened the male terminal sections at both ends of the wire, and before cutting the old wire, measure for the new wire against the old wire. This is the time to consider whether the new wire should be a trifle longer or shorter than the old wire.
To measure accurately, tape the old and new wires together every few feet along their lengths to prevent the two wires from “walking.” Bracket, with duct tape, the location on the new wire where it will be cut, and carefully cut the end as square as possible.
This can be done with a cable cutter, hacksaw (tape either side of the cut and secure the wire in a vise), or a high-speed rotary tool such as a Dremel.
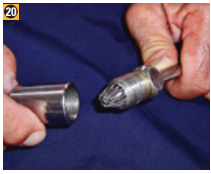
Now remove the male Sta-Lok terminal section from the old wire.
Installing a terminal
Before reassembling the terminal on the new wire, clean the male and female parts thoroughly with WD-40 or a similar solvent and a synthetic scouring pad, such as Scotch-Brite.
Ensure the threads are clean and that you can thread the terminal easily by hand. Inspect each piece carefully for corrosion or cracks.
Inspect the cut end of the new wire. The cut should be reasonably clean and none of the individual wire strands should vary in length more than 1 mm. Use a wire snipper to trim individual wires if necessary.
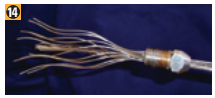
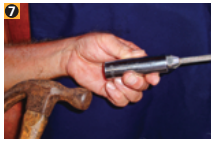
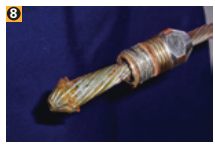
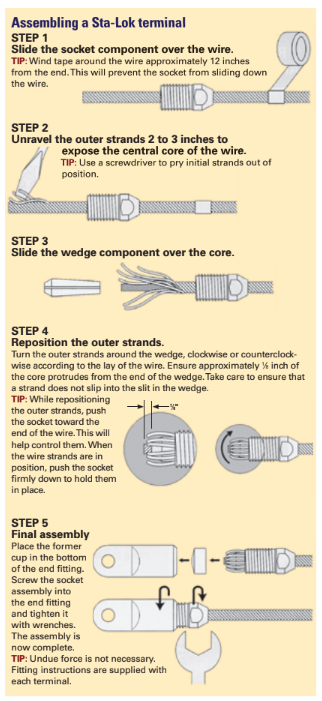
Slide the male terminal piece (socket) over the new wire (an important step). Using a small slotted screwdriver, begin to uniformly unlay the wire approximately 2 to 4 inches from the end. If you want, you can apply a wrap of thread or tape a few inches from the end of the wire to prevent the wire from unlaying beyond this point and to prevent the socket from sliding down the wire.
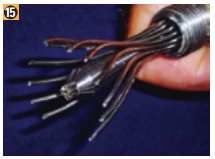
Slide the new wedge over the seven core wires until 2 to 4 mm (about 1⁄8 inch) of wire extends beyond the wedge (this distance depends on the wire diameter and is specified in the Sta-Lok instructions). Do not reuse old wedges unless no other option exists.
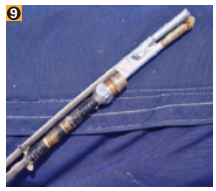
Re-lay the wire. Push the male terminal fitting up the wire and rotate it with the lay of the wire to gently re-lay individual strands.
Take care that the wedge does not slide out of position (off the end of the wire), that strands are uniformly spaced around the wedge, and that no individual strand is lodged in the wedge slot. If the pre-assembly is poor, pull back the male terminal piece and use a small slotted screwdriver to gently push the wedge back into position and realign individual strands. A good tip for Sta-Lok fittings: hold the male terminal piece snugly against the wedge and rotate the male terminal in the direction of the lay of the wire rope as you align the individual strands. This helps to keep individual strands out of the wedge slot.
Once you have the wedge, wire strands, and male component assembled satisfactorily, thread the female terminal section on until you feel some resistance. Some riggers recommend using a thread-locking compound at this point to lubricate the threads and to avoid galling.
Using a vise and box wrench, or two box wrenches, slowly tighten the terminal, but just hand tight. You will hear a disconcerting “scritching” sound as the wires bend and lay with the former inside the terminal. Immediately disassemble the terminal fitting to check the quality of the assembly; the wire strands should be bent and lie neatly and uniformly around the end of the wedge.
Complete the assembly by applying a “grape-sized” dollop of sealant to the female terminal section. If you didn’t do this during your test assembly, now’s the time to apply Loctite or another thread-locking compound to the threads of the male terminal section.
Reassemble the terminal, tightening to hand tight with box wrenches. Do not overtighten!
To seal or not to seal?
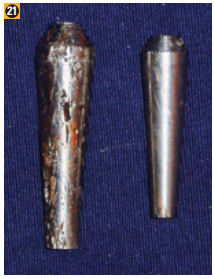
There are arguments for and against applying sealant to mechanical terminals. Hi-Mod discourages the use of a sealant while Norseman endorses its use but advises against silicone sealants. Sta-Lok indicates sealant is not needed but, if used, it should be a polysulfide. Blue Wave recommends Sikaflex 221. Upon replacing our failing 11-year-old wire rope, every terminal we disassembled revealed a wedge that looked nearly perfect. These terminals had been sealed by our rigger with marine silicone sealant.
Alternative products
Norseman (Navtec) — The Norseman system design has changed little with time. The company was purchased by Navtec, which is part of Lewmar. Lately, availability of Norseman fittings seems to be an issue with U.S. rigging suppliers. In our opinion, the industrial design of the Norseman is less refined and its finish compares poorly to the machining and brilliant polish of the other brands.
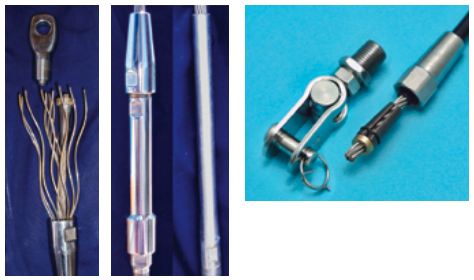
The wedge is similar in design to that in the Sta-Lok but a bit shorter and of slightly larger diameter. The wedge is inserted significantly deeper into the unlaid wire — 1.5 times the wire rope diameter — than with other designs. The terminal consists of three components: the body (female thread); the cone; and the end fitting (male thread) with its integral former machined to compress the end of the wire when the terminal is assembled.
Hi-Mod (Petersen Stainless) — The Hi-Mod system is the latest introduction into the market and has little history yet, though its manufacturer has a reputation for high-quality products and these cleverly designed terminals are rapidly gaining in popularity.
The industrial design and finish quality seems superior to the Norseman, though the form is similar. The Hi-Mod design is differentiated by its aluminum-bronze crown ring that sits on the wedge. This ring keeps the individual wire strands evenly spaced around the wedge and prevents the outer wire strands from bending, making all system components reusable. The crown and the end fitting also help to ensure a flawless assembly by holding the position of the wedge to a precise depth.
Blue Wave (Blue Wave A/S) — The design of the terminal body components of the Blue Wave are similar to those of the Norseman and Hi-Mod, though their terminology is slightly different. The key differentiating design element is a jaw (called by others a wedge or cone) that slides over and compresses onto the full diameter of the wire rope, making it universal for a given wire diameter irrespective of wire construction (7 x 7, 7 x 19, 1 x 19, or Dyform). In addition, the system includes a compression ring that slides onto the bitter end of the wire and a locknut on the head that secures the assembled terminal. The design and construction are of high quality but the product’s popularity (at least in the U.S.) seems limited.
Quick Attach (Suncor Stainless) — These terminals are of the same design as the Blue Wave terminals, although the installation instructions contain minor variations. They appear to be marketed primarily for lifeline applications by Suncor Stainless and for railings by Atlantis Rail.
Design note
Sta-Lok terminals have a design feature that distinguishes them from the other products listed above. In Sta-Lok fittings, the wedge is compressed inside the male-threaded socket and the female-threaded former. This doubles the wall thickness securing the wedge.
Proactive with rigging
When we left our home port on our open-ended cruise, we didn’t give much thought to replacing our standing rigging. Our rig was new when we launched Carina, we had sought advice from professional riggers just before departure, and we cleaned and inspected our rigging regularly. Though we were proficient at most maintenance tasks aboard Carina, we had not given enough thought to the possibility we would need to become do-it-yourself riggers.
Our experience taught us valuable lessons and we feel that others can benefi t from them:
- Know your rig and how to service and install every component.
- Clean and inspect rigging at least annually but preferably more frequently. Inspect your rig before departing on any ocean passage.
- End-for-end stays and shrouds when they have reached approximately half their expected life.
- Don’t neglect to inspect chainplates, as cracks are usually well hidden.
- Be comfortable in your bosun’s chair or climbing harness. Work out safety procedures with your crew and always use a safety line.
- When cruising, carry spare wire rope in all sizes represented in your rig, of a length and diameter suitable for replacing any stay.
- When cruising aboard a vessel outfitted with swaged terminals, carry enough mechanical fittings and suitable extensions or long studs to permit any swage to be replaced using the existing wire. For rigs already fitted with mechanical terminals, carry at least one representation of each fitting and terminal in the rig and possibly a connector that could be used to repair a section of wire in situ.
- Replace any rigging component — wire, terminal or chainplate — that shows any sign of degradation.
After learning by necessity while replacing first one part, and then all, of Carina’s rig without the help of professionals, we have become proponents of mechanical (compression or swageless) fittings. These systems are not difficult to master and working with them is certainly within the capabilities of most sailors. For offshore cruising, using them seems imperative, in case a rigging failure is discovered hundreds or thousands of miles from professional rigging services.
Philip DiNuovo and Leslie Linkkila came to cruising and boat ownership as adults and quickly developed a passion for small-boat travel. In 2003, they quit their professional jobs and left the Pacific Northwest behind. Now in the South Pacific, far from marine professionals, Philip and Leslie have had to learn to service nearly every system aboard Carina, their Mason 33.
Thank you to Sailrite Enterprises, Inc., for providing free access to back issues of Good Old Boat through intellectual property rights. Sailrite.com