A novel construction method for amateurs
Issue 71 : Mar/Apr 2010
Few parts of a boat are more vital than the rudder. If you lose the use of your rudder, you have no easy means of steering . . . always a serious prospect. If the failure should occur at a critical moment — while sailing near a lee shore, for instance — the consequences could be catastrophic.
After hearing three firsthand accounts of rudder failures within just a few months, we resolved to make sure ours was in shipshape condition before we began more extensive cruising. We had some cause for concern. During a previous haulout, we had noticed pitting on the stock. We couldn’t fully investigate at the time without dropping the rudder. That would have meant digging a deep hole in the ground, among other difficulties. With Caribee hauled out once again and well into a major refit, it was time to address the problem.
All three sailors who recounted their rudder failures to us said they had lost steering because welds between the stainless-steel stock and tabs within the rudder had broken. The stock still turned as designed, but the rudder didn’t turn with it, or turned insufficiently to be effective.
Conditions within the laminate of an immersed rudder are ideal for generating crevice corrosion in stainless steel. Because stagnant, oxygen-deprived salt water is much more conducive to corrosion than seawater that is able to circulate freely, this is one of the most common types of failure.
The apparent corrosion of our stock, along with osmosis problems and water saturation, convinced us that a new rudder was the best solution. After a lot of head scratching, questioning, and research, I came up with a design for a rudder that has no embedded metal. The construction method is “inside out,” in the style of an airplane wing or foil. This is the opposite of the more common molded method.
I believe this method is easier for a one-off construction, especially for unskilled builders. It’s certainly easier to get the stock aligned properly, a critical factor. Depending on the rudder type, a small degree of misalignment may result in binding. This may not be evident in a molded rudder until the construction is mostly complete . . . a bit too late. With the inside-out approach, you can check alignment frequently and make simple adjustments at various stages to fix any problems as they show up. This is an intuitive project that takes shape as you go, so it’s easy to make alterations before mistakes become serious.
Except for the welding and machining of the metal parts, any reasonably handy person with a working knowledge of epoxy and fiberglass construction techniques should be able to pull off this project, using a few simple tools. The only power tools required are a jigsaw and small grinder/sander, though a palm sander or random-orbit sander can be useful. The concept is well suited to keel- or skeg-hung rudders.
Frame design and construction
Unless you’re a welder and machinist, you’ll have to contract out the fabrication of the stock and attachment plate, just as you would with other construction methods. What you want is a stock the size of the existing one with two cheek plates welded to it. The plates will sandwich the fiberglass portion of the rudder between them. There will be no metal, except bolts, embedded within the rudder. The connection will be through-bolted with several hefty bolts. These should have flat heads countersunk into one cheek plate with threads tapped into the other so you’ll wind up with smooth surfaces that won’t create drag. The cheek plates themselves will be recessed flush with the fiberglass surface, producing a low-drag, hydrodynamically-smooth whole.
If your rudder is very thin in relation to the stock size, it may be necessary to flare the thickness of the rudder out slightly in the area of the cheek plates, then taper it down to normal size as you move some distance away from the plates. In our case, the plates had to be beveled on their forward edges because they were incorporated into the leading edge of the rudder.
Once you have designed the metal components, take the plans to a machinist. The best readily available material for the metal parts is probably grade 316L stainless steel (sometimes called marine-grade stainless steel), which is more resistant to chloride corrosion than 304 or most other grades. The “L” means that the carbon content is below 0.03 percent, which reduces the sensitization effect caused by the high heat of welding. In the presence of air or oxygen-rich water, this alloy is highly corrosion-resistant. Even so, it’s a good idea to have a 1⁄4 -inch hole drilled and tapped into each plate for attaching zincs. Try to find a supplier you can trust to give you the correct material, because you won’t be able to identify 316L stainless steel just by looking. Look for a machine shop that is used to welding stainless steel.
The size and thickness of the plates should be appropriate for the size and type of the rudder and the expected loads. A little common sense goes a long way and some overkill never hurts, at least up to a point. In general, the less secondary support a rudder has, the stronger the cheek plates should be. Spade rudders need the strongest connection to the stock. For our moderately heavy 32-foot offshore boat with a keel-hung rudder, we used 3⁄8-inch plates of about 100 square inches each. Nine 3⁄8-inch bolts squeezed them to the rudder. I feel sure this was overkill, but it gives us confidence.
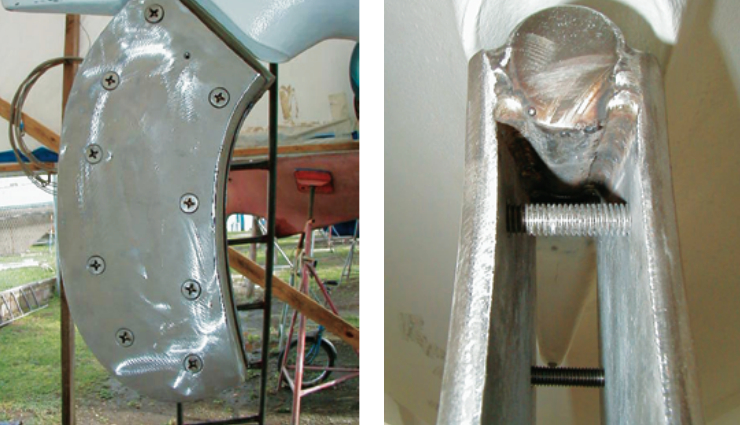
Rudder backbone
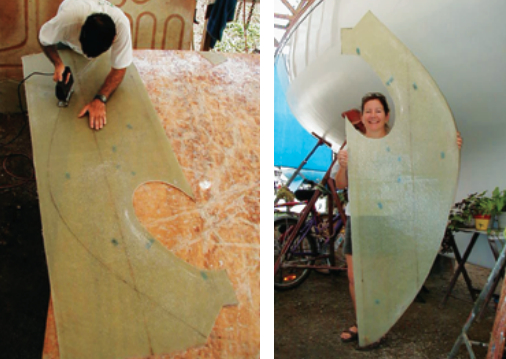
The next step is to build the “backbone” of the rudder. This is made from a flat panel of fiberglass laminate that is the shape of the profile of the original rudder and establishes the shape of the new one. If you want to change the shape or size of the rudder, you can do it now, but be cautious about making such changes without seeking expert advice, preferably from the boat’s designer.
You’ll be laying up a panel of fiberglass using mat, roving, biaxial cloth, or a combination of these, saturated with resin. It’s OK to use polyester resin for this step and for the ribs and stringers that will determine the rudder’s shape. If you use mat in the layup, don’t use epoxy resin unless it’s special matting designed for use with epoxy. You should use epoxy for most of the remaining steps because of its superior bonding and water-exclusion properties.
Wax a piece of plastic laminate (like the kind you see on kitchen countertops) a little bigger than the profile size of your rudder. Use mold-release wax or a few coats of car wax. (You can also use lightweight plastic sheeting over a solid surface such as a concrete floor.) In order to have extra material for making narrow ribs and stringers, make the sheet about 50 percent larger than the rudder.
Lay the plastic laminate on a very flat surface. Spread out your first layer of cloth on the plastic and saturate it well with catalyzed resin, working out any air bubbles with a ribbed metal roller (often referred to as an air roller) or plastic spreader. Use only enough resin to saturate the fabric. Before the resin has cured, add the next layer, and so on until the panel is the desired thickness. The finished panel of fiberglass should be about 3⁄16-inch thick for a moderately sized rudder. After it cures, you’ll be able to peel it away easily from the waxed plastic. It will be very flexible and floppy at this stage.
Next, lay your existing rudder over the panel of fiberglass and carefully trace the shape onto the panel with a marker or pencil. Draw a second line 1⁄4 inch inside the traced line to allow for the extra size the outer layer of fiberglass skin will add to the finished rudder. Take a jigsaw and carefully cut along your inner line. What you have now is a flat panel the shape and size of your rudder upon which you will begin to build the foil shape using ribs cut from the excess material.
Creating the sectional shape
Take careful measurements of the thickness of the old rudder at closely spaced intervals (about 6 inches apart) in a grid pattern. You can drill small holes in the rudder and measure the bit penetration or lay the rudder flat on the floor and use a straightedge set parallel to the floor. If you use a straightedge, mark the spot where each measurement is taken. Write the measurements beside the drill holes or marks. Divide the measurements in half. Subtract half the thickness of the backbone plus another 3⁄16 inch to allow for the outside skin of the new rudder. Transfer the corrected measurements as accurately as possible to the backbone, writing them down on spots that match the same stations on the old rudder. You may also want to chart them on a scale drawing. Double-check everything.
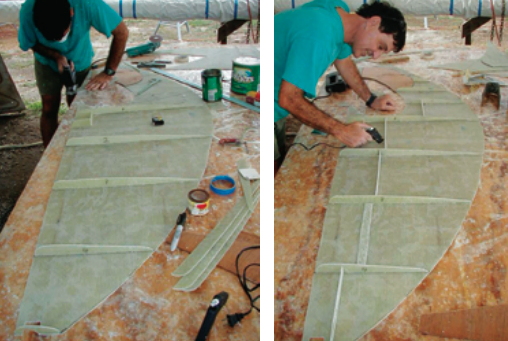
With a jigsaw, cut ribs from the remaining fiberglass sheeting, using the thickness measurements you pulled off the old rudder to determine their size and shape. Space the ribs about 12 inches apart, or more closely if you wish. The more closely spaced they are, the more precisely you will be able to define the shape of the rudder. For now, hold off on adding the first few ribs in the area where the cheek plates attach so you can first reinforce the backbone with a few layers of fiberglass, a point I will address later. This is all easier to do than it sounds, and any irregularities in shape will be obvious.
In the interest of speed, and ease of adjustment if needed, tack the ribs in place with hot glue or dabs of quick epoxy. After you’ve fitted the horizontal ribs, glue in some vertical stringers, cut from the same fiberglass panel. These will stiffen the backbone and give you additional reference points when building up the core material later.
After you’ve tacked the ribs and stringers in place, check the thickness and shape again. Make sure you’ve allowed for any fittings the rudder may require. It’s very easy to make adjustments at this stage.
Sight down the tops of the ribs and view the structure from various angles to ensure that it looks true. If you need to reduce the height of some of the ribs or stringers, a small angle grinder fitted with a coarse-grit sanding disc makes quick work of the job.
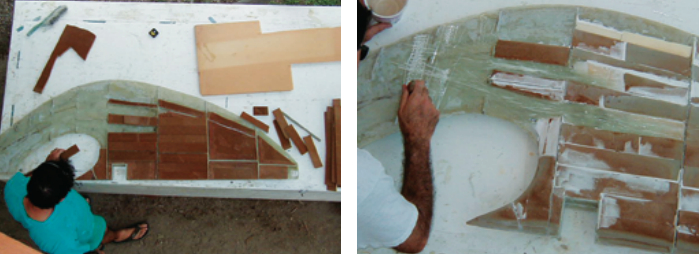
Once you’re satisfied, mix a small batch of epoxy resin and silica powder to a consistency somewhere between mayonnaise and peanut butter. Wipe all the joints with acetone or lacquer thinner and sand lightly. Run a small curved fillet of the mixture down both sides of every joint between the ribs, stringers, and backbone, including the rib-to stringer joints. Use a Popsicle stick or latex-gloved finger to give a small radius to the fillet. Before the fillets cure, lay some narrow strips of glass cloth over them, overlapping the edges of the fillets by a half-inch or so. Then wet out the strips with epoxy resin. Once the epoxy has cured, the structure will be quite rigid.
Flip the frame over and place the ribbed side down. Support it with small blocks of wood to keep the backbone perfectly flat. It’s important to make sure it’s flat and straight. If the rudder isn’t symmetrical, it will tend to pull to one side when the boat is under way. Repeat the procedure on this side.
When you’ve finished, the structure will be light in weight but very rigid and have the unmistakable appearance of a rudder. If you like, you can add stringers to more accurately define the shape and provide extra reference points for the build-out to follow. While any stringers you add at this stage will stiffen the structure, much of the rigidity will come from the fiberglass skin that goes on last. You now have a rudder in skeletal form, which has to be fleshed out.
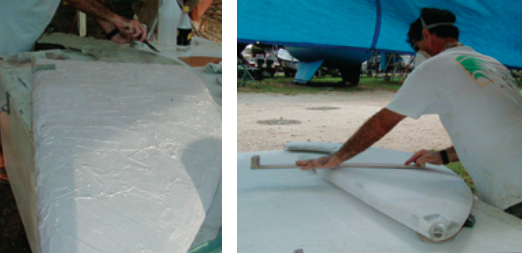
Putting meat on the bones
The next phase is the build-out of the core. Before you begin, make certain that you have allowed for any fittings or supports that will be needed in the finished rudder. In our case, this meant an intermediate bearing, as well as a socket to accept the small bronze pintle of the rudder shoe. I also planned for a small hole near the trailing edge, with the idea that it could be an aid to emergency steering if the stock, stock connection, or tillerhead failed. I reasoned that my keel-hung rudder would still be supported by the intermediate and bottom bearings and a line attached to the trailing edge of the rudder would allow the boat to be steered in some fashion, perhaps by blocks set to the ends of a lashed-down spinnaker pole.
Once you’re satisfied that everything is in order, start adding material to the frame. Fill in all the spaces between the ribs and stringers, bringing the core flush with their tops.
At the upper end, where the plates will be attached, the material should be solid fiberglass to ensure strength and prevent compression of the laminate when the plates are bolted on. In our case, I had already attached all the ribs below the plate attachment point, so any fiberglass material I added to the backbone below that point was not continuous but was in segments separated by the ribs. It would have been somewhat stronger if I had bonded a few continuous layers of glass to the backbone in the upper portion and placed the ribs on top of those layers. That’s the reason I recommend that you temporarily hold off on installing the upper ribs.
If you decide to reinforce the upper part of the backbone this way, add the upper two or three ribs after you’ve completed that reinforcement. Much of the rudder’s strength will come from the fiberglass skin, but it’s a good idea to build up and strengthen the backbone in this area just to be conservative.
You can use any kind of strong glass cloth that is compatible with epoxy resin. I recommend biaxial or even triaxial fabric, made up of multiple layers of unidirectional rovings stitched together in different orientations. It takes fewer layers of such fabric to produce a laminate with multidirectional strength than with unidirectional fabric. This offsets its higher cost to some degree.
Test-fitting the stock
When you’ve built up the stock attachment end a bit with fiberglass, do a test fitting to see how the rudder fits between the cheek plates. Make sure the frame is centered and aligned between the plates and is straight on the pivot axis. Then take measurements of how much space remains between the laminate and the plates. Add more fiberglass until it’s close, then do another fitting. If the laminate is too high in isolated spots, grind it down with a coarse sanding disk.
Once the laminate is touching the cheek plates in a few spots, trowel in some epoxy/glass-fiber (or silica) paste. Wax the cheek plates and clamp them onto the rudder. After the mixture has cured, remove the rudder and check the result. It should only require one or two more additions of the paste to make the joint perfect. Don’t use microballoons in this area because they have little compressive strength. Short glass fibers (you can shred some cloth with scissors to make them) mixed with epoxy are best, but an epoxy/silica mixture is OK if the voids you’re filling are relatively small and shallow.
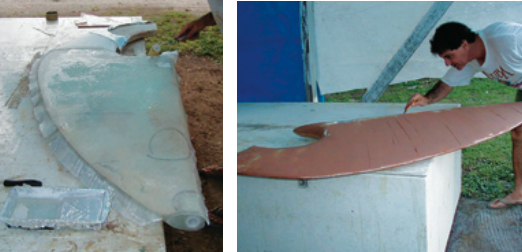
Filling in with foam
As you move away from the plate-attachment area, gradually use less glass and more foam to build up the core, transitioning to all foam about halfway along the length of the frame. The resulting ratio of fiberglass to foam should impart something close to neutral buoyancy in the finished rudder. Any other load-bearing areas should also be reinforced with glass.
Use structural foam for the core. Airex or Core-Cell, two brands sometimes used in cored-hull boat construction, or a similar product will work well. Glue the blocks of foam to the backbone, ribs, and stringers with epoxy, filling gaps with an epoxy/microballoon paste. During this build-out phase, the ribs and stringers act as guides. You’ll know you have gone far enough when the surface of the core is flush with the tops of the ribs and stringers. If some of the foam blocks are a little too high, it’s easy to sand off the excess. Finish by troweling on a thick paste of the same microballoon mixture, which will cure to a sort of foam that sands easily.
Once you’ve built all the fillers out to the height of the ribs, take a longboard and sand off any high spots, making the surface fair. You can buy a longboard at a boatyard chandlery or auto-body-repair supply outlet, but it’s easy to make your own from a piece of 1⁄4-inch plywood. The board should be 4 or 5 inches wide and around 30 inches long. On one side, screw a small wood block at each end to serve as handles. Buy some 36-grit bulk sandpaper and cut it into strips the size of your longboard. Glue it to the plywood with a spray adhesive such as 3M Super 77.
Start sanding the surface in long, smooth motions until any high spots fall away. You will find the microballoon material is easy to sand.You will be left with a relatively fair surface that has some obvious low spots. Mix another batch of epoxy/microballoon paste and spread a thin layer over the surface. After it cures, repeat the longboard fairing process. Some sanding with handheld sandpaper and/or a palm sander will probably be needed on areas where the curves are too sharp for the long-board. It may take one more application before the surface seems nearly perfect.
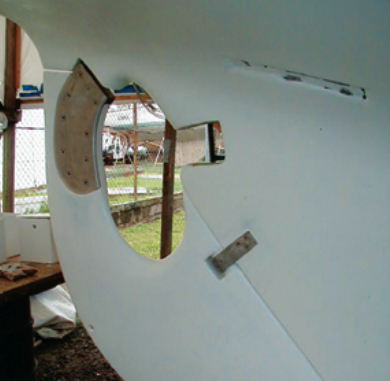
The structural skin
Next, apply the structural skin. Use as many layers of cloth as needed to form a skin about 3⁄16-inch thick. (Make a small test panel to see how many you’ll need.) While it’s possible to use woven roving, stitched biaxial or other multi-directional long-strand glass fabric is a much better choice.
To make sure the rudder is clean and grease free, I like to wipe down surfaces with an acetone-soaked rag before coating.
Coat one side of the rudder with epoxy resin. Lay a piece of precut fabric over the wetted surface, allowing the edges of the fabric to overhang the edges of the rudder by an inch or so. Wet out the cloth, working from the center out. Pour a little resin onto the cloth and spread it toward the edges with a plastic spreader. Remove any bubbles with a metal air roller. Use just enough resin to saturate the cloth. You can cut off the overhanging edges with an angle grinder or rasp after the epoxy has cured, but it’s easier to trim away the excess with a razor knife when it’s tack-free but still pliable.
Turn the rudder over and repeat, this time wrapping the edges of the glass cloth around the leading and trailing edges of the rudder, overlapping the first layer’s edge by 2 or 3 inches. Flip the rudder back over, alternating sides and overlapping edges until the skin is thick enough.
It’s important to overlap layers of glass fabric at the leading and trailing edges to add strength and prevent any tendency toward splitting under stress. If you’re not sure you have enough overlap in these areas, or if you have difficulty getting the edges to wrap around without leaving voids under them, you can always add a strip of fabric along the edges, overlapping each side of the rudder by a few inches.
After the skin has cured, sand the entire surface as smooth as you can get it without removing too much material. Use the longboard or float an angle grinder fitted with a sanding disc lightly over the surface.
Mix another batch of microballoon paste and spread a thin layer over the surface. It’s a good idea to do this with the rudder clamped or bolted to the cheek plates. That way, you can use some of the mixture to fill in any gaps between the plates and the fiberglass surface, making a perfectly smooth joint. Remove the rudder and sand the cured surface fair with the longboard. The purpose of this step is to fill small dimples and imperfections and ensure that the surface is smooth and fair in preparation for the barrier coat.
Keeping the water out
While a rudder built in this way won’t be too susceptible to water damage, it’s still a good idea to keep the inside dry, mainly to protect the foam from deterioration and to retard osmosis. The best way to seal out water is to cover the whole thing with a specialized epoxy barrier coat. Pay special attention to any areas where the skin is pierced by fittings or holes.
My favorite coating is West System epoxy mixed with their Barrier Coat Additive #422. This is easy to mix and apply with a roller. Four to six coats should be plenty. Once you’ve started applying the barrier coat, don’t allow any layer to fully cure before applying the next coat. If a coat does cure, you must clean it with soapy water or a solvent and sand it well before applying additional coats. This rule applies to all epoxy work: a chemical bond is always stronger than a mechanical one, so try to apply epoxy layers wet-on-wet for the strongest bonds. If you’re not familiar with the use of epoxy products and construction techniques, you can obtain excellent technical manuals from Gougeon Brothers and System Three.
The finished surface will be dark metallic gray in color and very shiny. If the barrier coat was carefully applied, it will also be smooth and free from runs or sags. The rudder is now complete, except for coating with anti-fouling bottom paint. Bottom paint doesn’t stick well to epoxy, so a primer is called for. Ideally, a two-component epoxy-based primer would be painted directly on the last layer of barrier coat before it is fully cured.
In practice, it may be hard to apply so many coats wet-on-wet because of the cure time involved. If the barrier coat has cured, before applying the primer, wash it well with soapy water or wipe it down with a solvent, then sand it to a dull finish.
Roll on two or three coats of a good two-part epoxy primer, preferably adhering to the wet-on-wet rule. We used Amercoat 385, which is certified for use above or below the waterline. This is an excellent product for any application that calls for a high-build epoxy primer. If the bottom paint you plan to use specifies a proprietary primer, apply that over the epoxy primer. It’s also acceptable to skip the epoxy primer and apply the specified primer directly to the barrier coat. Otherwise, most bottom paints should adhere well when applied directly to well-sanded epoxy primer.
Project summary
We spent about two weeks building our rudder, not counting time spent working out the design, dealing with the machine shop, and applying antifouling paint. Much of that time, we were waiting for epoxy to cure, so it was possible to work on other projects simultaneously. I did most of the work myself, but my wife, Cheryl, took a break from her endeavors to help out when I needed an extra pair of hands.
We think it was well worth the effort. The total cost, not counting our labor or boatyard lay days, was around $475 in 2004 in Trinidad. It would have been a bit more if we hadn’t had access to some scrap biaxial fabric and structural foam. This was considerably less than the lowest price that we were quoted for a molded rudder.
We now have a new rudder we can trust without having to wonder about any unseen corrosion. It’s very easy to inspect the welds; they can even be inspected with a mask and snorkel while the boat is in the water. Dropping the rudder is dead easy. We just unscrew the nine bolts from the cheek plates, remove the intermediate bearing strap, and tilt the rudder back while lifting it off the bottom pintle. To then inspect the portion of the stock that’s encased within the tube, and thus still subject to crevice corrosion, we simply remove the tiller head and the whole weldment slides down and out. We no longer have to dig a hole. We carry a set of replacement bolts, so we can easily and inexpensively replace any bolt that becomes corroded. So far, we have seen no sign of corrosion in either the bolts or the stock.
Caribee displaces 14,000 pounds. Her rudder is 76 inches long, 24 inches wide at the widest point, and has a maximum thickness of about 3 inches. The backbone, ribs, stringers, and skin of the rudder were all built to a thickness of 3⁄16 inch. The top one-quarter of the rudder’s length is solid fiberglass, gradually transitioning to a foam core about halfway along its length. The skin is made of biaxial glass fabric, with overlapping layers at the leading and trailing edges. The ribs were spaced about a foot apart. The stock is 1 3⁄8 inch in diameter and the cheek plates are about 100 square inches each in surface area and 3⁄8-inch thick. Both sides of the stock/plate junction are welded with a continuous bead. The plates are through-bolted to the fiberglass rudder with nine 3⁄8-inch bolts. All metal except for the bolts is 316L stainless steel. The bolt material is undetermined (dictated by availability) but probably 304 stainless steel, which warrants frequent inspection.
I’m not a structural engineer but I feel certain this rudder is stronger than the original one it replaced. It has performed flawlessly for five years and nearly 10,000 miles of offshore sailing, some of that in heavy following seas. If you’re planning to replace your rudder, consider building your own using this method. Lower cost may be the least important of the benefits you’ll enjoy.
Randy Baker and his wife, Cheryl, have been living aboard and cruising Caribee, their 1968 Nicholson 32 sloop, since 1992. They transited the Panama Canal in 2008 and are spending the South Pacific cyclone season of 2009/2010 in the Kingdom of Tonga.
Thank you to Sailrite Enterprises, Inc., for providing free access to back issues of Good Old Boat through intellectual property rights. Sailrite.com