Fishing-net locker shelves provide vital ventilation
Issue 31 : Jul/Aug 2003
Most boats from the 1970s and early 1980s came with cavernous hanging lockers, big enough to get at least one or two crew completely inside. Perhaps the idea was that you could stow your foulies in the hanging locker along with a couple of replacement crew just in case someone was washed overboard. Pneuma, our 1973 Ericson 39, is one of those boats.
While we were getting ready to head across the Pacifi c on the “Coconut Run,” we ran out of places to store food and toilet paper. In the past we had discussed the notion of converting the giant hanging lockers to shelved storage, but due to its magnitude the task never even made the project list. The idea of purchasing an entire sheet of mahogany-veneered marine ply, cleat stock, glue, varnish, and brushes, then spending at least two days getting all the joinery perfect seemed like too much. Suddenly, though, we needed the storage, and something had to be done immediately.
That night, while I was removing 48 rolls of toilet paper from my side of the V-berth, I remembered having looked in the lockers of an old square-rigger and seeing shelves made of canvas. This seemed like a good idea, especially with one of the tubes from the toilet paper roll sticking in my ear. Melissa was worried that even canvas would-prevent good ventilation and result in mold and mildew on the precious soft cargo. In addition, we would have to sew up the shelves out of whatever canvas we could find in Mexico. A quick look at the price of a yard of Sunbrella south of the border brought that idea up short.
The solution
The next day, while I was transporting paper towels from the supermarket, I happened by one of the fishing boats moored at the marina. I noticed them drying a fine fishing net. Here was the solution I had been looking for. At the local hardware store I got a nice straight 1 x 4, a couple of good 6-foot pieces of 3⁄4-inch dowel, and a handful of stainless-steel screws. Then I went to the local fishing supply for some netting, and the project was more than half completed.
The shelves were simple to construct and install. They met all of our requirements: they are very strong, allow for good ventilation, and are easily removable should we want to hide extra crew from the race committee. Best of all, the total cost was less than $30 and installation took less than a couple hours for both lockers.
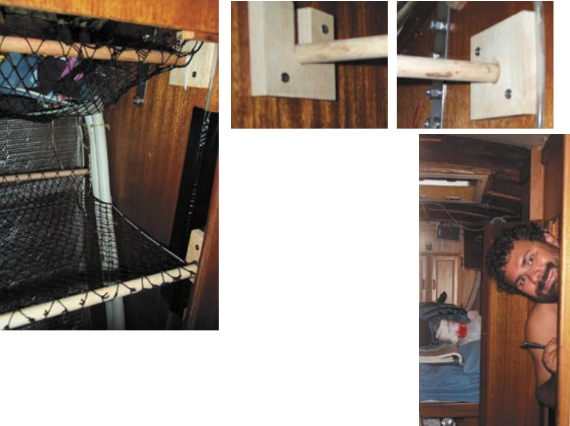
We cut the 1 x 4 into square pieces, 4 inches on a side, four per shelf. In the center of each of the squares we used a paddle drill to make a 3⁄4-inch hole to fit the dowel into. On half of the squares, we cut out a 3⁄4-inch slot from the edge through to the center hole, making them into U-shaped brackets (see illustration on Page 64). The blocks are installed in pairs, with one of the blocks with the center hole and one of the U-shaped blocks opposite each other on the opposite walls of the hanging locker. This allows each dowel to be removed by sliding it up and out of the U-shaped slot. If you slant the U-shaped block slightly away from the front of the locker, the dowel will stay in place even in the case of a knockdown.
Lined them up
Next we cut the dowel pieces to fit the width of the hanging locker. We used the dowels and a small carpenter’s square to line up the brackets opposite each other on the sides of the locker. Using the holes drilled in corners of the square brackets, we drilled starter holes for the screws in the bulkhead, being careful not to drill through the bulkhead. After drilling each starter hole, we started that screw before moving to the next one. This guaranteed that all of the holes would be in the correct place. The aft blocks were mounted about 3 inches higher than the forward blocks; this prevents items from dropping off the back of the shelves when removing items of clothing stacked on the shelves and makes for better ventilation.
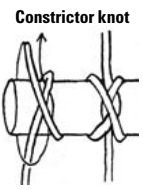
We then cut the netting 3 inches longer than the locker dimensions. This extra allows the netting to hang slightly and keeps things from sliding off even in the worst weather. The netting was then threaded onto the dowels. The dowels were placed one end in the block with the hole in the middle and the other end dropped into the U-shaped block. By threading a piece of light string along the sides and tying simple constrictor knots around each of the dowels, we were able to tighten up the netting on the sides just enough to keep everything in place.
Both of the lockers on Pneuma now have three shelves. The top shelf is about 10 inches from the overhead; by placing its forward edge in from the front of the locker by 8 1⁄2 inches we were able to use the space above the hanging locker door. We found that about 16 inches of vertical separation between the shelves was perfect. Each of the shelves is as deep as the locker.
Place to sleep
All of the rolls of toilet paper fit nicely on the top shelf in the forward locker along with the majority of the paper towels, thereby freeing my side of the V-berth for sleeping. Under the bottom shelves we store large but little-used items that can be reached by removing the bottom shelves’ contents and slipping the forward dowel out of its brackets.
It’s very easy to get to anything on the three shelves. We have fewer problems with mold and mildew since converting the hanging lockers to shelves than we did when they were hanging lockers. The entire contents of the former hanging lockers fit on the middle shelves when neatly folded. The usability of the hanging lockers for storage was increased by at least four times.
After completing the shelving project, there was nothing left to do but put them to the test. After 11,000 miles and two knockdowns in the Southern Ocean, nothing has ever fallen out of the net shelves. While cold water was running in waves over the sole, it was comforting, in some small way, to open the locker, reach in, and grab a dry roll of toilet paper.
Thank you to Sailrite Enterprises, Inc., for providing free access to back issues of Good Old Boat through intellectual property rights. Sailrite.com