Keep that mainsail attached to the mast
Issue 87 : Nov/Dec 2012
It is very likely that a sail loft seized the slugs or slides to the luff of your mainsail, mizzen, or trysail. Since that time, those seizings have been slowly chafing and eventually they will fail. If you’re cruising when that happens, you will probably be a long way from any sailmaker and will have to make your own repairs. Fortunately, re-seizing slugs or slides is a straightforward process you can master. There are many variations — we’ll show two here but all use the same basic techniques, tools, and supplies. Other sail repair projects require the same hand-sewing skills, so they’re well worth acquiring, particularly if you’re planning to venture out into the deep blue where self-reliance is imperative.
Rather than wait for a seizing to fail at 0200 on a dark and stormy night, inspect all your sail-slide attachments while you’re in a balmy anchorage and preempt the problem. Since you have to take the sail off the mast and boom to check the slides, take the opportunity to inspect the rest of the sail too.
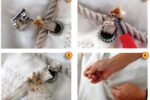
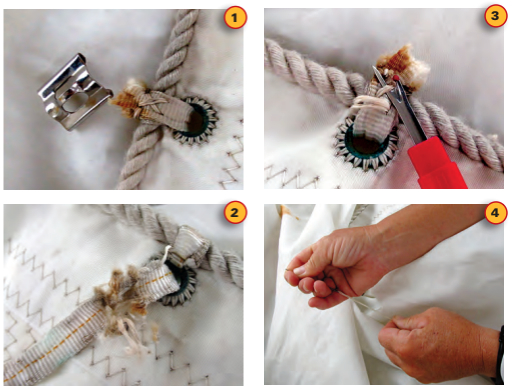
After removing the luff and foot from their tracks, tug on each slug or slide. If any wobble around loosely, it’s likely that one or more of the underlying layers of webbing is damaged, leaving the outermost layer as the sole attachment. If you can easily lift the slide or slug away from the boltrope and wiggle it around, renew the seizing immediately (PHOTOs 1, 2).
Where you set up to do the work will depend on your circumstances. A long, low, wooden bench that you can straddle and use as a platform for piercing assemblies with a scratch awl is nice to have, but most cruisers make do without.
Read the step-by-step instructions that follow while referring to the accompanying photos. In this case a picture truly is worth a thousand words. Refer to the sidebar on page 44 for the tools and supplies you’ll need.
Remove old seizing
Using a seam ripper, gently disassemble the existing seizing, separating old stitches from the webbing (PHOTO 3). Cut and pull gently until all the stitches are free. Remove any twine remnants or nits and inspect the grommet and boltrope.
Your sail might have hand-worked eyelet grommets consisting of a sewn ring finished with a brass eyelet (as in PHOTO 3) or spur grommets (see PHOTO 24 on page 43) made of nickel or brass.
Prepare your supplies
Webbing: Lay out the old webbing and use it to estimate the length of new webbing you’ll need. Cut your new webbing generously, as the old webbing is likely to be distorted. You need enough to do 2 1⁄2 wraps through the grommet or ring to end on the opposite side of the sail. Use the butane lighter to melt the ends of the tubular webbing to prevent them from unraveling.
Waxed hand-sewing twine: Measure roughly 5 feet of waxed hand-sewing twine and select a large needle. We like a #14 needle; it’s usually the largest in an assortment and measures 2 3⁄4-inches long. (Needles get smaller as the number goes up.)
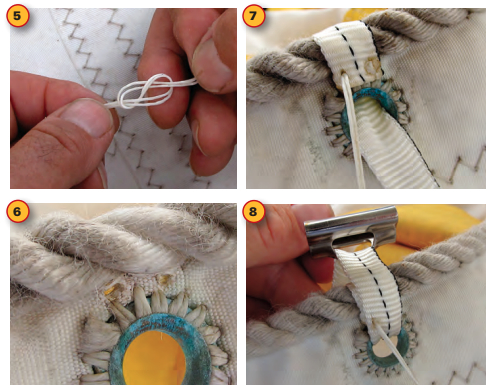
Insert the twine through the needle eye and pull it through until it’s doubled. Holding the needle in one hand, pull the waxed twine between finger and thumb on your other hand a few times (photo 4), stretching the two strands and warming the wax until the strands lie evenly against each other and any kinks are removed. Tie a figure-eight knot close to the end (photo 5) and trim the excess to about 3⁄16 inch.
Seizing a slide
Secure the webbing to the sail: The first step is to tack down one end of the webbing on one side of the sail, next to the grommet. It doesn’t matter which side you begin with as long as you begin all your seizings on the same side. For this description, we begin on the starboard side and call this the front of the seizing.
If you are replacing a seizing, you’ll see holes in your sail between the boltrope and the grommet where the twine passed through the sail (photo 6). Use the same holes (making more holes will weaken the sail). If you need to expand these holes a little, use the scratch awl, but gently so you don’t rip the sailcloth. If there are no holes already in your sail, use the scratch awl to make them. They should be about 3⁄8 inch apart (for 1⁄2-inch webbing) and centered midway between the boltrope and the ring.
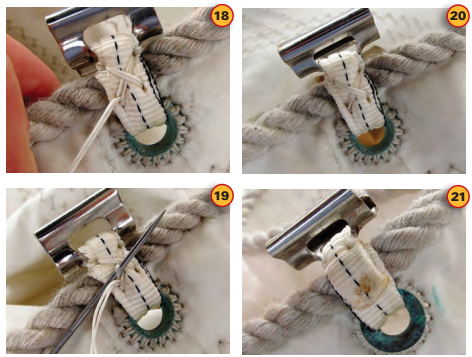
Begin attaching the webbing to the sail by creating a single bar stitch. To do this, first align one end of the webbing with the grommet on the front (starboard) side of the sail. Pierce the webbing with the threaded needle and push it through the right-hand hole and then back through the left-hand hole, creating a single straight or bar stitch parallel to the boltrope on the back side.
Pull the twine tight to press the figure-eight knot into the webbing. Light the 3⁄16-inch tail of the twine with your butane lighter (see “Tools and supplies,” page 44) and, once it burns near to the knot, squash the knot with a sacrificial (insulated) blunt object to douse the flame and “rivet” the knot flat. Flattening the knot minimizes chafe inside the seizing and augments the knot’s holding power. Wrap the webbing over the boltrope and feed the bitter end through the grommet to bring it back to the front side (photo 7). This first layer of webbing is there to prevent the slide from chafing against the boltrope.
Wrap the webbing to attach the slide: Wrap the webbing once again up and over the boltrope but this time feed it through the bail of the slide as you hold the slide against the boltrope. Pierce the webbing with the needle from the back to bring the twine to the front of this new layer (photo 8).
Repeat this step (including the step where you bring the twine to the front) so two wraps of webbing are holding the slide to the boltrope, the edges of these layers of webbing are aligned, and the needle is outside the wraps. Remember, the first wrap of webbing is between the sail slide and the boltrope, while the second two wraps will be threaded through the slide.
Check the webbing length: The bitter end of the third wrap of webbing should be on the back side, aligned with the edge of the grommet, mirroring the termination on the starboard side of the sail (it’s visible on photo 21). If the webbing is too long, trim it. If it’s too short, start over with a longer piece.
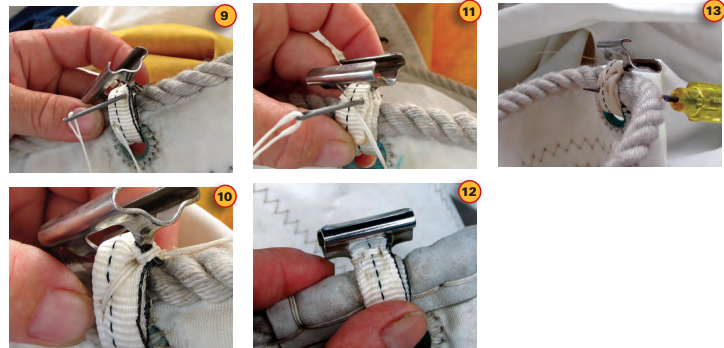
First crossover: Holding the front side toward you with the twine emerging from the lower left (and through all three layers of webbing), cross the twine over the face of the webbing lying on the boltrope and plunge your needle through the two webbing layers holding the slide to create a stitch that crosses from lower left to upper right (photo 9). The needle should not penetrate or even nick the boltrope (consider the consequences of that sort of mistake) but should pierce only the webbing. The needle will emerge on the back side.
First seizing: Bring the needle back around the edge of the webbing wraps and insert it once more through the same hole in the same direction (photo 10). Pull the waxed twine snugly to secure the slide. If you choose to repeat this stitch (it’s not essential but will make the seizing more durable), take care to make it in the same hole as the first and to avoid splitting any of the waxed twine of the first stitch with the needle.
Upper bar stitch, back side: Turn the seizing over and view the back side. The twine exits the webbing between the boltrope and the slide bail at the upper left corner of the back of the seizing. Bring the twine across the webbing (parallel to the bail and boltrope) and create a single bar stitch by pushing the needle through from the back to the front of the same two webbing wraps and at the edge (photo 11). Once again, avoid nicking the boltrope.
Second seizing: The twine now emerges on the front of the seizing. Once again, wrap the twine around the edge of the webbing (front to back) and push the needle through the same hole you made with the bar stitch (back to front) and tug hard to secure it. Repeat this stitch for extra strength if you wish. The slide bail should now be centered above the ring and laying parallel to the boltrope, secured by seizings at both ends (photo 12). The needle and twine should be on the front side of the seizing and on the upper left.
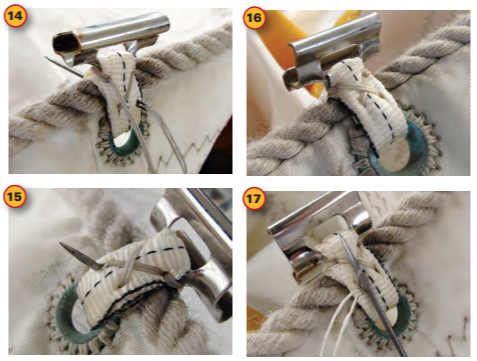
Second crossover: Turn your seizing back over to the front side. The waxed twine will have emerged from the upper left. Bring the twine crosswise, going from upper left to lower right (to complete an X across the boltrope) and push the needle through all layers of webbing to the back side. Probe with the scratch awl to find the previously used hole in the sail (photo 13). The needle is now on the back side of the seizing, emerging at the lower left (as viewed from the back side). Tug to secure the X stitch against the front side of the webbing (photo 14).
Lower bar stitch, back side: Create a bar stitch to secure the end of the webbing by crossing the twine over parallel to the webbing’s bitter end and forcing the needle through all the layers of webbing, to emerge at the bottom left end of the X on the front side (photo 15).
The crossover stitching will appear only on the front side of the finished seizing (photo 16).
Flat knot to finish
A flat knot (used frequently in hand sewing) finishes the seizing. Insert the needle under one of the strands of twine in the adjacent X stitch outside to inside, taking care not to split either strand of twine. This is easier if you roll the needle as you insert it (photo 17). Pull the twine through and pull back toward its standing part (photo 18).
Repeat this step, outside to inside, on the opposite strand of twine. Pull back snugly toward the standing part once more (photo 19).
Complete the knot by pulling it inside the webbing: re-insert the needle and twine through the hole the two strands had emerged from and pull it out the back side, tugging smartly until the knot disappears into the webbing as viewed from the front side (photo 20).
Turn the seizing over to the back side and cut the twine about 3⁄16 inch long. Using the butane lighter, melt the ends of the waxed twine and squash them to create a rivet (photo 21).

Seizing a slug
This seizing example is executed with 3⁄4-inch polyester or Spectra webbing and a T-slug. This description will be a bit abbreviated since it is similar to seizing a slide, described above.
Attach the slug: Thread the sailmaker’s needle with sailmaker’s twine, as described above. Wrap about 1 1⁄2 inch of the bitter end of the webbing over the slug bail and secure it by piercing both layers of webbing with the threaded needle in the center (photo 22).
Bring the twine around one edge and back through the center, then around the other edge and back through the center once again. Pull to set the knot snugly against the webbing and rivet the knot (photo 23).
Secure the slug to the sail: For this seizing, three holes are needed in the sail between the grommet and the boltrope. One is centered. The other two are approximately 7⁄16 inch on either side of the center hole to allow the twine to clear the edge of the webbing when stitching the webbing to the sail (photo 24).
Lay the webbing and the attached slug against the “back” side of the sail, thread the needle through the center hole in the sail, from the back, and tug the twine to bring the slug/webbing assembly against the sail. Align the slug bail atop the boltrope and hold it securely while wrapping the webbing down the back side of the sail and through the grommet (photo 25).
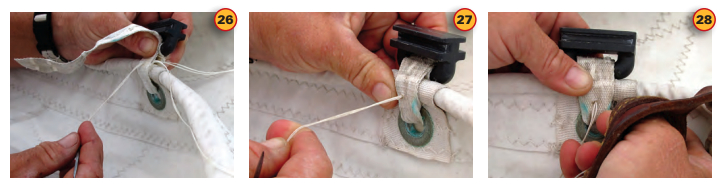
As you bring the webbing up the front side of the sail, pierce it in its center (back to front) to bring the twine to the outside of the wrap (photo 26).
Wrap the webbing through the bail and back around through the grommet (back to front), repeating the step of bringing the twine to the front. A second wrap of webbing through the bail completes the wrapping (photo 27).
The bitter end of the webbing should roughly align with the upper edge of the grommet on the back side (visible in photo 29).
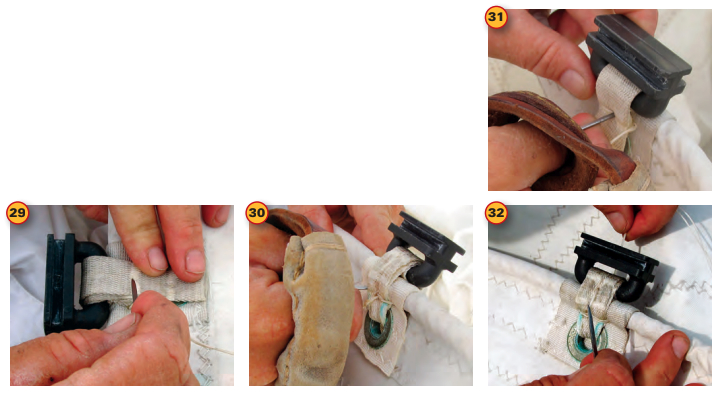
Secure the webbing to the sail: Holding this assembly snugly, pierce the sail from front to back outside the webbing — but very tight to its edge — using the hole previously made in the sail (photo 28).
Next, pierce all the layers of webbing back to front in the center, bringing the twine and needle once again to the front side of the sail (photo 29).
Repeat this stitch on the opposite edge of the webbing: front to back, tight to the edge of the webbing, and then back to front up through the center (photos 30, 31).
Seize the slug: At this juncture, the needle and twine emerge from the center hole in the sail and webbing and are on the front side of the sail. Bring the needle up the center of the webbing (parallel to its length) and pierce, in the center and front to back, the two layers of webbing holding the slug bail — without nicking the boltrope (photo 32).
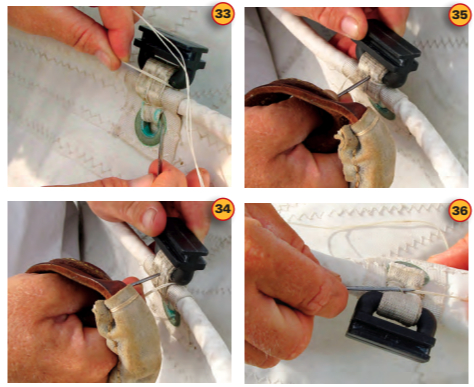
The twine now emerges under the slug’s bail on the back side of the sail.
Wrap the twine around one edge of the webbing to bring it to the front (photo 33).
Pierce the webbing once again in the center hole to move the twine to the back side of the seizing (photo 34).
Pull firmly to tighten the twine against the edge of the webbing. Repeat the wrapping around the opposite webbing edge and again pierce the seizing in the center, pulling firmly once again (photo 35).
Repeat both of these seizing stitches so there are two sets of stitches (four strands of twine) along each edge, tightening each stitch firmly to snug the webbing to the slug bail (photo 36).
Secure the seizing: At this point, the twine and needle emerge from the back side of the sail. Select one stitch or the other (two strands) and tie a flat knot.
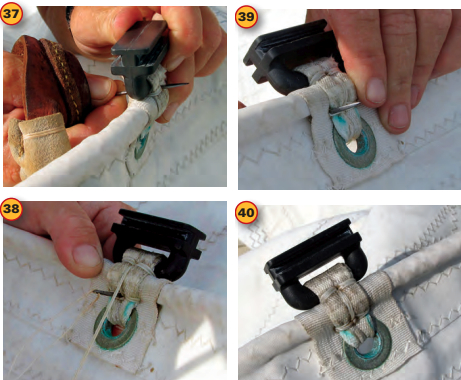
Bury the knot in the webbing by putting the needle back through the center hole (back to front). The twine will emerge on the front side just under the slug (photo 37).
Bring the needle and twine down the face of the webbing along its centerline and plunge the needle into the bottom center hole (photo 38).
The twine and needle are now on the back side of the sail. Once again, secure the webbing to the sail by creating a stitch around both edges and through the sail.That is, push the needle through the sail at the edge of the webbing (back to front) and then back through the center of the webbing (front to back), tugging smartly. Repeat this stitch around the opposite edge of the webbing (photo 39).
Flat knot to finish: The twine and needle are now on the back side of the sail in the center of the lower seizing. Using two strands of the adjacent stitch, create a flat knot (see page 43) and pull the knot into the webbing through the center hole by pushing the needle and twine from back to front and pulling until the knot disappears into the webbing. Snip the end of the twine as it emerges on the front side to 3⁄16 inch, melt it, and make a rivet (photo 40).
A stitch in time
Renewing seizings to ensure an aging mainsail stays firmly attached to your mast is not a complex process and provides valuable practice in using simple hand-sewing techniques. This sort of expertise has been invaluable to us in keeping our boat’s sails ready for the challenging conditions of open ocean sailing.
Philip DiNuovo and Leslie Linkkila came to cruising and boat ownership as adults and quickly developed a passion for small-boat travel. In 2003, they quit their professional jobs and left the Pacific Northwest behind and are now in the South Pacific. Follow them in their travels at http://sv-carina.org.
Thank you to Sailrite Enterprises, Inc., for providing free access to back issues of Good Old Boat through intellectual property rights. Sailrite.com