Gadgets you can make and use to back up your GPS
Issue 38 : Sept/Oct 2004
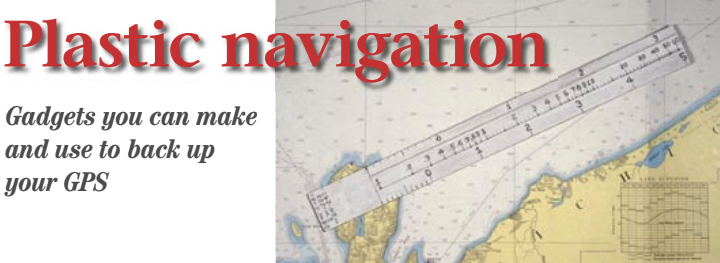
Here are three navigation aids you can use when your GPS isn’t working or to reinforce old time-tested methods of navigating.
The STD stick
Make a logarithmic speed scale stick. Rarely mentioned in any books on navigation, this little device is for fi guring speed-time-distance problems. (We have reproduced the scale at 100 percent on facing page –Ed.) Here’s how to proceed:
To find speed, place one point of dividers on elapsed time (in minutes) and second point on distance in miles. Without changing spread of dividers or right-left relationship of points, place first point on 60. Second point will indicate speed in knots.
To find distance or time, place one point of dividers on 60 and second point on speed in knots. Without changing spread of dividers or right-left relationship of points, place first point on time (in minutes), second point will indicate distance in miles. Or place second point on distance in miles, first point will indicate time (in minutes).
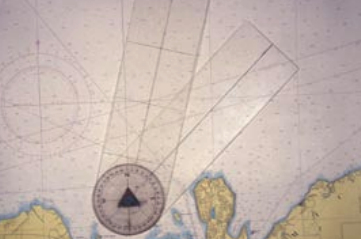
Course protractors
There must be dozens of course protractors on the market today. Everybody has a favorite. Mine has the advantage of a moveable compass rose. Setting this rose to the known variation taken from the chart allows compass courses to be labeled directly, with no need to calculate plus or minus, east or west. This comes in handy for laptop navigators, as bearings and courses can be plotted directly on the chart using any latitude or longitude grid. Notice that the grid alignment line on mine is set to 14 degrees westerly variation and the course line is 58 degrees.
To use this course protractor, you dial in the local variation as shown in the illustration below (in this example 14 degrees west). If variation in your cruising area is reasonably the same (a constant amount of variation), a small pin can be inserted as shown. This assures that the rose won’t move. If your boat is free from deviation errors, the desired course can be read directly from the plotters in the usual way.
When taking bearings for position fixing, the bearing can be directly plotted on the chart with your altered plotter as the variation is already fixed in.
The first thing you need to make your own course plotter is a compass rose, available from any good art- or office-supply store. For the clear plastic needed for the arms, consult your Yellow Pages. Inquire which retailers stock clear acrylic plastic in various sizes and thicknesses. Determine the size you want.
The length of the arms can vary, but the width is determined by the size of the compass rose you obtain. I kept mine small for laptop convenience. There are special tools for cutting acrylic, but in a pinch you can score the plastic several times on both sides and break it off. Smooth the edges with 220-grit sandpaper, being careful not to scratch the face. Place the rose against the end of one arm, trace its outline, and cut. A saber saw fine-toothed blade will work, but scoring it first will help prevent breakage.
Round off and sand the other arm smooth in the same manner. Next, scratch marks down the middle of both arms and make lines across only on one arm, as shown in the illustration above. These are to align with latitude or longitude lines on the chart. The other arm has only one line down the center. This and its two edges are for the course line.
Drill the center hole considering the size rivet you intend to use. The fit should be snug. Assemble and peen the rivet just enough to prevent it from coming out. If your principal cruising area has the same variation, you might consider locking in the variation by a small pin, as shown in the illustration. Or make two plotters, one fixed and the other moveable.
STD stick with mileage scales
For sailors and most powered craft, speed is not constant, which makes precise figuring a classroom exercise. Thus although your logarithmic speed scale will not be as accurate as standard math formulas, it is accurate enough and certainly more handy. When doing chartwork, you already have your dividers in your hand when you’re checking courses, distances, and so on. Now, any speed-time-distance solution can be picked off using your homemade scale.
A chief advantage for me is that it requires the use of only one hand, since the other one is on the tiller or wheel. Most circular calculators for solving speed-time-distance problems require two-handed operation. I keep my scale pasted directly on the chart I’m using but have another “stick” scale handy.
I also made an addition to the scale with decimal points to the left of the number 1. This enables me to figure times, speeds, and distances of less than one nautical mile. This comes in handy when running by harbor buoys in a deep fog, as the distances between these are often less than one mile. Using your logarithmic scale, you can predict when the next buoy will appear as well as any other component of the speed-time-distance problem.
In constructing my homemade scale I used white Formica, but any white plastic laminate will do. I marked the scale and numbers with a pencil, checked them, and cut the piece to size. I etched in the scale and numbers using a vibrating etching tool available at hardware stores, but a hobby knife or sharp scriber would work too. The point is to scratch the plastic laminate so that it will accept ink. I cleaned off the surface and inked the etched-in lines with waterproof ink, wiping off the excess with a cloth. If your shop is so equipped, it might be nice to make one out of brass and stamp in the graduations and numbers.
I also drilled small holes at each number using a pin drill. This simplifies holding one point of the divider in place. I also etched, in the top and bottom edges, the mileage scale of frequently used charts.
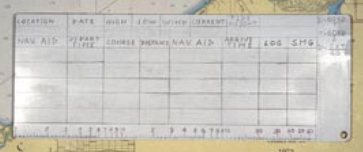
Deck log
In addition to the three gadgets mentioned above, plastic laminate used for the speed scale can also be made into a deck log. Use any configuration to suit your particular needs. I have my speed scale on the bottom. This allows me to make calculations at the same time as other log entries. Before making your deck log, work out all the details on a piece of paper to the exact full scale. When you’re satisfied that all is OK, cut the size needed from the plastic laminate and lay it out on the surface in pencil. Then etch out the lines, letters, numbers, and so on. Ink them in and wipe it clean.
Now, using 600-grit wet/dry sandpaper, rough up the open spaces. These surfaces will permit you to make pencil entries that can be erased when obsolete. After a few uses, the surface will need to be cleaned thoroughly with soap and water.
Cut another piece of laminate the exact size as the first. You can leave this one blank or make another log useful for your style of navigating. If you chose to leave it blank, rough up the surface with sandpaper to make it possible to make pencil notes or calculations on it. A hole in one corner will accept a lanyard for hanging in your nav station.
Thank you to Sailrite Enterprises, Inc., for providing free access to back issues of Good Old Boat through intellectual property rights. Sailrite.com