A classy English lady gets a facelift
Issue 45 : Nov/Dec 2005
In this two-part series, which began in the September 2005 issue, James Baldwin discussed interior modifications, including cabinets, lockers, and the hull liner, of Jeff Fletcher’s Echo, restored with the help of James’ wife, Mei. Now he begins with the headliner and discusses countertops and final touches.
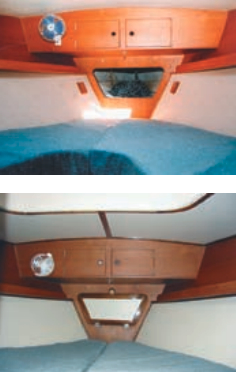
The old headliner in the saloon, forward cabin, and quarter berth was a textured vinyl glued onto a type of particleboard. These panels had deformed and sagged in several areas. Rather than replacing it with more vinyl, Jeff decided on a Formica-faced liner with teak trim. Fortunately, we were able to purchase — at less than half of U.S. retail prices — three 10-foot planks of teak left over from the refi t of a neighbor’s 60-foot schooner. This supplied all the teak for the projects mentioned here. A portable 10-inch table saw with an 80-tooth cutting wheel made an easy job of ripping trim and moldings from the 1 1⁄4-inch-thick planks.
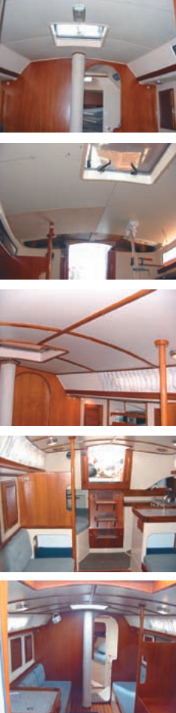
Some of the original overhead plywood battens supporting the headliner were still usable. Where more were needed, we added 1⁄2-inch-thick strips of pine battens glued to the underside of the fiberglass deck and cabin trunk. The battens were cut short enough to conform easily to the camber of the house and deck and glued in with epoxy thickened with talc powder to a putty-like consistency. An adjustable support brace, using two pieces of 1 x 2 oak held together with two clamps, works well to hold the overhead battens and panels in place while working. Clean all surfaces with acetone before applying the epoxy.
The forward cabin headliner was fit in two pieces. The saloon required four separate pieces just to fit through the companionway hatch. We cut them into eight pieces for easier fitting to the deck’s camber and to maintain maximum headroom for Jeff, who is 6 feet tall. Two more panels went above the quarter berth and one each side under the saloon sidedecks. The outside edges of the headliner screwed onto the lip of the fiberglass hull liner. Unfortunately, this edge was so uneven that we had to remove some of it with a cutting disk on an angle grinder. A tight-fitting respirator, safety goggles, and DuPont Tyvek coveralls with hood were essential for this miserable portion of the job. At this point, a boat could be fitted with insulation material glued to the underside of the deck and cabin trunk between the battens.
Patterns for new panels
The old vinyl-covered overhead panels were used as patterns for the new panels, which were cut from 1⁄4-inch hardwood-faced plywood. Once the plywood panels were trimmed for best fit, we took them to the dock and faced them with Formica cut slightly oversized. The panels containing light fixtures or Dorade vents now had those holes precut. The edges of the panels were given countersink holes for #8 flathead stainless-steel self-tapping screws. The holes need to be close enough to the edge for 1-inch teak moldings to cover the screw heads. Then we sealed the backs and edges of the panels with two coats of varnish. The finished panels were held in place with the adjustable brace topped by a small piece of plywood to spread the load. We drilled pilot holes into the battens and screwed the panels in place. In places where screws needed to tap into the underside of the wood-cored fiberglass deck, we applied a dab of polyurethane sealant to the screw as it was driven in place. An extra electric drill with a screwdriver bit is useful here.
Once the panels were in place, we measured for the teak molding trim that would cover the panel edges and screw heads. We cut outside edge trim from 1⁄4-inch x 1-inch teak strips and used 1 1⁄4-inch strips to cover the more widely-spaced screw heads where two panels meet. Trimming the many curved edges around the inside and outside perimeters of the panels required us to make paper templates and cut the curved teak trim out of ripped 1⁄4-inch stock up to 6 inches wide. The considerable wastage was unavoidable. This should be taken into account when ordering lumber. We rounded the exposed edges of the teak moldings with a router except where they butted up against other trim. We drilled countersink holes for #8 brass flathead screws along the centerline of the trim, spaced as needed for the trim to seat tightly along the camber of the panels. Where the camber was sharpest, the backs of the trim were thinned with a router to allow for easier bending. The brass screws that fell on the centerline between the panels needed to be 1 inch long in order to get sufficient bite into the battens to hold the trim firmly in place.
After the trim pieces were fit and their joints sanded flush, they were removed and numbered from behind, along with corresponding numbers on the panel edges. Numbering the dozens of pieces before laying them out for varnishing avoids having an enormous puzzle to solve during final fitting.
Corian countertops debacle
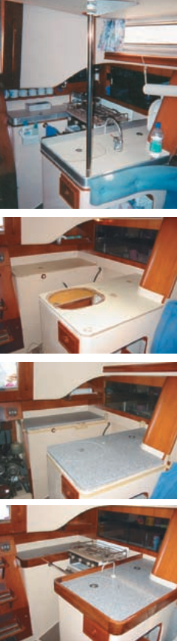
With everything going well thus far, it seemed only fair to Murphy’s Law that we should find some challenging project to test our sanity. We found that test when Jeff said, “While you’re at it, let’s do something with the galley. My wife would like to replace the worn Formica countertops with that imitation marble called Corian.” If I knew then the hassles that job would entail, rather than agreeing so readily, I might have put my head in the galley oven, turned on the gas, and breathed deeply.
Our first setback came at Home Depot where we were told that the pricey DuPont Corian was not available for do-it-yourself installation. No problem, the specially trained Corian installers would come to the boat and take care of everything. I prepared the two countertops by removing the oven, the faucets, and the grotesque factory-installed aluminum galley-counter fiddles. Then I raised the sink so that its lip rested flush with the existing countertop. Two weeks later, a woman came down from the South Carolina-based Corian installation company and made templates of the countertops. After another two weeks the specialists came down to the boat with the precut counters. “We’ll have this wrapped up in two hours,” the boss of the three-man crew assured me. Five hours later, they left me with countertops so badly misaligned I had to work several hours the following day cutting away and rebuilding the locker lid’s supports from under the countertops to match the misaligned cutouts. Now that the lids had supports again, we found the locker-access cutouts on the Corian countertops had not been cut square, so the lids had varying gaps along two sides.
“I’m not paying them $600 for this kind of work,” Jeff said. The Home Depot rep agreed, and two weeks later a different crew from the same company came down and spent two hours raising a Corian dust storm as they ground through several lids with their belt sander. The first crew could not cut a straight line and the second crew could not shape a curved one. “I’ll have to send down our best man to fix this, he’s a real artist — even worked on a boat before,” the man said as he packed up for the three-hour drive back to the shop. A week later, the master craftsman showed up and spent the entire afternoon cutting subtly curved lids to fit the slight curves in the countertop cutouts. Finally, the job was finished to everyone’s satisfaction, and I had relearned the concept of stepping back and relaxing when things are obviously beyond my control.
We then installed the counter-lid ring pulls and the spout for the new galley foot pump that replaced the water-wasting pressure tap. We did keep the hot and cold pressure water system in place for the shower in the head and for a future owner to easily reconnect the galley sink tap, if desired.
We cut the galley fiddles from 3⁄4-inch x 3 1⁄2-inch teak and rounded the edges with a router. Then the pieces were epoxy-glued and screwed to the plywood under the Corian with bungs over the screw heads. We cut corner pieces with 45-degree joints out of 1 1⁄2-inch teak stock. These fiddles had to be fixed in place strongly because they supported brackets for the heavy gimbaled propane oven.
Once finished, we all agreed the Corian countertops were a huge, if costly, improvement over Formica and aluminum . . . and may even have been worth the struggle and expense.
Some final touches
Among the shrinking list of jobs left to complete was the installation of a sealed door on the anchor chain locker. On deck, a self-draining recessed anchor locker held the windlass under a hinged deck hatch. The hawse pipe below the windlass directs the anchor rode into the chain locker below. This lower chain locker had no drain or door between it and the forward cabin, allowing muddy water to splash onto the V-berth and the smells of the previous harbor bottom to permeate the cabin.
The existing cutout in the chain locker bulkhead made it simple to make a cardboard door pattern, which we transferred to a piece of 1⁄2-inch plywood and cut to fit flush to the bulkhead. It was then faced with Formica and trimmed with 3⁄8-inch teak overlapping 3⁄4-inch all around. We glued a rubber gasket to the inside of the teak lip and secured the door with offset hinges along the bottom and a twist-latch door button at the top. At the bottom of the chain locker bulkhead we installed a mushroom through-hull to a drain hose and shut-off valve accessible under one of the bilge-access floorboards.
There are several ways to recognize an English-built boat. Obvious giveaways are the sensible Lavac vacuum toilet and the different color coding of the electrical system. Another English oddity, regulated by law in many countries, is that deck hatches are installed so that they open from aft. Several production and amateur builders around the world also install their hatches this way, the idea apparently being that you scoop less water and have a reduced chance of breaking the hatch off if a wave rolls over the bow and catches the hatch in a partly open position.
Weighing these theoretical advantages against the real disadvantages of reduced visibility when looking forward through a partly open hatch and the reduced usefulness of a Windscoop while at anchor, we rotated the forward hatch 180 degrees. A similar hatch in the coachroof was left reversed since it provided better clearance for a vang in that position and would not be used to look forward or hold a Windscoop.
Stripped old varnish
We stripped the old varnish from bulkheads, teak trim, and handrails using scrapers kept fine-edged on a sharpening stone. Where the teak was discolored, we were able to restore its golden brown tone by light sanding or — in a few areas — with careful use of wood bleach. We repaired screw holes from old fittings no longer used and other isolated damage by drilling out and inserting teak bungs or patching in small strips of teak veneer. We final-sanded all bare wood with 120- and 150-grit paper and cleaned it with acetone before applying a first thinned coat of varnish.
We used different types of varnish for different areas: satin for bulkheads and two-part polyurethane for maximum protection on high-chafe areas, such as galley fiddles. Handrails and selected moldings were sealed with a topcoat of Cetol clear gloss. We gave all teak five to seven coats of varnish, generally with a light sanding between every second coat and before the final coat to fill the grain and get a smooth surface. The numbered moldings were set on battens over covered bunks and on the floor for varnishing and then reassembled by the numbers.
Jeff decided to remove the massive drop-leaf table to open up the main cabin. He has the table at home; if he finds he and his wife miss it, he can install it later.
Is it worth it?
The jobs described here were selected from dozens of individual repairs, modifications, and upgrades we completed on this boat over several months. The question arises as to whether it makes financial sense to put this much work and money into refurbishing an older boat when you will not recover much of that money during resale. This would be discouraging if you were simply trying to make a profit or were pouring money into dressing up an old hound of dubious pedigree that will never suit your needs or make a capable and attractive cruising boat.
However, if you are lucky enough to find a classic cruiser for sale that has already been refitted in exactly the manner you’re looking for, it’s worth paying a large premium to save the time and expense of doing the work yourself or hiring it. Unless you are doing the work entirely by yourself and are an extremely resourceful materials scrounger, it usually pays to let the previous owner take the loss and go through the headaches of a refit.
Unfortunately, you may never find this ideal boat, recently outfitted exactly as you want. Or you may want the satisfaction of working on your boat and gaining the knowledge and reassurance that comes with doing the job yourself. Often we’re committed to the boat we own for practical or emotional reasons. Tackling projects one by one as we can afford the time and expense is another sensible approach.
Like many other boatowners, Jeff does some of the work on his boat himself. He purchased a sewing machine from Sailrite and taught himself to reupholster all his bunk and settee cushions. While tackling the difficult job of replacing the polycarbonate in his saloon windows, he realized he did not have time to run his business and simultaneously learn the skills to finish the many jobs that would get his boat set up for cruising in a reasonable time. In his case, it made sense to hire someone to speed up the process of getting cruise-ready.
Immediately after completing this refit, Mei and I accompanied Jeff and his wife aboard Echo on their first cruise to the Bahamas. What we learn in this world should be passed on. It’s always gratifying to help a fellow-cruiser realize his dream.
Thank you to Sailrite Enterprises, Inc., for providing free access to back issues of Good Old Boat through intellectual property rights. Sailrite.com