When all is said and done, it might be worth hiring a rigger
Issue 8 : Sept/Oct 1999
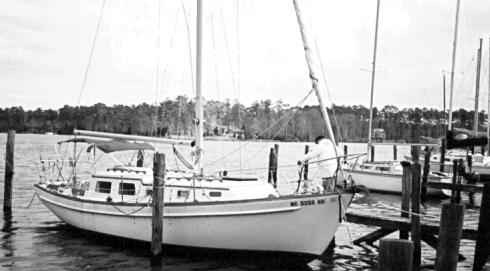
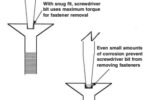
There was no question about having to re-rig my new-to-me good old boat, an Eastward Ho 31. When I surveyed the boat, I noted the barbershop spiral bands of discoloration on all of the standing rigging and that the bottom eye terminal on the headstay had a severe crack. I wouldn’t even have daysailed the boat with that defect.
Once the boat was trucked home to Bay St. Louis, Miss., the first priority was to strip the mast and make up a needs list for the new rigging. The most difficult part of the job was trying to free the port and starboard upper shrouds from the aluminum plates holding them to the spreader ends. The boat, at 23 years old, still had its original rigging. The 6 x 32 stainless steel machine screws were firmly corroded into the aluminum end fittings on the spreader. I unpinned the spreader from the mast sockets and took the sockets, wire and all, to the shop. I succeeded in twisting off the screwheads and freeing the wire, but that left the problem of reassembly. I took the spreaders to a machine shop which drilled out the existing machine screw studs and tapped new fasteners into the old spreader body. They did a great job and cleaned up the surface corrosion in the process.
I had initially contacted a rigging supply firm in Rhode Island in an attempt to buy new spreader end fittings, but I had no luck because the Schaeffer mast is oversized, and the spreader tubes are 1 5/8 inch outside diameter. This company said they carry replacement parts up to 1 1/4 inch only. They suggested sleeving my spreader tubes to fit the smaller endpieces, but I wanted to keep my oversize system intact.
Speaking of oversized, once I was able to assess all of the standing rigging wire, I found the port and starboard upper, headstay, and backstay to be 9/32 inch 1 x 19 304 stainless steel while the port and starboard lower were 1/4 inch 1 x 19 304 stainless steel. This difference would be important when re-rigging. Since the boat’s intended use is to be in tropical waters, I wanted to re-rig with 316 stainless steel wire for increased corrosion resistance. This created problems since the 9/32 inch 304 stainless steel wire had, when new, a breaking strength of 10,300 pounds while the 9/32 inch 316 stainless steel wire’s breaking strength was only 8,700 pounds. The 316 stainless steel wire would have to be 5/16 inch (having 10,600 pounds breaking strength) to equal the 9/32 inch 304. The 1/4 inch 304 was rated at 8,200 pounds while the 1/4 inch 316 was 6,900 pounds.
I did not want to reduce the strength of my rig, nor did I want to increase the size of the wire, since this would affect the size of the required terminations and the mating sizes of the masthead fittings, turnbuckles, and tangs. Inspection of the turnbuckles, tangs, and other fittings proved they were solid and in no need of replacement. This was good news, as those are expensive items to buy.
If I had to use 5/16 inch wire, all of my turnbuckles and chain plates, previously fitted with 7/16 inch pins, might have to be replaced or re-drilled to accept the larger pins that go with the larger wire.
Choices, choices
As I discussed in an earlier article (Good Old Boat, May 1999), the rigging on a boat is a system. The pieces are carefully orchestrated to work together. Change one size, and everything is affected. It began to look like I had to decide between 304 stainless steel wire for strength or 316 stainless steel wire with less strength but greater corrosion resistance. That was not an easy choice.
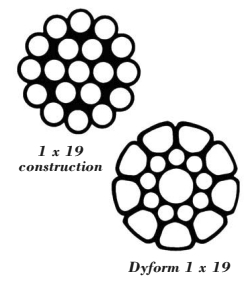
Doing further research, I found another type of rigging wire called Dyform. This wire has a different cross-section profile than stranded 1 x 19 stainless steel wire. It is made of 316 stainless steel and has 30 percent greater breaking strength and 25 percent less stretch than conventional wire. Because of its additional strength, a sailor can use a smaller diameter wire, create less windage aloft and have a smoother, aerodynamic shape. Unfortunately, it is also 50 percent more expensive.
In figuring out my needs for this project, I found the wire to be the least costly of the components needed to re-rig the boat. A 50 percent increased cost in the wire only added $300 to the total cost for the project. Calculated over a 10-year time span, $30 per year was a reasonable cost to pay for the increased strength and corrosion resistance of the Dyform wire.
I spoke with several rigging companies which concurred with my conclusion to use the more expensive Dyform wire. This decision brought its own set of complications. I considered duplicating the old rigging with swaged fittings, but this meant finding a rigging shop to do the swaging. I talked to the rigging shops of two national marine distributors, and they knew of Dyform but had not done much work with it. The Dyform wire has a smoother profile than conventional strand wire, and I worried about the mechanical grip a swaged fitting would be able to make on the hard (316 stainless steel) smooth finish of the wire.
Swageless it is
This yellow brick road I was creating seemed to lead me to swageless mechanical rigging terminations such as Norseman or Sta-Loc. In the past, I had installed Sta-Loc and Norseman fittings on boats as large as 46 feet and was impressed with the design concept. On the opposite side of the coin, I had lost a backstay and a mast on a daysailer and on a 42-foot Gulfstar, each time when a swage failed. And a friend lost his mast when an upper swage let go on his Pearson 365.
The negative experiences with swaged fittings, combined with my concern over the suitability of Dyform wire for swaging made swageless fittings the clear choice.
The next choice was between a two-component swageless system and a three-component swageless system. The two-component system uses a cone to spread the wire and the top fitting to form the wire around this cone. (See Norseman instructions on Page 20.) The three-component system uses a wedge and a “former” to form the wire strands over the wedge with a screwed-on top fitting. (See Sta-Lok instructions on Page 21.) The two systems were comparable in price.
I chose Norseman’s two-part system for simplicity (one less part — no former) and on the recommendation of a rigger with whom I had discussed the project.
Next, I attempted to place the order for the wire, terminals, and the biggest manual wire cutter I’ll ever see with a marine discount house. All the items were in their 1999 catalog, and I was confident of success. Wrong! The person who took the order acknowledged that they were all catalog items, but were no longer being made. Hmmm.
I called the manufacturer’s distributor who assured me they were, in fact, still being made. However, the 9/32 inch terminators with a 7/16 inch pin size (in the catalog) were no longer made. The termination was now 9/32 inch with a 1/2 inch pin size. I called the discount house which received the information with skepticism, but the representative promised to “look into it.” Oh yes, the 9/32 inch terminators were indeed available with a 7/16 inch pin size.
I was getting a little nervous at this point, but the price was the best I could find, and the distributor was well known. I placed the order. Delivery was to be in 5 to 10 days.
I asked for a confirmation number for the order, but one “had not been assigned yet.” I called back in five days to check and was told that they had “not placed the purchase order with the manufacturer yet, so the order would be delayed.” My calls to customer service were to a series of voice-mail messages that got me nowhere. I called two days after placing the wire order to buy new rope halyards. That order took 30 days to arrive. And it was only rope, just rope!
Finally, with ever-increasing frustration because I could not even talk to a real person to cancel the order, the wire and fittings arrived (35 days from the order date). The wire was correct, but the swageless fork terminals with the 7/16 inch pin size? They were 1/2 inch pin size. This would complicate a lot of things, but I’d waited too long to start over.
Oh, I almost forgot to mention the large (huge) wire cutter I ordered. They sent the largest pop rivet tool I have ever seen. When I called, they took eight hours to authorize the return of the tool. Shipping the correct wire cutter took another week. Finally, all was ready to fabricate my new standing rigging.
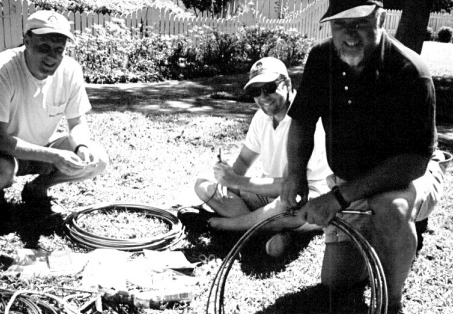
As luck would have it, my son and son-in-law arrived for a visit a week after the wire package arrived, so I had plenty of manpower. Even though we all read the instructions twice and had previously installed swageless fittings, we did not do well with the first eye.
The process itself
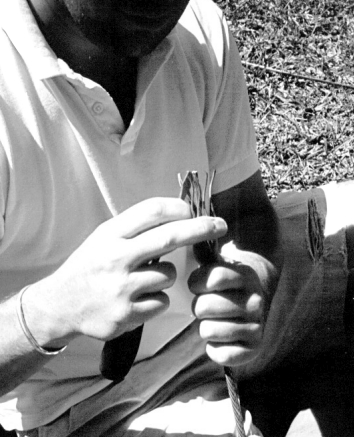
What the Norseman instructions do not tell you is to unlay left-hand twisted wire counterclockwise. If the wire were to have a right-hand twist, it should be unlayed clockwise. When the wire is unlayed, it should assume a tulip shape. (See illustrations below.)
The cone should be positioned below the cut end of the wire a distance equal to one and one half times the diameter of the wire itself. Since I was using 9/32 wire, the cone needed to be 7/16 inch below the end of the wire. When cutting a length of wire, it is possible to cut it at such a point that the curve of the wire will conflict with the cone.
If this occurs, the cone needs to be pushed down into the bowl of the wire and an appropriate amount of wire trimmed from the cut end.
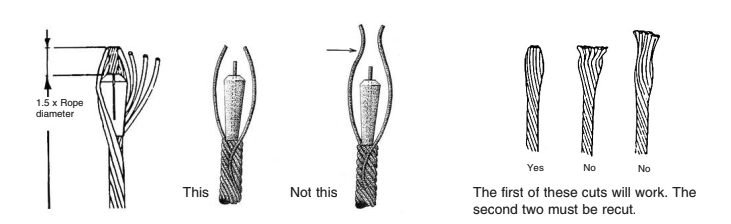
If the cone is too high, the wire will not form over the end of the cone. If the cone is too low, too much wire will close over the cone and the threaded bottom fitting will not be able to be mated with the top portion.
The information the instructions did not give us is to use a little bit of white grease when assembling the fittings so a strand of wire does not get caught between the top and bottom fittings and destroy both fittings. This happened the first time I tried to assemble a terminal on the wire. The way to avoid this is to use white grease and handtighten the top fitting into the bottom fitting. Screw the top down two threads, back off and look inside to see if the wires are forming inward over the cone. If they are, replace the top and tighten a little more, reverse and check. If the wires are not forming over the cone, use a small flat-bladed screwdriver to push the wires inward toward the center. Handtighten the top over the bottom fitting. Do not use wrenches at this point.
If it works, do it several times more, a little at the time, until all wires turn inward toward the center over the cone. Check one more time to be sure they are correctly formed. Then, use two wrenches to tighten the top and bottom together. They should be snug but not overly tight. The instructions advise you to turn only the top fitting if using lefthand laid wire and, if using righthand laid wire, turn only the bottom of the fitting. We followed this advice but still messed up the first fitting. Disassemble the fitting for the last time. Tap the bottom part of the fitting down, away from the cone and wire. Wipe the white grease from the wire and the fittings. Pull the bottom fitting into position over the wire and cone. Fill with 3M 4200 or similar non-acetic-acid marine sealant. Do not use a household bath sealant. They contain acetic acid. If it smells like vinegar, it contains acetic acid, which is harmful to stainless steel.
Assemble the fittings and tighten snugly. Do not overtighten. The sealant should ooze out of the bottom fitting. Wipe it clean, and go on to the next fitting.
Measure twice, cut once
When I was figuring out the amount of wire I needed to buy, I measured the old wires from the centerline of the hole in the eye, or fork, to its corresponding point at the other end of the wire. I did not include the turnbuckles in my calculations. When all eight wire lengths had been added together, I added three feet to be sure I had enough. This added wire was a waste. When you think about it, if you cut a wire short, there is no way to add to it. It will have to be replaced, and the extra three feet will not help. Live and learn.
In measuring the new wire to be cut, I used the old wire as a template and cut it exactly to the length from where the wire bottomed out in the old fitting to the corresponding point at the other end, swage to swage. The extra wire I purchased, from centerline of eye to eye, was also a waste, although it was only a few inches per wire.
A concern I had when deciding on swageless fittings was their large size as compared to the aircraft fork and eyes used with the original swaged fittings. This should be investigated by anyone planning to re-rig with swageless fittings. Be sure you have room to utilize the larger termination. They were not a problem for me, but could pose a problem if mast tangs are very close to the mast surface without room to allow the larger fittings to be used.
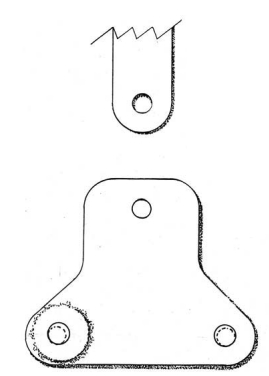
The problem of the 1/2 inch versus 7/16 inch pin for the fork fittings caused some grief as I had to drill out the 7/16 inch holes in the masthead tangs to fit the 1/2 inch pin size. Care must be taken when drilling larger holes to preserve the integrity of the tang. The rule is that the amount of material below the hole must be equal to the diameter of the hole. Thus a 1/2 inch hole needs 1/2 inch of metal between it and the edges of the tang. (See illustration below.)
The problem I had was with the tangs for the port and starboard lowers. If I re-drilled the hole to 1/2 inch, I would not have 1/2 inch of metal below and to the sides of the hole. I removed both tangs from the mast and took them to the machine shop where the machinist told me it would be “about impossible” to enlarge the hole up and inboard from the existing location, but he would try.
Using a milling machine, the machinist was able to enlarge the hole to 1/2 inch by taking material away from the edges. Even so, I still had only a 7/16-inch margin outboard and below each hole. I compensated by welding a stainless steel doubling washer to the tang to increase its strength. This is an ABS (American Bureau of Shipping) approved method of compensating for holes or hatches cut into steel plate for large steel construction jobs. I used a thick stainless steel 1/2 inch washer which was perimeter-welded to the tang. The large swageless fitting had room to accommodate the increased thickness.
Prior to re-rigging, my good old boat had 3/8 inch, 7/16 inch, and 1/2 inch rigging pins and 1/4 inch and 9/32 inch wire. Now it has 1/2 inch pins and 9/32 inch Dyform wire throughout. This was definitely an improvement. I think the previous owner owned stock in a silicone factory, because everything was coated in silicone — not bedded — coated. There was no way to determine the condition of the bedding for the mast step or chainplates except to remove all of the silicone and start over. I scraped the silicone from the fittings, cover plates, nuts, and bolts and re-bedded everything in 3M 4200, (similar to 3M 5200 but not a permanent adhesive sealer). A careful inspection of the clean parts showed them to be sound and not leaking. A tribute to silicone, I guess.
While you’re there
While the mast was horizontal, I pulled all of the old electrical wire out and replaced it with Ancor marine-grade tinned wire. I also rebuilt the foredeck light and bow light assemblies. The original rig had combination wire/rope halyards festooned with fishhooks. You needed gloves to handle them. I’m a firm advocate of all-rope halyards and purchased Sampson XLS 7/16 inchrope for the main and jib halyards. The go-fast crowd will bemoan the weight and windage aloft, but my boat will not feel any difference.
I also added mast steps while I waited for the new rigging since there is one bridge between my home mooring and the sea that we must pass under at less than high tide. With my wife at the helm, I can be at the masthead to make sure we’ll clear the span.
Stepping the mast was supposed to be a non-event at the local shipyard, but at the last minute the cherry picker the yard uses to set masts quit, and I had to arrange for a truck crane to do the job. The smallest crane I could find was a 20-ton model. Overkill for a mast, perhaps, but it worked. The rigging fit as desired, and it was time for rig tuning and sailing.
Worth the effort?
I noticed a wide variation in prices between suppliers of identical products. It should be noted that the cost of swaged fittings is one half to two thirds that of swageless fittings, you have to add the labor cost to the swaged fittings. With swageless fittings, you can build your own rig at home with your own “free” labor.
Is it cost-effective to build your own rigging? I think not. It is not very difficult work, but it is time-consuming. If you make just one mistake, it can ruin $50 to $100 worth of wire. The fitting we ruined cost $50 to replace.
In addition, there is the cost of the wire cutter at $140 to $160. If you do not do your own work, you will not need this tool unless you want it for emergencies aboard your boat. I wanted one for my boat anyway, so the cost is not a total write-off.
The cost to have a professional rigging shop do the work seems to be about $400 above the material cost for swageless fittings and about $300 above for swaged fittings. If you subtract the $140 to $160 for the wire cutter, the difference is quite small. For this amount, you get a warranted job with no mistakes. If the shop cuts something too short, they replace it.
If you are upgrading your rigging as I was, have the rigger visit your boat to make sure the new rigging will work. The pins for swaged fittings are much shorter than those for swageless. The fitting diameters may be correct for the wire, but may not fit up to the mast-mounted hardware. There are lots of things to think about before you start the work.
I’m proud of the new rigging I built, and I’m glad I did it. However, it took four times as long as I thought it would, cost almost as much as a professional job, and my fingers are just beginning to heal from the wire punctures which are an inevitable part of the process.
Bill Sandifer is a marine surveyor and small boatbuilder who’s been living, eating, and sleeping boats since he first assisted at Pete Layton’s Boat Shop building small wooden boats. He’s worked for Charlie Morgan (Heritage), Don Arnow (Cigarette), and owned a commercial fiberglass boatbuilding company (Tugboats).
Thank you to Sailrite Enterprises, Inc., for providing free access to back issues of Good Old Boat through intellectual property rights. Sailrite.com