Even the worst-case scenario is a pretty straightforward repair
Issue 29 : Mar/Apr 2003
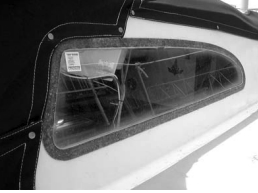
When I discovered the weeping portlights on our Pearson 28, my first thought was: “Caulk ’em.” So, not knowing any better, I did — around the outside edges. Tightened the screws, too. The ports still leaked.
Closer inspection revealed that over a long period of time water had dripped down the cabin-trunk liner in the head onto the toilet plumbing, leaving a long rust stain on the head sole. Water then ran out of the head and pooled in the forepeak under the notch of the V-berth.
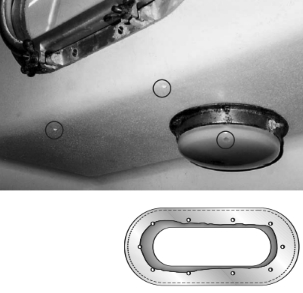
On the other side, water dripping down the liner had corroded the dome light over the main locker into a fossilized state of uselessness; when I tried to work the switch, it and the surrounding metal broke off in my hand. (See photo above.) The contents of this locker were well-dampened after every rain shower. There was no point in replacing that light or improving the locker until the portlight quit leaking.
Next, I looked at the gaskets. I concluded they were original. They looked like desiccated reptile hide from the Cretaceous period. Replacing them with black neoprene adhesive hatch seal from the marine store was simple and quick.
The durn things still leaked. I got on the Pearson 28 Forum email discussion list and solicited suggestions. I found out that I was looking at what I considered the worst-case scenario: the portlights needed to be removed and rebedded in structurally modified openings. Arrgh!
But wait — don’t flip to the next article yet. It wasn’t that bad — really.
Mark Petrush, an experienced P-28 owner and moderator of the forum, had come up with a permanent fix. The problem is one common to production boats with liners — which most of us sail. When Mark took his leaky portlights off, he discovered that the cut-outs made by the builder looked as though the man with the saw had sniffed a few too many resin fumes. The cut-outs were rough and wallowed-out, with large gaps between the “spigot” (the lip of the portlight that goes through the opening to the other side) and the boat. The builder had filled these gaps with about half a tube of caulk. (See illustration below.)
Mark also discovered that the gap between the cabin trunk itself and its liner wasn’t filled, leaving a flexible, fairly flimsy mounting surface for the portlight. With all that caulk and no solid mounting surface, a good whack and/or some caulk aging could easily cause leaking. It could also allow water to leak between the liner and the cabin trunk, down into the who-knows-where.
The solution was to pack these gaps with a permanent, strong, hard-curing adhesive filler, creating a solid mounting surface for the portlight (by filling the gap between cabin trunk and liner), and a cutout that fit the portlight spigot exactly, with room only for a bead of caulk. Then, only a normal bead of caulk (and some in the screw holes) was needed to seal the portlights. Now they’re held firmly in place against solid surfaces on both sides, so jostling them won’t break the caulk seal and cause leaks.
The project requires only basic tools and skills and readily available materials. The time required for the project, including getting the stuff together, was 30 hours for me, but I’m slow. It took Mark only about 12 hours. I worked on it a little at a time over a couple of weeks, but if you can’t work during the week, one or two full weekends should suffice. The total cost for materials should be about $25, excluding two-part marine epoxy and filler, which is optional — see Step 4.
Following this procedure will allow you to avoid the minor pitfalls and delays I stumbled into, even if you’re not experienced at this sort of thing.
Step 1: Gather tools and materials
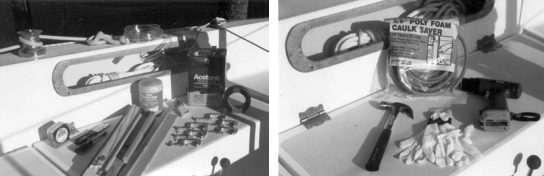
You may be able to get everything you need at the local hardware store or home improvement warehouse and the auto parts store.
Tools:
- Several 3- to 4-inch C-clamps. I used six.
- Puttyknife
- Razor scraper (sold to get paint off windows)
- Pocketknife
- Screwdriver(s) to fit your screws. You’ll need two at the same time — one on one side, and one on the other.
- Detail sander with 100-grit pads
- Hammer
- Caulking gun
- Goggles
- Breathing masks
- Long nail or coat hanger to punch through caulk seal
- Tap tool to match your portlight screws (if your portlights aren’t through-bolted — you’ll have to take them off to find out).
- Drill and bit to match your screw holes
- Old toothbrush to clean off powder corrosion (if your portlights are metal)
- Calipers (optional)
- Tape measure
Materials:
- Strips of scrap lumber, about 1⁄4-inch thick and 1 1⁄2 inches wide, to “frame” the portlight opening
- Clear, thin-wall, vinyl tubing, non-adhesive weatherstripping, pipe insulation, Caulk Saver, or some other flexible material to stuff down into the gap between the liner and the cabin trunk. (I recommend taking your portlights off before buying this, to see how much of a gap you have. The sealing material should be just thicker than the gap.) Here’s how to calculate the length of the material you need: [(horizontal length of portlight + 2 inches) x 2] + [(height of portlight + 2 inches) x 2] for each portlight.
- Plastic body filler with chopped-strand fiberglass and cream hardener (Bond-Tite or Bondo-Hair — the hardener and a plastic mixing tray come with it). About 2⁄3 of a quart will easily do two portlights. (Again, I would take off the portlights before you buy this (see Step 2) — if your liner/cabin-trunk gap is 1⁄8 inch or less, you might find it easier (but more expensive) to use thickened marine epoxy. I found the epoxy more difficult to work with, and it’s expensive, so I’d suggest using body filler, if you can.)
- If you opt for epoxy — this could happen if you have a very narrow liner-cabin trunk gap — you’ll need a two-part marine epoxy and high-density filler. You’ll also need syringes or empty caulking gun tubes. The tubes will work if a tube tip will fit all the way inside your gap; you’ll need syringes for smaller gaps. You might need two syringes per portlight; if you don’t clean them out completely before the epoxy kicks (tedious), you have to throw them away.
- (Optional.) Empty cans, jars, or plastic dairy cartons for mixing epoxy
- Roll of blue masking tape (Long Mask) about 1 1⁄2 inches wide
- Box of disposable latex gloves (I used wads of them — they don’t last long)
- A couple of paper plates to catch mixing spills
- Rags to wipe surfaces with acetone
- Pipe cleaner to wipe out screw holes with acetone
- Paper towels to wipe up filler, epoxy, and caulk
- Silicone grease or silicone-based vinyl and rubber protectant (such as Armor All)
- Tube of caulk (I used clear silicone; you could also use polysulfide; I wouldn’t use 3M 5200 because you’ll never be able to get the portlights back off if you need to repair or replace one).
- Can of acetone
- Plastic grocery bags or kitchen-size plastic garbage bags
- For non-through-bolted portlights only: machine screws to replace self-tapping screws, same size
- For non-through-bolted portlights only: Loctite or other screw-thread or pipe-thread adhesive sealant (Caution: some thread sealants attack plastic –Ed.)
Step 2: Remove your portlights
This job makes a mess, so if possible move everything under the portlights out of the way or cover it well beforehand. I was able to do this step without assistance; the caulk in the bolt holes held the nuts in place while I turned the bolts and vice versa.
Your portlights might be through-bolted with barrel nuts (these have a head like a screw), or they might be screwed in from each side with self-tapping screws (like Mark’s plastic ones). On one side is the portlight and on the other is a ring that fits around the protruding spigot. (You can tell which is which because the ring and spigot are not attached to each other but merely fit closely.)
Take the ring off first. You may have to use a hammer and putty knife to break the caulk seal on the outside. Tap the putty knife, corner first, gently between the portlight (or ring) and the boat (it’ll need to be a fairly thin putty knife) — going all the way around until the ring or portlight will pull off with moderate steady pulling. Once you have the ring off (you may bend it a little in the process if it’s aluminum like mine — don’t worry about that), you’ll be able to see the cut-out, along with any gobs of old caulk used to fill it. Note how much space there is between the cut-out and the portlight spigot.
To get the portlight out, carefully slice through as much of this as you can with a pocketknife. You should then be able to pry out the portlight by getting the claw of your hammer under the flange (where the screws go) and pulling gently and steadily. Don’t put brute force to it or you may damage the liner (if your portlight goes in from the inside, like mine) or gelcoat (if from the outside, like Mark’s). If you’re prying from the outside, masking tape can help protect the gelcoat surface.
Step 3: Clean up the openings
Cut out the big pieces of caulk with a sharp pocketknife or razorknife. Cut and pry the caulk out of the gap between the liner and cabin trunk. Now you can measure the gap between the liner and cabin trunk. It may be uneven. Your goal is a gap of consistent width; shoot for a rough average of the narrowest and widest points. (Note: Whenever you need to leave the project for a while, just tape a plastic grocery bag over each opening with blue masking tape, from the outside. Don’t leave it more than a week.)
Step 4: Filler and gap-stuffing material
If your liner-cabin trunk gap is 3⁄8 inch or more, you can use thin-wall clear vinyl tubing from the plumbing section of the home improvement warehouse for the stuffing material. It’s flexible enough to stuff in the gap but firm enough to stay put. If your gap is like mine and closer to 1⁄8 inch, you’ll need to use something smaller. I used round closed-cell foam Caulk Saver. It comes in rolls of 20 feet, and you’ll find it with the weatherstripping. I actually had to cut mine in half lengthwise to use it, but that was easy. Your gap stuffing will need to be slightly thicker than your gap.
If the spaces between the spigot and the cut-out are pretty big, like ours, I’d get the body filler for those (Bond-Tite with chopped strand or Bondo-Hair) from the auto parts store. It costs about $7. If your liner-cabin trunk gap is closer to 1⁄4 inch than 1⁄8 inch, I’d use the filler for that, too.
If, like mine, your liner-cabin trunk gap is 1⁄8 inch or even less, the body filler will be too thick to cram in there. You’ll need to use epoxy. If you don’t already have some, be prepared to spend $50 for two-part marine epoxy, dispensing pumps, and filler. The syringes or caulk-gun tubes will cost you another $5 to $10. The good news is that you won’t use nearly all the epoxy, even if you get the smallest containers, and this stuff is great to have for all sorts of repairs and projects. It keeps indefinitely if properly stored.
This is also the time to buy machine screws to replace your self-tapping screws if your portlights aren’t through-bolted. Get the same size screws. You’ll also need a tap tool to match the machine screws. Ask someone knowledgeable at the local hardware store.
Step 5: Stuff and even the gap
Use a putty knife or something with a thin blade (but not a sharp edge) to push the tubing or foam stuffing into the gap all around. It helps to use a screwdriver to gently pry apart the liner and cabin trunk as you stuff in the tubing or foam strip. Be careful, though; the liner can crack. Try to get the stuffing in at an even depth of 1 inch. Use tape wrapped around your putty knife at a 1-inch point as a gauge. If the cabin trunk takes a turn before 1 inch, use as close to 1 inch as you can all the way around. If the stuffing material ends up a little long, trim off the end so it just meets the other end.
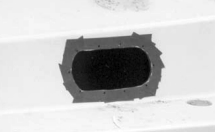
Once your gap is completely stuffed and depth is consistent, wipe down all surfaces that will contact filler (inside of gap, edges of cut-out, screw holes) with acetone. Then mask the surface around the cut-out on both sides, covering the screw holes. (A 1 1⁄2-inch tape will do.) This will save you a lot of time and trouble later. (See photo below.)
Place the wooden strips around the cut-out like a frame, on both sides. (Do one pair at a time.) Keep the strips clear of the edge of the cut-out. Clamp the whole “sandwich” together with two C-clamps for each long pair and one for each short (side) pair.
By tightening or loosening the clamps, even out the gap all the way around, using calipers or a simple homemade gauge (like the putty knife with tape on it) to get a consistent gap. This will give you a completely flat and straight mounting surface on both sides.
It’s important to keep the gap on the narrow side — certainly no wider than the widest point you find when you take the portlight off. Otherwise, your bolts may wind up being too short.
Step 6: Fill the gap
Now’s the time to put on your latex gloves. Mix up your body filler or epoxy according to the directions. The body filler has a very short pot life; it will kick off in as little as five minutes. Mix only about a golf-ball-size gob of it at a time on the plastic mixing tray that comes with it. Use only about a toddler’s toothpaste dab of cream hardener per gob. Mix with the putty knife. Working with one small section of the gap at a time, press the filler firmly into the gap, wipe up what oozes to the sides, and press that in too. Keep dabbing on and pressing in until that gob of filler is gone. Mix up another and keep going. For this stage, keep your filler even with the edge of the cut-out; you’ll fill in the other spaces in Step 7.
If you’re using epoxy, you’ll need to add filler until you get a peanutbutter consistency so it won’t sag and ooze out of the overhead gap. For one 1⁄8-inch liner-cabin trunk gap, I used about a half pint. You’ll use a lot of the high-density filler to get it thick enough. If you mix it with a tool you want to use again, clean the tool with acetone before the epoxy kicks.
Epoxy has a longer pot life than body filler; how long depends on the hardener you use and the ambient temperature. Check the manufacturer’s instructions. Make sure the tip of your syringe or caulk gun tube will go all the way inside the gap. Load up and squirt the epoxy all the way in, applying it from the inside out. Have a rag and some acetone handy to wipe up any drips.
If you use epoxy for the gap but you’re going to use body filler for the spaces around the portlight spigot, you’ll want to let the epoxy cure first. Call it a day and give the epoxy whatever cure time the manufacturer calls for.
If you’re using epoxy for the space fill as well, you’ll need to let the epoxy set up before proceeding to Step 7. Again, check the instructions for setup time. It will be less than half an hour in most cases.
If you used body filler for the gap, you only need to let the filler set up for about seven to 10 minutes before proceeding to the next step. You can test the filler by pressing gently on it with a gloved fingertip while it dries. When it’s set up, it will be hard; the chopped fibers will be almost brittle.
Step 7: Pack filler in
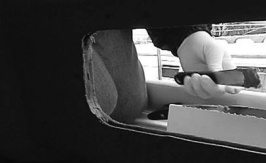
Before you get started on this step, clean off your portlights. Remove the screens. Remove any traces of old caulk. A paint scraper works well for this. Brush off powder corrosion. Clean out screw holes. Check for any damage. Clean the glass. Clean the gaskets (I’m assuming they’re in good condition) and put some silicone grease or silicone-based vinyl and rubber protectant on them. Wipe the mounting surfaces down with acetone (something milder if they’re plastic or have a delicate finish).
Once clean, wrap the outer surface of the portlight spigot with three layers of blue masking tape. (See photo on Page 21.) This adds a little thickness to the spigot so that when the filler cures, a little room is built-in for expansion. It also masks the surface to keep it clean. Also, mask the inside of the portlight flange (where the screws go). One layer is fine there.
Remove the clamps and wood strips from the cut-out. Trim away any excess filler sticking out of the cut-out.
Replace the portlight in the cutout. Make sure the flange still fits flush against the liner or cabin trunk. If not, take it out and carefully trim away any filler material that’s sticking out past the edge of the cut-out. Feel with your gloved finger to make sure the surface is smooth and flush.
You may need to tape or clamp the portlight to the boat to hold it flush, depending on how loose the opening is. Make sure it stays flush, or you’ll have time-consuming trimming and sanding to do after this step.
From the other side, pack filler into the spaces around the portlight spigot, using the same procedure as in Step 6. Don’t let filler protrude out of the cut-out, or you’ll have to trim and sand it away later. Your goal is a flush surface. Once you’re done, let the filler set up only until rubbery — not until fully cured — about seven minutes for body filler. Proceed immediately to Step 8.
Step 8: Trim away excess filler
Once the filler has set up, but before it has fully hardened, gently pull the portlight back out. Trim away any loose fibers or rough edges sticking out. This will be easy. Gently pry up the masking tape on both sides. The excess filler on them should come off with the tape. Check your screw holes on both sides. They should be completely filled. If not, you’ll need to fill them with filler or epoxy and let that harden. Wipe away any excess around the screw holes with acetone before it hardens.
Step 9: Final surface prep
You need a completely flush surface on both sides. Any raised spots on the liner or cabin trunk should now be easy to take off with a detail sander with a 100-grit pad. Be sure to wear eye protection and a breathing mask or respirator whenever you sand epoxy or fiberglass. Don’t let fiberglass dust get on your skin. Wear long sleeves and long pants. If you feel an itch after working with it, take a piece of new masking tape and stick it firmly to the itchy area, then pull it off. Do this a few times to take the fibers off your skin. If you have sanded filler, wash your outerwear separately before wearing it again.
Step 10: Re-drill screw holes
Take all the tape off the portlight. Clean up the ring if you haven’t already. If it’s metal and a bit bent, beat it flat with moderate hammer taps on both sides. Sight down its edge to make sure it’s flat and straight.
Through-bolted portlights: After the filler in the screw holes has completely hardened, put the portlight back up. Put the ring on the other side. Tape or clamp both so they stay put. Drill new holes from the portlight side, all the way through, being careful to keep the bit perpendicular to the portlight both horizontally and vertically. Then go to the other side and drill from that side, through the holes in the ring, to “neaten” the holes and make sure screws and barrel nuts will align.
Screwed-in portlights (not through-bolted): Drill the holes only to the original depth — put a piece of tape or a paint mark on your drill bit to gauge hole depth. Then use the tap tool to tap (cut threads into) the holes.
Step 11: Remove dust and filler
Take the portlight back down first, of course. Use a pipe cleaner dipped in acetone to clean out the screw holes.
Step 12: Caulk
Lay a generous bead of caulk on the new edge of the opening (the surface that fits around the spigot). Lay another bead around and right next to the outside edge of the cut-out on the exterior side. Squirt a little bit of caulk into each screw hole on the exterior side.
Have a paper towel handy for wipe-ups, but if you dribble, it’s frequently easier to wait for the caulk to cure and then just pull it off — it doesn’t smear that way. (This won’t work with 3M 5200, but I wouldn’t use that anyway.)
Non-through-bolted portlights: You’ll only need to caulk the outside holes, since the others don’t go all the way through, but I’d put some Loctite on the inside screws to help hold them in place over time.
Step 13: Reinstall portlight
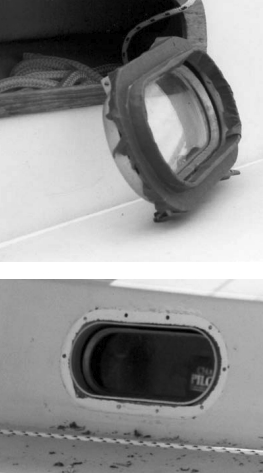
Do this with the screen out so you can reach through. Put the portlight in carefully, then put the barrel nuts or screws in the holes on that side. Then put the ring on the other side. This can get messy so have paper towels handy. Put the screws or barrel nuts in on that side. Push them in as far as they’ll go. If caulk squeezes out, wipe it up carefully; if you smear it around during this process, you’ll probably want to wipe up the smears before they dry. With polysulfide, this might be easier if you use acetone.
You’ll need to hold one side (nut or bolt) with one screwdriver while tightening the other from the other side. I found that propping up a small mirror was helpful. Tighten each bolt or screw a little at a time, then move to the next one in sequence. This will help prevent warping the ring. Continue tightening until all bolts and nuts (or screws) are as tight as you can get them. A little caulk should have been squeezed out around the outer edge of the ring and between the edge of the spigot and the ring. The ring and portlight should be completely flush with their contact surfaces (liner and cabin trunk). You can neatly and quickly clean up the excess caulk by bending and creasing a piece of thin cardboard — like a piece of cereal box or packaging — into an L-shape and running it along the seam so it lies flat against each surface and scoops up the caulk.
Replace the screens in your portlights once you’ve cleaned up any excess caulk inside the spigot.
Step 14: Clean up
The debris from this job made my boat look like a war zone, but almost all of it vacuumed up easily and quickly. I had to do more sanding than you will if you follow these instructions, so I had to give the interior a wipe-down as well. I keep a 1-gallon, 1-hp $20 Shop-Vac on board that I run off the boat’s shorepower. It is about as good a way to spend $20 on the boat as I’ve found. Cleaning up the whole mess took about an hour.
Step 15: Celebrate
You’ve now installed your portlights the way they should have been installed in the first place, permanently enhancing your boat’s integrity. You can feel good about that. If your portlights are in good condition, you can also feel good knowing that the next time it rains or you’re in some boisterous water, you won’t pull damp underwear out of your locker. (It’s the little things that count.)
Mark says, “This was one of the sweetest boat ‘fixes’ I have ever done. Those windows absolutely will not leak again.” So go home, take a shower, have a cold one, and take yourself out to dinner with your favorite company.
Thank you to Sailrite Enterprises, Inc., for providing free access to back issues of Good Old Boat through intellectual property rights. Sailrite.com