When our keel started weeping and our bilge started filling, a keel bolt repair came next.
Issue 129: Nov/Dec 2019
Losing a bolt-on keel is a relatively uncommon occurrence, but it’s also about the most disastrous event that can befall a monohull sailboat. World Sailing (the world governing body for the sport of sailing) reported 72 keel separations between 1984 and 2017, resulting in 24 lives lost. I’ll note that World Sailing counted only cases in which keels completely detached from the boat; keel damage or partial separation occur more frequently.
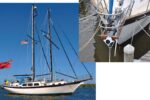
With this information in mind as we prepared to cross the Pacific aboard MonArk, our 1979 Dufour 35, we decided to examine our own keel bolts. And are we ever glad we did.
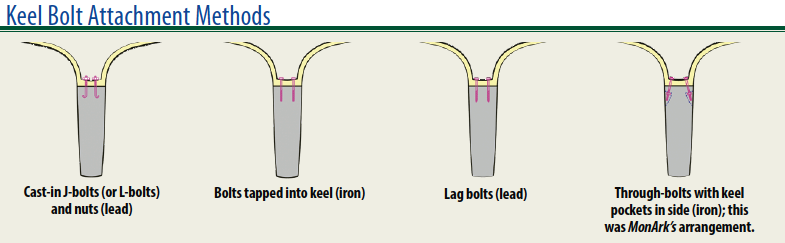 Keel Attachment Methods
Bolt-on keels are attached to boats in a variety of ways, but the most common methods are cast-in-place J-bolts or L-bolts, through-bolts with side pockets, cast-in-place nuts, and lag bolts. Each has its advantages and disadvantages, and each will dictate the method of any repair; MonArk‘s keel bolt project was specific to the way her keel is attached to the rest of her.
In North American-produced boats, bolt-on keel ballast is often lead, in which case cast-in-place J-bolts, L-bolts, and lag bolts are the most common connection methods. The J- or L-bolts are cast into the lead with threaded ends that project through the keel stub and are fastened with washers and nuts. Lag bolts are tapped into the relatively soft lead of the keel from the bilge side. No nuts are used in this method.
Many European boats feature bolt-on iron keels and usually employ the two remaining methods for attaching the keel. The first is to tap the iron keel and install a bolt from the bilge, through the keel stub, and threaded into the keel. A preferable method is to cast pockets either in the keel’s side or internally, enabling a bolt to pass from the bilge through the keel stub and connect to a nut in the cast-in pocket.
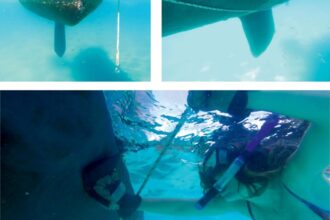
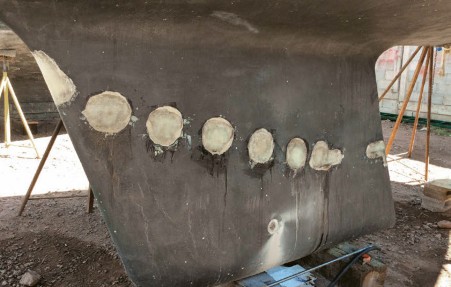
We learned that MonArk‘s keel is attached with the latter method, with 12 bolts, six on each side, passing through the keel stub and emerging in pockets on the keel’s sides.
The Warning Signs
We had plenty of warning that we had keel bolt issues.
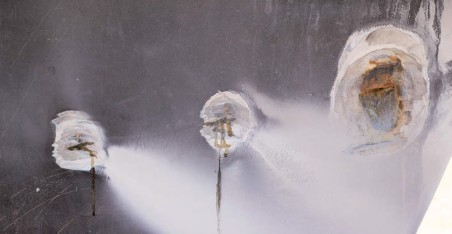
The first sign came when we hauled the boat. After two days on the hard, a small, rust-colored weep appeared on the side of the keel. It looked just like a burst hull blister, which is what I initially thought it was. I ground it out to the iron ballast and could see that vinegar-smelling water was weeping from between the ballast and the thin fiberglass covering it. I figured the blister must have burst during the pressure wash, allowing water to get in between the metal and fiberglass. I let it dry for a couple of days and then repaired it as I would with any blister.
The next time we hauled out the weep was back, along with three others.
The second sign was that our bilge slowly filled with saltwater despite none of our through-hulls showing evidence of leaking. Whether we sailed or not, the level crept ever higher, but slowly. Our bilge pump would turn on only every other day for a few seconds. We didn’t think too much of it.
Then I stumbled upon an article on weeping keel bolts. The photos in the article looked just like our weeping keel. The article cautioned that in the case of leaking keel bolts, water can become stagnant and cause significant unseen corrosion to the keel bolt. And why were they leaking? It was time to take a look.
One piece of good news was that there was no evidence of cracking at MonArk‘s keel-to-hull joint. Had there been, we may have had to take much more drastic measures, including completely removing and rebedding the keel.
 Removing the Bolts
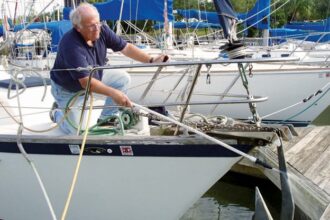
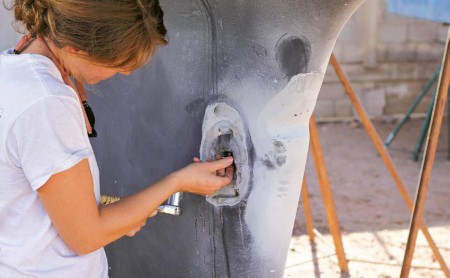
Once we determined our keel was attached using side pockets, we set out to find them. The rusty weeping gave away several, but to find the rest I walked around and tapped the keel with a 4-ounce hammer, the same way I’d identify soft spots in a deck. A soft thud — as opposed to a slightly metallic tap — meant that either the fiberglass had badly delaminated or I’d found a keel pocket.
I marked the keel pocket locations with an X. Then, using an angle grinder with a flap disc, I ground out the fiberglass over the keel pocket to expose the filler compound and the edges of the pocket. I ground down to the metal of the keel at least a half inch around the perimeter of each keel pocket and then tapered the surrounding fiberglass about two inches beyond to prepare for the fiberglass repair later.
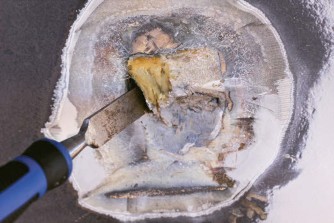
With a chisel I didn’t care too much about, I began removing the filler compound. The filler was clearly not marine epoxy and had been installed carelessly, leaving voids, which partly explained why we were having issues. It’s important to wear eye protection during this process. It’s also important not to damage the bolt’s threads, so I excavated carefully, though in a few cases I nicked the threads and ended up using a die to smooth them back out.
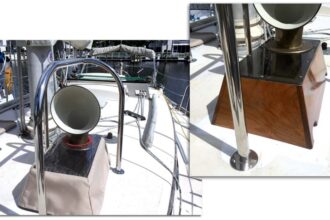
With the filler chiseled out of the pockets, I could move to the bolt heads. The tops of the bolts, which sit at the bottom of the bilge, are covered by a resin cap. This is common and a good way to improve the seal around the bolts, though it’s better to use marine epoxy than porous fiberglass resin. We pumped all the water out of the bilge and cleaned it thoroughly with a degreasing agent. The resin caps appeared as bumps in the bottom of the bilge.
I used the same chisel to begin chipping the caps off. I couldn’t reach the bolts at the back of the keel and fashioned a 3-foot-long chisel by cutting the hook off a crowbar and grinding down the other end into a chisel shape. It took me about six hours to chisel off the 12 resin caps. I didn’t worry about doing a very clean job as I knew I would be grinding down the whole area after we removed the bolts.
Inspecting the Bolts
The bolt heads exposed, I began removing the bolts two at a time for inspection. This was a two-person job, requiring my partner, Fiona, to be outside the hull with a socket wrench, and myself in the bilge with the same-sized socket. I removed the bolts in opposite pairs. After each pair was removed and inspected, I reinstalled them to torque specifications so the next pair could be removed without risking movement of the keel. This was a little time consuming, but I wanted to know what exactly we were dealing with before moving onto the next phase.
There are a couple of things to look for when inspecting the bolts. After the nut has been removed, is there any play between the bolt and the surrounding fiberglass? Over time, the bolt hole can become enlarged. If the bolt jiggles in the hole, you must install a larger diameter bolt that will take up the difference, because bolts in an oversized hole will move under load and break the seal, leading to leaks.
Next, if you plan to reuse the hardware, examine it for structural problems. When possible, I recommend replacing the hardware, but in our case, we were in a boatyard in Mexico and getting the stainless 316 bolts in the length we required was impossible. Still, you don’t have a choice if you find obvious visible signs of corrosion, wear, or material fatigue.
A magnifying glass will help identify obvious problems. If nothing jumps out, the next best step is a dye penetrant inspection. Dip the hardware in the dye and set it aside. Then wipe the dye off the bolt; dye will remain in any fractures. Shine a black light over the material and inspect with a loupe or magnifying glass. This is not a fail-safe method, but if you have to reuse the material it’s better than nothing.
In our case, the bolts thankfully looked good to go (we did replace the washers and nuts). However, removing the bolts made it clear what the other part of our problem was; the sealant that had been used to install the bolts originally was completely deteriorated, allowing water to penetrate. Now that we knew this, and had confirmed the hardware’s integrity, it was time to reinstall and rebed.
Reinstalling and Rebedding
As with most boat projects of this magnitude, prep is everything. Outside the boat, I used a wire brush on a handheld drill to polish the pockets cast into the keel. Back inside the boat, I used an angle grinder and flap disc to remove the remaining resin cap material, bilgecoat, and sealant to get down to original fiberglass.
I tried to create a smooth and even surface in a 3-inch radius around the bolt holes and finished the area with an orbital sander with 80-grit sandpaper. I also used a wire mini-bottle brush on the drill to scour the inside of the bolt hole in the keel and keel stump. After all the grinding and sanding, I cleaned all areas with acetone, until no dust appeared on the cloth. It’s a good idea to wash the entire bilge again as dust will settle in areas away from the bolt holes but can be stirred again and cause problems.
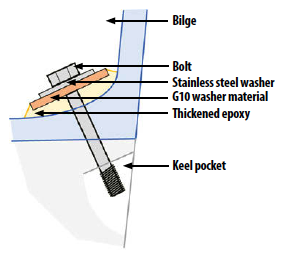
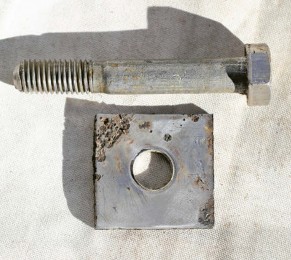
The bolts were originally installed in a curved part of the keel with large, square, stainless washers. The washers had deformed somewhat to take up the curvature of the keel stump, but still left a void. I didn’t like this system and I wanted the mating surface to be perfectly flat. After consulting with a boatbuilder, I opted to use G10 — a high-pressure fiberglass laminate with incredible compression and tensile strength — to make a washer that would enable a flatter surface.
I cut circles from a ¼-inch-thick sheet of G10 with a 2.5-inch-diameter hole saw. Because G10 is extremely smooth, I scoured it with 60-grit sandpaper to ensure it would properly adhere to the substrate. I increased the mandrel hole to accept the diameter of the keel bolt.
It was critical that I center the G10 washer while I epoxied it in place. I decided to use the keel bolt, greasing it up first so that the epoxy wouldn’t stick to it. After the epoxy cured, I could remove the bolt, clean it, and reinstall it with final sealant. With the hardware sufficiently protected, I slid the bolt through the center of the G10 washer, then applied a large amount of marine epoxy, thickened with microballoons to a peanut-butter consistency, to the underside of the G10 washer and put the keel bolt into the hole.
I snugged the bolt down with the nut on the other side of the keel to make sure the alignment was correct and the epoxy made good contact with the keel stump without voids. I wanted to make sure that epoxy squeezed out all around the G10 washer. I used a popsicle stick to smooth the excess epoxy into a ramp around the washer.
I let the epoxy cure according to the manufacturer’s recommendations and then loosened the nut and removed the bolt, using acetone to de-grease it. To seal the bolts, I applied Sikaflex 291i sealant inside the bolt hole and on the mating surface of the G10 washer. I then reinstalled the bolt with a thick stainless steel washer between the bolt head and the G10 washer. The threads on the keel side were covered in Sikaflex so I cleaned them — it’s important to immediately clean up excess Sikaflex with acetone — and then installed the washer and nut to hand tight.
I let the Sikaflex cure for an hour, and then with Fiona on the bilge side, I torqued the nut to specifications, being very careful to turn only the nut, not the bolt or washers. I used red Loctite to reduce the risk of the nut unthreading. We couldn’t find torque specs for our boat, so I used a generic torque chart, which specified 60 foot-pounds for a 13-millimeter 316 stainless steel bolt. I saw torque specs for other boat manufacturers that recommended up to 80 foot-pounds for ½-inch keel bolts; however, I felt 60 was substantial and I didn’t want to risk damaging the bolt.
I repeated the process in sets of two for all keel bolts, which took two days.
Before moving to the next step — filling and fairing the keel pockets — we tested the keel bolts by filling the bilge completely with water and letting it sit for 48 hours. This increased the job time, but I wanted to make sure that there were no leaks. After 48 hours, no runs, no drips, so we removed the water and dried the bilge.
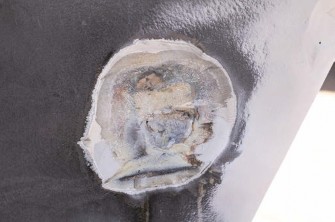
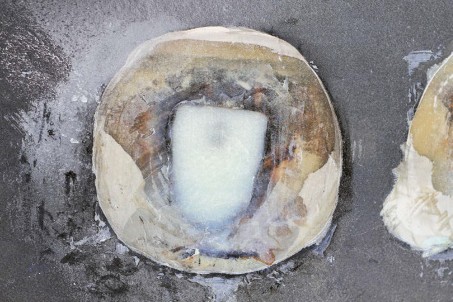
Now that we knew the bolts were properly sealed, we could fill the keel pockets and fiberglass the keel. I used marine-grade epoxy thickened with microballoons to peanut-butter consistency to fill the pockets. I filled one in a single application of epoxy, but the heat generated by the exothermic reaction caused the epoxy to cure too quickly and entrap gas, creating voids. I also didn’t like the effect the heat might have on the Sikaflex seal around the bolt. So, for the remainder, I applied the epoxy in 2-inch layers.
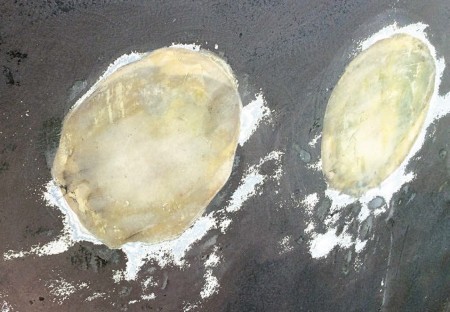
After filling all the pockets to a level slightly proud of the metal of the keel, I used an angle grinder with a flap disc to grind the epoxy to a smooth, even surface, flush with the metal of the keel. I added five layers of fiberglass with epoxy resin, which must be used to adhere to the epoxy filler compound.
I cut the fiberglass into various sized circles, starting with the largest circle of mat and working outward to the smallest circle. This is better than the reverse, since I’ve learned that going small to large can cause voids where the larger circle overlaps the smaller.
When the layers had cured, I used an angle grinder and flap disc to grind the fiberglass to a smooth and even surface contoured to the rest of the keel. I used Interlux Watertite Epoxy Filler to go over the repaired areas to create a perfectly smooth surface. I sanded the Watertite with 80-grit sandpaper, careful to keep the contours of the keel. Most of the Watertite was removed, with specs remaining in tiny voids in the fiberglass mat.
An optional step before bottom coating the hull is to add barrier coat. But, if the Watertite filler connects to the original barrier coat on the hull, this step can be skipped as there is a continuous barrier coat.
I opted not to reinstall resin caps over the bolt heads in the bilge so that I could see the bolt heads and retorque the bolts down the road, if necessary. I think this is personal preference and others might be well justified in reinstalling resin caps.
Ten-thousand ocean miles later we have had no complaint from our keel bolts, and for the first time in our boat-owning lives, we’ve had a dry bilge. We saved thousands of dollars by doing the work ourselves, and although it was fiddly at times, it wasn’t an overly complicated or difficult task.
Make Fluorescent Penetrant Dye and Black Light
An easy fluorescent dye can be extracted from a highlighter. Simply remove the highlighter felt and squeeze out the liquid into a bowl. You can add water to increase volume. Wear gloves. Create a black light by putting clear tape over a flashlight or headlamp. Color the tape blue with a marker pen, then put another layer of tape over the first layer and color it purple. The result will be mostly UV-A light, also known as a black light.
Robin Urquhart is a Good Old Boat contributing editor. His master’s degree in building engineering and his skills as a diesel mechanic have been severely tested since he and his partner, Fiona McGlynn, headed south from Vancouver on MonArk, their good old 1979 Dufour 35. Check out their website, youngandsalty.com, where they reach out to younger sailors who share a passion for good old boats.
Thank you to Sailrite Enterprises, Inc., for providing free access to back issues of Good Old Boat through intellectual property rights. Sailrite.com