A few tricks of the trade add sparkle to springtime varnishing rules
Issue 12 : May/Jun 2000
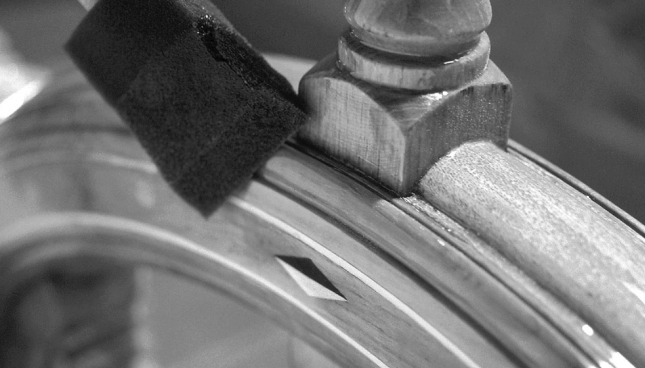
Varnished wood on a fiberglass boat is a waste of time,” says my neighbor, who is a devout wooden-boat fan. “You’re just trying to cover up the fact that you’re sailing around in a big Clorox bottle.”
Like all zealots, my neighbor overstates the case a tad. So when I gently pointed out that all paints and varnishes are intended to be coverups, even when used on wooden boats, he turned away in disgust. But in its most basic form, any coating on wood, fiberglass, steel, aluminum, or ferroconcrete is meant to do just one thing: protect the underlying material.
In fact, wood needs protection at least as much as any synthetic material, usually more. And so, every spring, owners of good old boats must decide what wooden parts of their boats get rejuvenating coats of paint or varnish. From companionway hatches and handrails to dinghy thwarts and navigation tables, a glossy new coat or two of finish today will always bring compliments for the rest of the sailing season.
Most oil-based paints and varnishes come with specific instructions on how to get the best results. If you carefully follow all the directions on the can, you can expect a handsome finish that will protect the surface and increase the life expectancy of the object under the new coating. But over the years, I’ve learned some small but essential painting and varnishing techniques that go beyond the can’s directions. Using them, I’ve achieved better results, saved some time and money, and maybe even improved the environment.
Cold cure
Too often, many paint and varnishing jobs are postponed or even canceled because you’re waiting for “just the right weather.” This is usually defined as dry sunny days with temperatures in the high 70s. In Maine, the sailing season would be half over if I held out for those conditions.
Instead, I’ve found I actually get better results if I paint and varnish when temperatures are in the 40s and 50s. In fact, if you can work in a garage, under a winter cover, or in some other outside shelter, painting during cool, damp, or even rainy weather works best. Here’s why:
Most oil-based paints and varnishes need time to “lay down.” This is a process by which the layer of finish spreads evenly over the surface of the object. Done properly, the finish lays down without any sags, runs, curtains, or drips, resulting in a gloss that rivals a mirror.
However, in warm dry weather, the amount of time for a finish to lay down is decreased. The finish “sets up” quickly, very often before you can spot imperfections and brush them out. But my cold-cure method of painting significantly retards the drying process. This gives you plenty of time to see all the problems and fix them before they become permanent.
As for doing finish work in a shelter on rainy days, I’ve found the advantages are twofold. First, the dampness keeps dust, bugs, and other airborne miscreants to a minimum. This is important for a contamination-free finish. Also, the dampness allows me to paint at slightly higher temperatures and still have a slow cure. So even with temperatures in the 60s or low 70s, a finish brushed on during a rainy day has plenty of opportunity to lay down properly, plus I have ample time to correct problems.
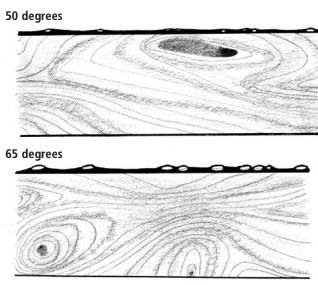
The only drawback to the cold-cure finishing technique is when it’s used on bare porous woods like Spanish cedar, some mahoganies, or oak. In this situation, a modest change in temperature (15 degrees or so) can make the finish bubble up out of the pores when the temperature rises (see sketch above). In fact, I’ve seen this happen in perfect finishing weather, particularly when the object is finished in the shade and the sun hits it a few hours later.
Preventing this problem is easy, though. Most paint and varnish manufacturers offer a paste filler specifically designed to smooth a porous surface before the finish is applied. Most paste fillers are available in various colors or in a semi-clear formulation.
Using the cold-cure method, I’ve found it only takes an extra day or so for the finish to cure completely. If you do your boat maintenance on weekends, it’s therefore best to save the finish job until Sunday morning. That way you won’t care about the extra day for curing because you’ll be back at your regular work anyway. Moreover, you can spend Sunday afternoon hunting down and correcting imperfections that develop as the finish lays down.
Sags and drags
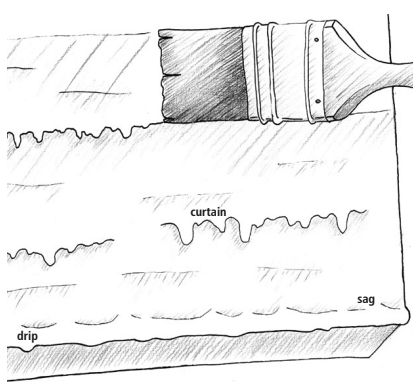
Even using the cold-cure method, some day you will face a sag, curtain, drip, or other blemish in your finish (see sketch at right). As already mentioned, if you catch this before the finish has cured, the problem can be brushed out. This is done with a natural-bristle brush that has just enough of the finish on it to coat but leave the bristles very loose. It’s called a “dry brush,” which is not the same as a “clean brush.” A dry brush’s relative lack of paint or varnish helps pick up some of the excess paint causing the drip, sag, or curtain. Avoid using a clean brush (no paint or varnish on it at all) or a brush that has been recently cleaned with thinner. Both will create more problems than they solve.
Unfortunately, sometimes excessive-paint defects turn up after most of the new coating has cured. Though difficult, remedial action is still possible.
Sags, curtains, and drips are all a result of excess paint or varnish building up. This is important to keep in mind because fresh excessive-paint or varnish defects usually have not completely cured; just the defect’s surface has cured. So removing defects is a job for a razor, not sandpaper. If you use sandpaper, once it breaks the surface of the defect, the underlying damp paint or varnish will clog the sandpaper and spread a sanding dust/uncured paint or varnish all over the immediate area. Sanding may also gouge out some finish material, leaving a slight depression where the bulge was.
A single-edge utility razor is the best tool for this job. Hold it at a low angle to the surface and slice off the top of the bulging paint or varnish. This will cut the bulge level with the surrounding cured paint and also give the uncured paint or varnish under the bulge a chance to dry.
Once it does dry (usually in a day or two), it can be sanded smooth with 180-grit sandpaper. Then all of the paint or varnish can be prep-sanded with some 320-grit sandpaper and another coat applied. But remember, as the paint cans always warn: two thin coats are better than one thick coat.
Spot repairs
Sometimes, a spot repair is necessary before the entire object is refinished. Oil-based paint is easier to repair than varnish, but both require steps you won’t find written on the can.
Before you begin a repair, be sure it’s not indicative of a more serious situation. Peeling paint or varnish may signify incipient rot in the structure underneath the paint. Gently probe the area in and around the peeling finish with a thin-bladed, sharp-pointed knife. If the blade slips more than an eighth of an inch below the structure’s surface, you’ve probably got rot problems.
On the other hand, peeling paint or varnish may just be indicative of a sharp blow to the area from a previous season. In varnish, such a blow can also cause a symptom known as crazing, which is characterized by lots of small cracks radiating out from a central point. In either case, all of the finish in the area plus about two inches beyond the area must be removed by scraping and/or rough-sanding. Then the area is sanded smooth. Then tape the area off and begin filling.
For paint, there are opaque fillers that have so much body you’ll be able to fill and begin repainting the entire object in a day or two. Most paint companies have a list of recommended fillers and their uses.
For varnish, though, filling is painstaking because no one has invented a truly clear filler. So filling must be done on a coat-by-coat basis. To accelerate this process, I use an ordinary blow-dryer on a fairly low heat setting. This allows me to put two thin coats of varnish a day on the affected area. It takes a few days to fill the area of repair.
The other problem with repairing varnish is the color of the wood in the repair area is difficult to match with the surrounding wood. Depending on the wood species, the problem may take care of itself when exposed to the sun. Some paint companies recommend stains that will very nearly match the newly exposed wood with the surrounding wood. The best paint companies have toll-free telephone numbers to help with problems like this. Use them. The numbers are usually printed on the paint can.
Once the repair area has been filled and properly built up, remove the tape and use some 220-grit sandpaper to make both the repair area and the rest of the object’s surface completely smooth and consistent. Then finish the object with two thin coats and prepare for the compliments.
Ken Textor has lived and worked aboard boats for 22 years. He contributes to a number of sailing periodicals and offers boat deliveries and pre-purchase surveys for other mariners. Ken’s latest restoration project is an Allied Seabreeze.
Thank you to Sailrite Enterprises, Inc., for providing free access to back issues of Good Old Boat through intellectual property rights. Sailrite.com