Issue 16 : Jan/Feb 2001
There was very little wrong with our 1976 C&C 30, Mystic, when we bought her. The raw-water pump impeller was about to fail, the mast wiring needed to be replaced, and the hinges on the toilet seat were loose and about to break. The impeller and wiring are another story. The hinges on the toilet seat were obviously loose and distorted, and failed altogether soon after we took possession of the boat (or she took possession of us, depending on how you look at it).
I replaced the hinges with standard hardware-store parts that seemed equivalent. The new parts were not in service all that long before I replaced the head altogether, simply because a new one, on sale, cost just $30 more than the pump rebuild kit the old one needed.
In very little time the new hinges also failed, and I installed the hardware store ones again from the old head. Right . . . I had not thrown it away yet. I was starting my own marine junkyard. By this time I was beginning to study why these hinges failed so quickly.
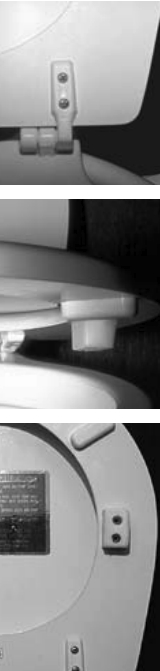
We’ve all seen toilet seat hinges that have failed on toilets that have never been to sea. This bit of hardware is not overdesigned, even for shore-bound use. In most cases, however, hinges will last many years in home use. Shore-bound toilet seat loads are quite low and almost purely vertical, while toilets used at sea have very high loads that are often horizontal. Yes, I know that a well-designed head compartment would have handholds to help the seated person maintain position in a heavy sea, but this design feature is rare, especially in smaller boats. Staying in place in heavy weather in the head compartments of most boats involves using the seat as an anchor point, and this will quickly destroy the hinges.
I reasoned that these hinges needed help with high horizontal loads. When replacement time came again, I added two pieces of high-density polyethylene to the bottom of the seat. I fitted them so they contacted the bowl near the widest point on both sides (see middle and bottom photos). When the seat was pushed to one side or the other, it immediately pressed the newly added stop against the bowl. These stops took most of the side loads imposed on the seat in heavy weather. The stops could have been made from hardwood instead of plastic. If made from wood, they should be painted to make them easy to clean. I was careful to measure the thickness of the seat and to use fasteners that would go almost all the way through the seat, but not quite come out the other side.
I used two #12 stainless sheet-metal screws per side and counter-bored the holes in the stops to adjust the maximum penetration into the seat. For a tap drill in the seat, I selected a drill that was roughly equal to the minor diameter of the screws. I put masking tape on the drill so I could gauge how far it penetrated into the seat. I used C-clamps to custom-fit the stops to the seat and then used the stops themselves as drill guides. This works best if the stops are initially drilled with the tap drill instead of the clearance drill. After the seat was drilled, I drilled the stops to the clearance drill size.
So, how does all this work? In heavy weather, the seat feels like it’s screwed to the bowl. I did the modification four years ago, and the hinges are still very tight, and look as good as new. I still carry spares, of course, but I have not needed them.
Now, I wonder if I should do the seats at home . . .
Thank you to Sailrite Enterprises, Inc., for providing free access to back issues of Good Old Boat through intellectual property rights. Sailrite.com