Oars: How to choose ’em and use ’em
Issue 30 : May/Jun 2003
Although some dinghies can handle outboards and some have sailing rigs, every dinghy has a set of oars. The ease and pleasure of rowing a small boat depends on its hull design, oars and oarlocks, and the skipper’s technique. In every dinghy the types of oars and oarlocks, as well as the rowing technique, are contributing factors to a dinghy’s practicality. Not only is a rowing dinghy great for taking out that storm anchor or bringing ice from the marina, but leisurely rowing through an anchorage allows conversations with other boatowners, a social event that’s impractical when using an outboard or sailing rig. (For a discussion of dinghies themselves, see Page 51.)
Oars
Oars come in many lengths, shapes, and levels of quality. When you visit your local marine store, you’ll find a good selection of oars, but how do you choose the best? People have argued for years over which wood was the most perfect for oars. Most are made from basswood or spruce.
There are about a dozen species of basswood, or linden, which grows in the temperate zone of the Northern Hemisphere. Basswood is the choice of hobbyists, since its wood is light, soft, and easy to carve. Nonetheless, it is tough and durable and is a reasonable choice for oars.
Spruce doesn’t rot easily. It is considered by many to be the best oar material for recreational rowing, since it is very light yet has a good strength-to-weight ratio. Sitka spruce, a special variety of that species, grows in moist sites along the coast of British Columbia and can attain heights of 300 feet. Because of the height of the tree’s stem, the wood is usually straight-grained but has a lower resistance to decay than other spruce varieties. For oars, it is light in weight and moderately strong.
Oars made from the ash tree are the heaviest and strongest and are recommended for extremely hard usage. However, ash oars, because of their weight, are not as easily used as oars made from lighter-weight woods. Ash is the common name of a large variety of trees found in northern North America and Europe. The trees grow to a height of 100 to 150 feet. Their wood is fine-grained, tough, and hard, ranking next to oak in strength and durability, so it holds up well.
Occasionally you’ll find oars made from sassafras, maple, or cherry. Oars and paddles made from these woods are prized by their owners since these woods have the look of a fine piece of furniture when varnished. Oars of sassafras are light, flexible, and darken to a rich walnut color as they age. Using these woods tends to make oars a bit more expensive.
If you look closely, you’ll find that most oar blades are made from three pieces glued together (laminated). The best and most expensive oars are those that have been cut from a single piece of wood. The expense is partially a result of the waste involved. While the shaft of laminated oars can be made from a 2-inch by 2-inch piece of lumber, one-piece oars are made from 2-inch by 6-inch boards — so the wood stock costs nearly three times as much.
Blades on most oars are straight and come in a variety of shapes and sizes. In the early part of the last century, quality oars came with copper blade tips to protect them from wear. Now this protection usually is made of epoxy or sometimes epoxy and fiberglass. The firm of Shaw & Tenney, of Orono, Maine, which has been manufacturing oars and paddles since before Abraham Lincoln was president, supplies oars with inlaid cherry tips. This hardwood resists wear and creates an elegant contrast. Other manufacturers, such as Lahnakoski of Finland, use wood wedges that are mortised into the tip of the oar.
Oar length
Once you’ve decided on your oar material and construction, length is the next consideration. A rowing dinghy should have the longest oars possible. Generally, the length of an oar should be at least 1.5 times the beam. So a dinghy with a 4-foot beam should have 6-foot oars. For dinghies with very high freeboards, longer oars are required.
The Pardeys suggest oars up to three times the beam. Many oar manufacturers use the formula that the oar length should be beam times 25, divided by 14 (to the nearest 6 inches). This would give an oar-length of 7 feet for a dinghy with a 4-foot beam. The controlling factor here is that the oars should be able to be stowed inside the tender. To this end, some long oars are made in sections. A few rowers (usually those who have grown up rowing racing sculls) prefer to row with the grips of the oars overlapped. In that case, add 6 inches to the above figures.
Oar maker Shaw & Tenney uses a slightly different formula to calculate oar length: measure the beam of your boat in inches between oarlock holes, divide by 2, add 2 inches, divide by 7, and multiply by 25. This formula gives you the oar length in inches, which will produce a leverage ratio of about 7:18.
The diameter of the shaft of an oar depends on oar length. Shafts generally vary from 1 3⁄4 inches for the shorter oars to 2 1⁄2 inches for the long ones. Although shafts are usually round and turned on a lathe, square-shaft oars, popularized by R. D. Culler, are also available. With square-shaft oars you’ll have to use the pinned-type oarlocks.
The rate of the rowing stroke is proportional to the oar length, with the longer oar resulting in a slower rate. A rate of about 30 strokes per minute is comfortable for recreational rowing.
Oar maintenance
Oars are usually sold already varnished. However, some are sold bare. Although varnishing allows you to see the condition of the wood, it requires regular maintenance. Paint is more practical but can hide faults in the wood. Although varnished oars seem to be the norm, I advocate painting oars— at least the lower part of the oars — with white, marine-grade paint. If you have ever tried to find a pair of varnished oars in the water at night, you’ll understand why. Whether oars are varnished or painted, it’s a good idea to leave the grips bare. Varnished or painted grips are slippery when wet.
Whenever oars are not being used, keep them out of the sun and weather as much as possible. This is especially true if they have laminated blades.
Oar protection
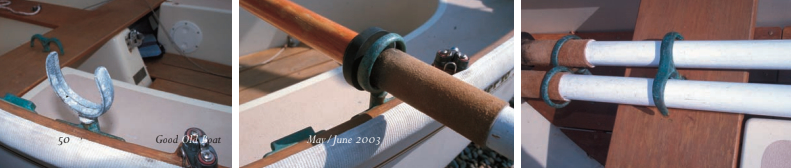
When your dinghy is being towed, make sure your oars are secured to prevent loss. Although the oars can be tied down, a better idea is an oar yoke, which fastens the oars through the seat of a dinghy. This yoke is usually bronze. The one-piece version can be fastened in place from under the seat with a clevis pin. When the dinghy is left at a public dock or on the beach, a padlock can be substituted for the clevis pin to discourage theft or kids’ joyrides. Edson makes a two-piece bronze yoke, where the clevis pin or padlock is above the yoke.
Oarlocks
There are many types of oarlocks, or rowlocks, available. For children and rowing novices, the U-shaped, or “horn” oarlock (sometimes called the North River horn oarlock), with a pin through the oar, is the most common and easy to use. (The term “horn” is usually applied to U-shaped oarlocks, which resemble the horns of a bull.) With a pinned oarlock, the pin through the oarlock and oar keeps the oar and oarlock together and keeps the blade vertical. This is not the ideal type for rowing, however, especially while rowing into the wind or chop, when feathering the blade is a great advantage. When I began rowing my own boat — at about five years of age — my father would not allow pinned oarlocks (he was on the rowing team at Cornell).
Another type of horn oarlock, extensively used before World War II, was an oarlock where the pin was on the rail and the oarlock horn had a socket in its bottom that fitted over the pin. A variation of the pinned oarlock is the Wynn post-and-clamp oarlock, which consists of a metal clamp that bolts around the oar and is attached through a pivot to a post that fits in the gunwale socket.
U-shaped, unpinned oarlocks — also a horn-type oarlock — were originally called crutches. These oarlocks are not fastened to the oar and allow feathering. A big advantage of unpinned oarlocks is that in close quarters you can pull the oar inboard and still maneuver. Unpinned oarlocks require practice, however. They must be tethered to the boat so they are not lost overboard. These oarlocks have holes in their casting for just that purpose. Although a short nylon lanyard will suffice, commercially available chains with a short bar at the end are also used. Of course, this chain and bar cannot be used with top-mounted gunwale sockets. Oarlock materials vary widely: inexpensive pot metal, Delrin plastic, galvanized steel, stainless steel, and bronze.
For the rowing perfectionist and those with very narrow boats, there are also outrigger oarlock brackets that extend the socket of the oarlock about a foot beyond the side of the dinghy. This type of oarlock, however, is impractical if the rowboat is being used as a tender.
My personal preference is for the round-type oarlock. It becomes part of the oar and cannot be lost over-board, but it takes two hands to put the oar in place.
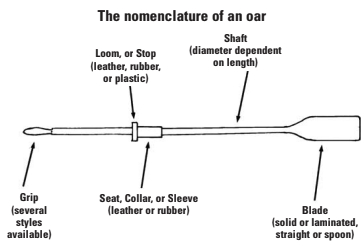
Unpinned oars need a stop. This stop is the raised section on the oar just inside the oarlock. It’s often made from leather wrapped around the oar several times and secured with copper nails. The stop prevents the oar from sliding out into the water if you release your grip and, in round type oarlocks, it keeps the oarlock connected to the oar. If you are installing round oarlocks on your oars, be sure to slide the oarlocks in place before the loom, or stop, is installed.
In place of leather looms, hard rubber or plastic ones that are slipped down over the grip of the oar and pushed into position last longer and require less maintenance. The stops should be positioned so that when the oars are held in a horizontal position, the grips of the two oars are almost touching (unless you like rowing with an overlapping grip).
Just outboard of the loom are leather seats, collars, or sleeves where the oar comes in contact with the oarlock. Leather seats can be installed with contact cement to hold them in place temporarily; then they can be herringbone-stitched or fastened in place with copper nails. Rubber or plastic sleeves are also available. Naturally, these sleeves must be installed before the loom or stop. One-piece combination collars and stops are also available in hard rubber or plastic. Since shaft-diameters of oars vary, be sure to check that dimension before ordering rubber or plastic collars and/or stops.
Oarlock sockets, or gunwale sockets, come as top-mount or side-mount and, as with oarlocks, are made in a variety of materials. The Davis oarlock and gunwale socket is a horn oarlock/socket combination where the oarlock can be flipped down out of the way when not in use, but remains attached to the gunwale socket.
Rowing technique
Even though you may have the ideal dinghy and the best of oars and oarlocks, it all comes down to your rowing technique. There’s not much practice or technique required for oars with pinned oarlocks, but unpinned oars take a little getting used to.
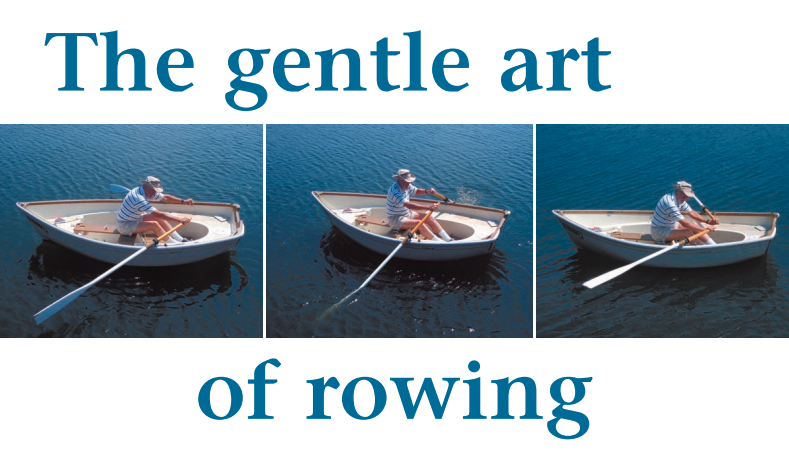
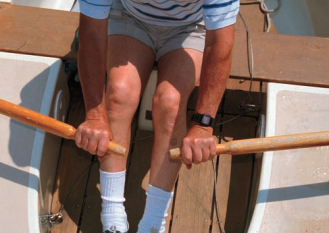
Good rowing technique requires that you use as many muscle groups as possible — not just your arms. With your wrists straight, grasp the oars so the blades are vertical. Lean well forward with your arms extended in front of you, and put the oar blades in the water with their upper edges just at the surface. Pull on the oars by straightening up your body, keeping your hands level, and using leg power to prevent you from sliding off the seat. Near the end of the stroke, your arms can be flexed for that added measure of blade-distance in the water. During this power stroke, the blades should not come out of the water or dip too far below the surface.
When you have completed the power stroke and begin the recovery, feather the oars by rotating your wrists downward so the blades are almost parallel to the surface of the water. This feathering reduces wind resistance on the blades, making it easier to row into a strong wind. In a chop it also prevents the oar from hitting the top of a wave. As the oar blades are returned toward the bow of the boat, you should be in the original position, leaning forward with your arms outstretched. Now rotate your wrists upward so the oars are at 90 degrees to the water, lower the oars into the water, and begin your next power stroke.
Keeping on track
To keep on track when rowing, point the dinghy in the direction you want to go, then select some fixed point astern — a point on land, an anchored boat, or a relatively stationary cloud formation, and keep that reference point dead astern. Naturally, you have to look over your shoulder occasionally to make sure there is nothing or no one in your way.
Sculling
Sculling is an alternative to rowing that is not seen much anymore. This method uses a single oar astern, in replication of a swimming fish. Nearly all dinghies of the 19th century and earlier had a sculling notch cut in their transom. The notch was about 3⁄4 inch wider than the sculling oar. Sculling now is almost a lost art and few dinghies have a sculling notch in the transom. However, the Pardeys, who have sailed the globe, are able to scull their engineless Taleisin, with 17,900 pounds displacement, in and out of harbors and anchorages at about 1 1⁄2 knots (with no wind) using a sculling oar.
Thank you to Sailrite Enterprises, Inc., for providing free access to back issues of Good Old Boat through intellectual property rights. Sailrite.com