Here’s how to preserve your own meats and fish
Issue 31 : Jul/Aug 2003
Centuries ago, scientists discovered that sterilized foods in a sterile vacuum-sealed container do not spoil. Since then, frozen, freeze-dried, and irradiated foods have come into the marketplace, but it’s still hard to beat the simplicity, low cost, safety, and reliability of canned foods for cruising — the canning process creates its own vacuum. Home-canned meats have always been on our provisioning list, yet I continue to meet people who are amazed that beef, poultry, pork, lamb, and even organ meats can be canned for the long haul. Yes, meats can be canned much like tomatoes or peaches (with some caveats) and, no, you don’t need salt, pickling spices, or saltpeter.
In fact, that’s the beauty of it. I fill jars with nothing but meat — no fat, skin, gristle, bones, salt, or chemicals and none of the heaven-knows-what else that is found in commercially canned meat products. Later, I can add herbs, sauces, gravies, and vegetables to create whatever dish suits a chef’s whim.
Best of all, canning jars are reusable. We’ve arrived back from a cruise with a supply of mahimahi canned in the same jars that were filled with meat when we left months before. In 10 years of full-time, liveaboard cruising, I never had a glass jar break or a jar of meat go bad.
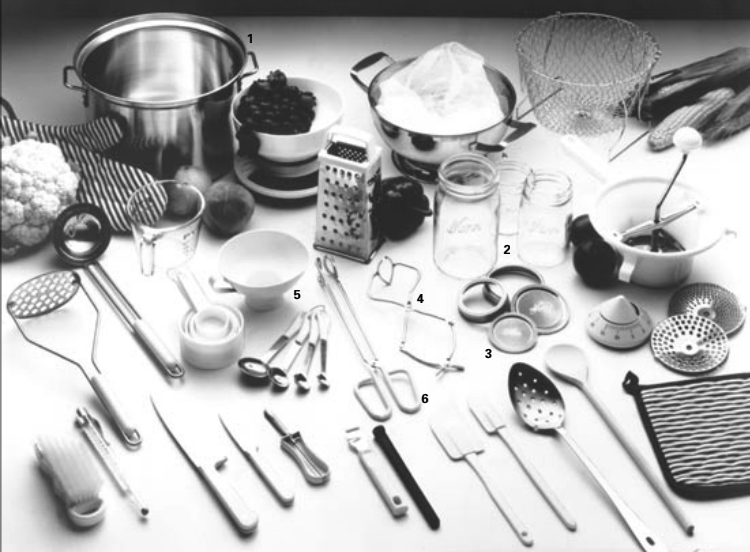
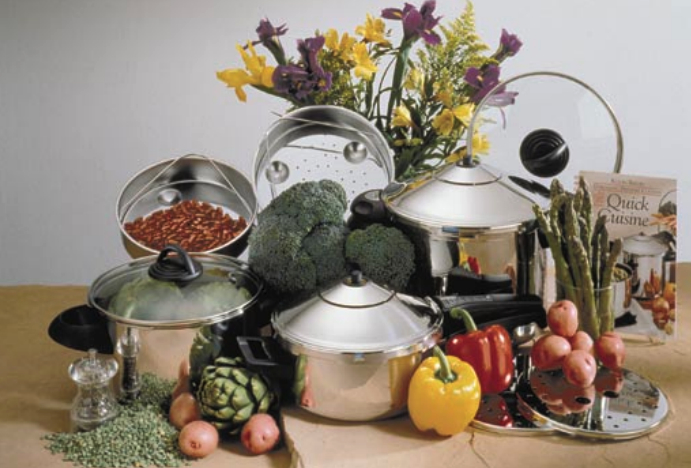
To can your own meats, you need a large pressure cooker or pressure canner. As a liveaboard without enough space to carry a canner, I used the same, four-quart pressure cooker that was also my galley saucepan, stovetop oven, stewpot, and rice cooker. It holds four pint jars, or the equivalent of four pounds of meat at a time. If you have a home base with plenty of space, invest in a 22-quart canner large enough to can large batches of quart, pint, or half-pint jars. Forget the water-bath canning kettles (1) that grandmother used unless you’ll be canning tomatoes or making jelly and pickles. Water-bath canning is no longer considered safe for canning meat and fish.
No substitutes
You’ll also need a supply of canning jars (2) and two-part lids (3). No substitutes. Ordinary jars can break from the high temperatures involved; new lids are essential to getting a good seal. You also need a tool called a jar lifter (4) because it’s difficult and dangerous to handle hot, wet jars with oven mitts. I also have a wide-mouth canning funnel (5) for easier, cleaner filling and tongs (6) for handling hot, sterilized lids.
Buy boneless, skinless, well-trimmed meats, such as chicken or turkey breast or thighs, rump roast, lean ground meats, stew beef or lamb, and pork chunks. If you like them, liver and heart meats can also be canned. So can venison, elk, or moose from the hunt, as well as fish and other fruits of the sea. Don’t can corned beef or ham. These are available from commercial canners. And steer away from expensive cuts of meat, which will be reduced to mush in the canning process.
Yes, you can buy cheaper cuts and whole chickens, but you’ll end up spending a lot of stove fuel and time to stew, de-bone, de-fat, and otherwise strip out the pure meat for canning. In this case, it pays to buy cuts that are cheap (because they are tenderized in the long canning process) but also lean and boneless. I recommend against canning whole chickens, bone-in chicken breasts, or drumsticks because tiny bones are almost impossible to fish out after the chicken is canned, and they pose a choking hazard. (Small fish bones, by contrast, dissolve in the canning process.)
Now it’s a simple matter of stuffing raw meat into hot jars that have been washed, then heated in the oven for 30 minutes at 250 ̊F. Neither salt nor water has to be added, although you could add salt and a little water or broth if you like. Don’t add herbs; it’s better to add them to the final dish. Leave an inch of “head” space for expansion, top with a flat lid that has a rubber seal, then screw on the ring. (The flat lids and rings should also be sterilized by boiling 10 minutes; leave them in the hot water until used).
Bring to boil
Place the filled jars on a rack in a pressure canner or cooker with hot water as directed by the canner manufacturer. Lock on the lid and bring to a full boil, allowing steam to escape for 10 minutes. This assures that no air remains in the cooker. Then put on the gauge or weight, let pressure rise to 10 pounds, and start counting the canning time. For meats, it is 75 minutes for pints and 90 minutes for quarts. Cook fish for 90 minutes for either pints or quarts.
When the time is up, turn off the heat and let the pressure cooker normalize on its own. Then open the lid very carefully to avoid steam burns and, using the jar lifter, place jars on the counter on a folded towel (to avoid shock to the glass jars), assuring good air circulation around them. Tighten the rings if you like, but don’t strain yourself. In the old days of zinc lids and rubber rings, more torque was needed; new canning lids don’t rely on a powerful grip. Let the jars cool undisturbed.
You’ll soon hear the “pop” as the seals seat in. Boiling inside the jars may continue for up to an hour; don’t be concerned. Your meat is now in a vacuum and the lower the pressure, the lower the temperature at which water boils. When the jars cool, you’ll see a slight cupping in the lid, indicating a vacuum. Sealed jars also sound different when tapped with a fingernail. Try it. You’ll soon recognize the difference.
Rings can be removed after the jars cool — lids are held in place by the vacuum — but I leave them in place for added protection against the jostling they receive in the boat.
Your meat supply will now keep for a year or more. Label and date the jars and stow them carefully (to avoid breakage) in a cool, dry spot away from engine heat or direct sunlight. Wetting, especially with salt water, should be avoided because corrosion could eat away enough metal to break the seal. If lids swell or fall off, you know gases have formed in the jar and the meat must be discarded.
Boil it again
When jars are opened, you’ll hear a reassuring pop. If the meat looks or smells bad, discard it without tasting. If it looks and smells good, it is additional insurance to boil it for 10 minutes. Botulism, which is tasteless, is extremely rare in properly canned meats but it is killed by heat.
One of the pluses of having a supply of canned meat on hand is that it’s already cooked, so dinner is only a few minutes away. If you have fresh foods, just add them to complete the dish. If not, add a can of spaghetti sauce to a jar of ground beef, and you have a meaty “homemade” sauce. Add fresh and canned vegetables plus seasonings to beef cubes, and you have beef ragout. Add canned carrots, a can of potatoes, a jar of gravy, and a jar of boiled onions to lamb chunks, and you have Irish stew. Make soup, lasagna, hot roast-beef sandwiches, chicken and dumplings, and much more. Add eggs, minced onion, and bread crumbs to canned fish and make into patties to fry to a crusty brown.
The possibilities are positively uncanny.
Thank you to Sailrite Enterprises, Inc., for providing free access to back issues of Good Old Boat through intellectual property rights. Sailrite.com