A crafty sailor converts a water tank into a chain locker
Issue 32 : Sept/Oct 2003
The stock water tank in my 1965 Columbia Defender 29 was a plastic, 25-gallon, tapered, trapezoidal thing under the V-berth way up forward. It had evidently leaked from the outlet nipple, as the previous owner had made several attempts at repair. There were wraps of tape and gobs of some hard, putty-like substance all over the nipple and hose connection. Filling was accomplished by dragging a garden hose through the foredeck hatch, lifting the berth cushions, and unscrewing a cap on top of the tank through a small lift-out lid in the plywood V-berth flat.
I never liked the setup, and the tank still leaked, so I abandoned it. In a multi-year rebuild, I changed the interior plan to include a peninsula with a sink and a permanent dinette, and I built a water tank to fit under that. This put the weight closer to the center of the boat and minimized the hose run from tank to sink. I just forgot about the old tank up forward.
When I converted to an all-chain rode and manual windlass, the subject of storing 200 feet of 1⁄4-inch chain arose, of course. My thoughts instantly fell to the water tank, lying empty for years. I determined that the weight of the chain would be less than the weight of water in a full tank, so trim would not be adversely affected.
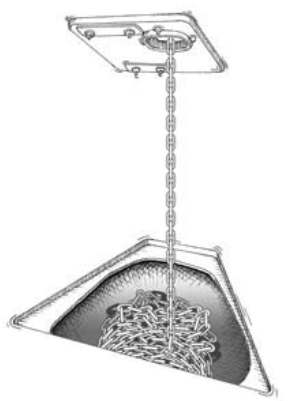
I mounted a Lofrans windlass on the foredeck, approximately over the water tank, which happened to be the ideal location for the windlass anyway. I installed a deck pipe so the chain could drop straight down into the V-berth area.
Next I used a jigsaw to remove a large portion of the plywood berth flat over the water tank. I left about four inches of plywood and tabbing where the ply met the hull sides. This hole was about 4 feet wide at the aft end, 2 feet at the bow, and about 30 inches long, exposing the whole tank. At that point I was not sure whether to remove the tank or leave it in place. I cut away the top of the tank, leaving about two inches of the top to form a lip. After looking it over, I decided that the tank would make an excellent chain locker and keep the chain off the hull.
Formed tabbing
The tank as installed just rested on the hull, and the factory simply laid a bit of 4-inch fiberglass tape on top to sort of hold it in place, forming some tabbing between the hull and tank top. . . of course it was that poly-plastic that nothing sticks to. The result was that the tank moved around quite a bit under the little tabbing pieces.
I bought a few cans of high-density expanding foam and shot that all around and under the tank to make a form-fitting nest. It didn’t move after that. Then I made a lift-up lid out of the plywood piece I cut out of the berth. This rested on wooden cleats I screwed to the underside of the hole.
To use the locker, I simply flipped up one or both cushions and the lid, and the chain would freely drop straight down into the “bin” or run up to the windlass mounted on deck directly above it.
When underway and after anchoring, I kept the chain out of the way by leading it through a small cutout in the lid and up the hull side, looping it over a hook under the deck (similar to a swag lamp) and then leading it out the deck pipe. This freed the V-berth for sleeping. The only time the cushions and lid needed to be lifted was when the chain was running out or in, while setting and weighing anchor.
I thought this was a pretty elegant solution to storing 200 feet of chain and getting some use out of an abandoned tank and wasted space. An unexpected benefit was created when I led the old water line (a length of garden hose) from the tank outlet to the bilge. The hose then became the drain for any water coming in with the chain.
Thank you to Sailrite Enterprises, Inc., for providing free access to back issues of Good Old Boat through intellectual property rights. Sailrite.com