An inspired solution to an intimidating problem
Issue 52: Jan/Feb 2007
BELOW THE WATERLINE OF VESPERA, THE 51-FOOT CUTTER I had chosen as a refit project, the entire gelcoat surface was star-cracked. The gelcoat cracks resembled a shattered car windshield or spider web. Pieces of gelcoat between the cracks ranged in size from 1⁄2 inch to a few square inches.
I had discounted the star cracks as a mere coating issue. But the estimate I received to cure the problem was more than $30,000. Naturally, I found this out after I bought the boat. On the other hand, no blisters were present. Perhaps because no blisters were visible and moisture meter readings of the hull showed low moisture levels, previous surveys had overlooked this problem with the gelcoat.
But how could I have disregarded such a visible problem? Before I bought Vespera, the boat had been surveyed and I had contacted two boatyards as well as the original manufacturer about the star cracks in the hull. In addition, I had years of boat restoration experience.
Because star cracks are unusual, no one could offer much helpful advice or a strong warning. The boat manufacturer listened a little but did not say much. One of the yards told me to test the gelcoat to see how thick it was. They had experience with older boats having gelcoat thicker than 1⁄8 inch that had cracked. They suggested that polyester resin by itself, without structural fibers, lacked strength and was likely to crack.
The second yard had past experience with European boats similar to Vespera. They had worked with the star- crack problems. They thought I could cover the existing gelcoat with a good barrier coat. Another expert told me that many boat manufacturers used bad resin in the 1970s and ’80s because of soaring resin costs. Now, as a result, all sorts of problems were showing up. However, he could not suggest a cure without first seeing the boat. Other than the initial surveyor, none of the professionals I asked for opinions actually saw my boat. That was probably a mistake. Later, when presented with a suggested $30,000 cure, I was completely unprepared.
Fundamental lesson
I dug further into the problem before I started applying a barrier coat. I was reluctant to cover the cracks with a thick barrier coat because of the most fundamental lesson learned from marine surveyor and author, Allan Vaitses: when two materials are bonded together that contract and expand at different rates, the bond will eventually shear or the stronger material will break the weaker. Common sense told me that unless the barrier coating was stronger than the underlying cracked gelcoat, the gelcoat cracks would come through the barrier coat. The question was how deep did these cracks go? Were they tectonic plates moving around or superficial crazing?
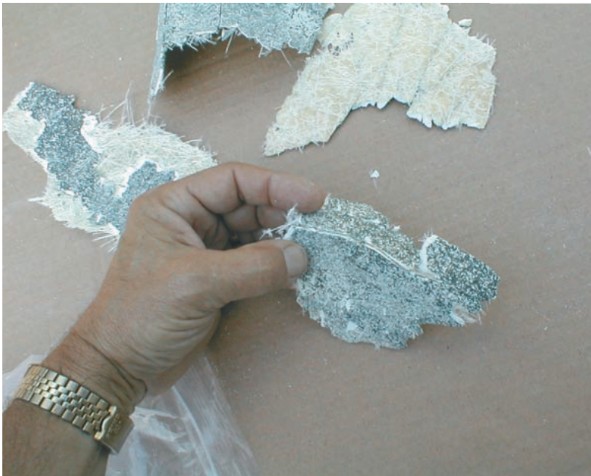
To determine their depth, I ground off the gelcoat in several test areas. To my dismay, I found that the cracks went through the gelcoat and had left stain lines through the first two layers of mat. In other words, the cracks affected the hull up to the first layer of structural roving. Under the gelcoat some of the mat looked snowy white as if it had just come off the roll. It had barely been wetted out. Had the resin been dissolved from hydrolysis or had the resin been poorly applied at the factory? We’ll never know.
What I did know was that I had a 51-foot boat that had to have all the gelcoat and first two layers of mat removed then rebuilt, refaired, and recoated. The only yard in my area that did restoration work on this scale said the repair cost would start at about $30,000 and could cost much more if the problems ran into deeper laminate layers.
Incidentally, I learned that Alan Vaitses was right: the hull had already received an epoxy barrier coat. The cracks had reappeared, coming through the barrier coat.
Life-long solution
What I wanted was a solution that would last the life of the boat. I decided to grind off the bad laminate and build a new thin epoxy hull over the original polyester hull. This new skin would consist of two layers of 10-ounce glass cloth and epoxy. This would be covered with six coats of Interprotect 3000 and one coat of InterProtect 2000E.
To research the problem, I went to boat repair manuals, a surveyor, and two yards with solid experience in hydrolysis restoration projects. I learned there is a big difference between the people who have book learning and the people who have hands-on experience. A textbook authority will tell you to remove 100 percent of the milky-looking (hydrolyzed) fiberglass down to the dark (un-hydrolyzed) layer below. This may require cutting large holes in the hull. The big problem with this “ideal solution” is that you might not have much of a boat left when the excavation is done. Hull construction is not uniform and hydrolysis is not uniform. Some layers are wet- ted out well and free of hydrolysis while other layers are delaminated in pockets. With spot grinding and a saw, you could remove every sliver of poorly wetted laminate, but the hull may need to be rebuilt in many places where the hydrolysis was not too bad. In other words, the cure might be far more destructive than the disease.
As I explored the problem, fairing the hull became a large issue. Fairing is your enemy since it accounts for about a half of the cost of the repair. The more fairing material you use, the less likely it is that the repair will last. The more cavities you grind out, the more filler material and fairing time will be required. Likewise, the more lumpy fiberglass you add to the hull, the more fairing will be required. Fairing is both destructive and expensive. You put on a bunch of expensive waterproof material that you then grind off. It results in thickness variations in the laminate repair and a mixture of dissimilar materials. Fairing compounds have fillers that enable sanding, but they are therefore more porous, with less structural strength than laminate.
Competing goals
Ideally, you want to do the least amount of fairing and use the smallest amount of fairing material. But also ideally, you should gouge out the hull down to sound laminate before restoring it. These are competing goals. One is to grind out the suspicious laminate, but the more you grind, the more you will need to rebuild and re-fair. So what is a healthy balance between excavating down to sound laminate and saving laminate? I needed a definition of “sound laminate.” I wondered, “Does the laminate need to look uniformly dark?”
After collecting opinions and weighing arguments, I now believe that sound laminate is simply laminate that does not retain moisture. Forget about how the laminate looks. If the laminate can be dried out and does not absorb water from the air after the drying process is complete, then it can be successfully covered. Conversely, if the laminate absorbs moisture from the air, it is bad laminate, no matter how good it looks. I won’t bore you with all the arguments that brought me to this conclusion, but bear in mind that not all authorities agree.
To determine if the hull is dry enough, check the moisture reading difference above and below the waterline. A 2-percent difference is acceptable. Some hulls absorb moisture from the air after they are tent-dried. If your laminate stays dry, you’re good to go. If it absorbs a lot of moisture from the air, you may have to start cutting holes in the hull with a Sawzall.
Not traditional
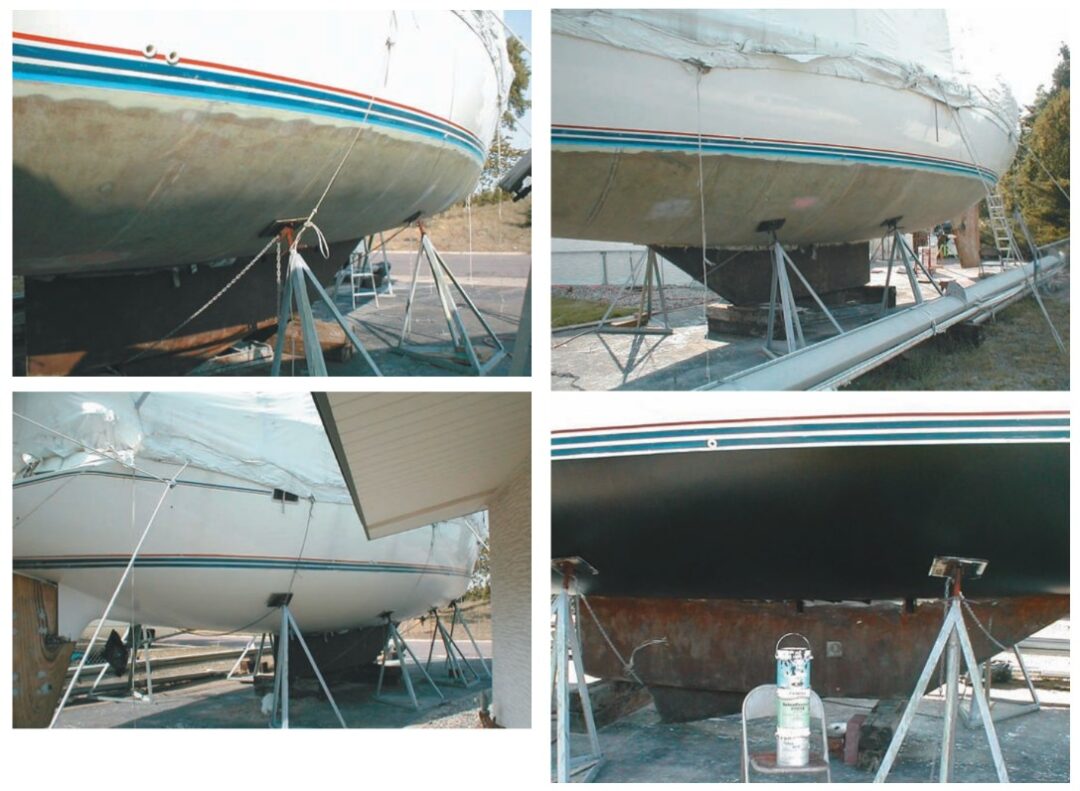
Because fairing is destructive to new laminate, I chose to fair out the original hull before covering it with new laminate. I realize this is the opposite of the traditional restoration method. Traditionally, the hull would be covered with new fiberglass layers and then faired because it is very difficult to add new laminate and maintain the smoothness. For light fairing I used epoxy mixed with micro-balloons designed for 100-percent submersion. For the spots where I had to gouge the hull, I used Awlfair. No roving had to be destroyed. The structural strength of the hull was not affected because only the outer layers of mat had to be removed. In Vespera’s case, the roving is bright yellow Kevlar so it was very easy to see if I ground into the roving fibers.
Before I started grinding off the gelcoat and mat, I had the bottom sandblasted to remove several layers of bottom paint. This got the hull stripped down to the gelcoat. I hoped the sandblaster would be able to remove the gelcoat also, but this was not possible since the gelcoat was unusually hard and thick. Because the gelcoat resin was harder than the laminate underneath, the sandblaster needed to use a very aggressive pressure setting to bite through it. This proved too destructive to the underlying laminate. I wound up grinding off the gelcoat the hard way, using 24-grit, 8-inch grinding disks on a 2,000-rpm automotive body grinder. This is a long, hard, messy job. It also requires the correct hand motion. A 2,000-rpm grinder can do a lot of damage in a hurry. The trick was to keep the grinder moving constantly with a wide, sweeping motion.
Next I covered the hull with two layers of 10-ounce cloth and epoxy resin. Why should the hull be covered with any additional fiberglass, since no structural fiberglass was destroyed? It seemed like good insurance — rather than just adding a coating — to add laminate layers that had better water barrier properties (epoxy) and structural strength.
As for why I chose fiberglass cloth instead of mat, I felt that fiberglass cloth would be the easiest material to keep fair. It can conform to compound curves and works well with epoxy resin. Fiberglass cloth has no binders that require solvents in the resin to dissolve them.
Why epoxy resin instead of vinylester resin? Some (but not all) of the hands-on experts say the best bond to an existing polyester laminate is made using epoxy resin and that epoxy is the best water barrier.
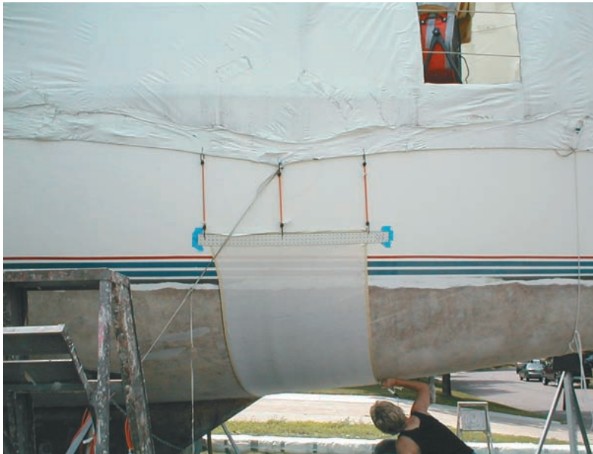
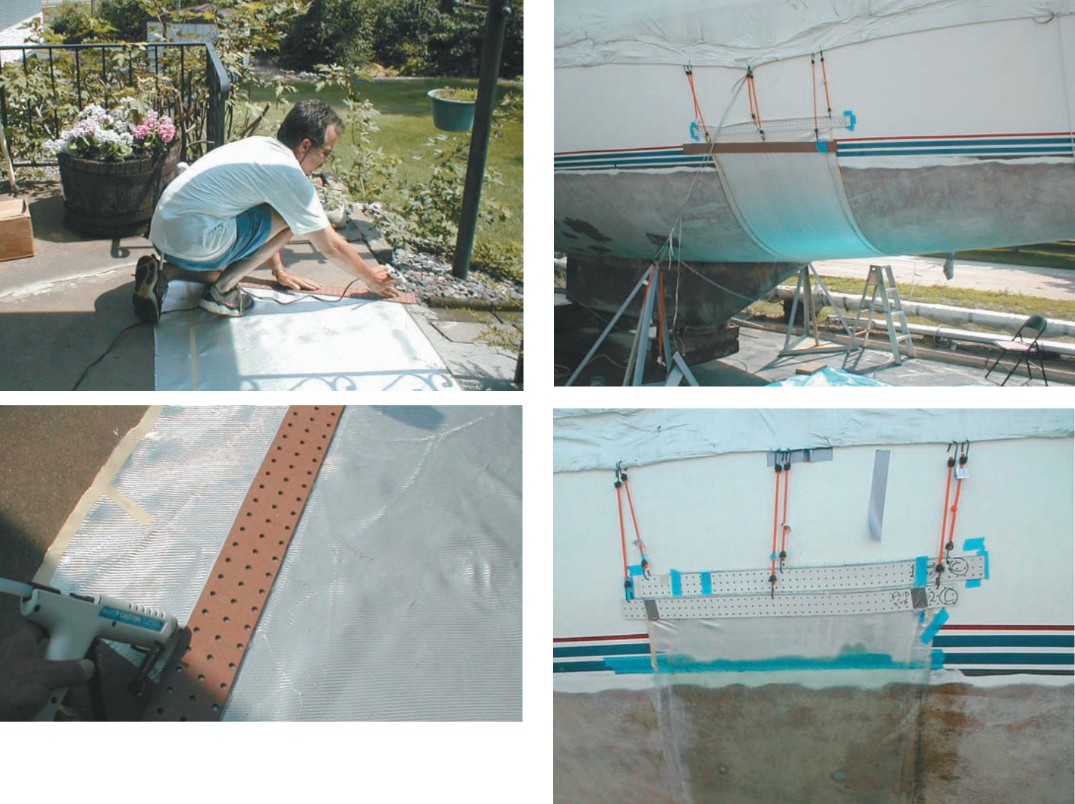
After I faired the hull and chose to cover it with new laminate, the next problem was how to cover the hull and keep it fair. Anyone who works with fiberglass knows this is a very difficult proposition. I chose to stretch each layer of cloth over the hull using bungees. In this way, the cloth could be wetted out after it was hung. The largest piece of cloth was 15 feet long and 4 feet wide. Working above my head with material this large would be impossible without a method to stretch the material and hold it in place. Also, as the cloth is wetted out it stretches. I left an extra foot of cloth above the waterline on each strip of fiberglass cloth for the bungee attachment. The elastic bungees would take up the stretch as it occurred. I cut strips of Masonite and hot glued these to the extra foot of cloth for each section. This could be done with the cloth laid out in strips on a clean driveway. The Masonite had pre-drilled holes for tool hangers. I used these holes when attaching the bungee hooks.
Avoiding fairing
Setting the fiberglass cloth using bungees was not a quick solution. But it was a solution that allowed me to cover the hull and avoid fairing afterward. Because I would be laying up two layers of cloth, wet on wet, I needed to be set up for two sets of bungees. I also needed to test hang all of the pieces of cloth (both layers) before I wet any of them out. Any adjustments had to be made before I started working with mixed resin. Once the resin is mixed, as you know, you are starting a continuous process that has no time for errors.
Working with epoxy takes practice. Too much resin in the laminate will cause it to curdle as it cures, creating a maze of grooves and mounds in the laminate that will result in a nasty fairing problem. Too much heat (sun), and you will run out of time to work your mix. Too cool, and you will get a bad cure. The first piece of cloth I applied was a mess. We did not roll enough resin out of the laminate, and it curdled. It looked beautiful one minute and like a mouse maze the next. After the resin began to set up, no amount of rolling would keep it flat. I had to grind it off and re-cover that area.
My wife, Kathy, and I applied the cloth in four steps over a period of four days. Eight days were required in total because each layup day was preceded by a setup day. The four hull sections were completed from the forward edge of the keel to the bow (both port and starboard), then the aft end of the keel to the stern (both port and starboard), then the port side of the keel and finally the starboard side of the keel. Two layers of cloth were applied on the same day to each section. The first layer of cloth was butted together, not overlapped. The second layer was staggered 6 inches forward and butted as well. The second layer was applied while the first layer was still wet. Peel Ply was put over the second layer before the laminate was rolled out using a 1⁄2-inch resin roller. Peel Ply is wonderful stuff. It allows you to roll the heck out of the laminate so you can attain a very fair surface if you have a fair surface to begin with. As an added bonus, you can remove the Peel Ply after the resin cures and you do not have to sand the surface or wash off an amine blush. To be safe, we washed it anyway.
The separate steps
In summary, the steps went as follows: start with a clean, washed, sanded, fair surface. Mix enough resin for the first layer of cloth, use a foam roller to roll the resin onto the hull, hang the first layer of cloth and stretch it, and roll more resin onto the first layer of cloth. Your helper is now mixing resin for the next layer. Hang the second layer, stretch it, and roll on more resin. Then (very important) use a serrated resin roller to remove the excess resin and put on the Peel Ply. Finally, use the serrated resin roller to remove the remaining excess resin.
All this must be done before the resin begins to kick. Before starting a section, measure and cut the cloth, glue on the Masonite ends, cut your bungees and test-hang both layers of cloth to make sure you’ve got it right before mixing the resin. In many ways working with epoxy resin is like pouring concrete. Once you start, you shouldn’t stop.
Next came limited finish-fairing. My goal was to do as little fairing as possible and to avoid using any fairing materials. But no laminate can be laid up perfectly. I filled the butt joints with epoxy mixed with micro balloons. This required only a very small amount of fairing material. Next I washed the entire hull with water and solvent, gave it a dual-action sanding with 40-grit, washed it with water and solvent again, and gave it three heavy coats of InterProtect 3000. InterProtect 3000 is normally sprayed on, but it can be rolled on.
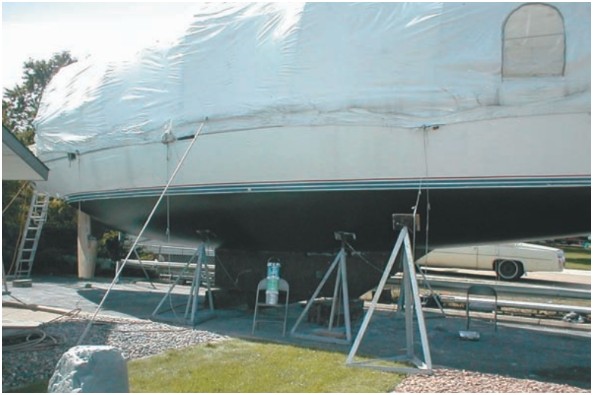
Because 3000 is almost 100-percent solids, it works well for fairing. But use it only for light fairing because it is so hard. The whole boat was then lightly faired with an air file using 40-grit and rewashed. This took about eight hours of fairing time. Compared to a traditional fairing process, which will require two full-time workers for several weeks, this was nothing. Finally, three more coats of InterProtect 3000 were rolled on, followed by a coat of InterProtect 2000E and bottom paint. The bottom paint was applied before the 2000E cured so that a chemical bond was made.
Saved $25,000
The good news is that the total cost of this cure was about $5,000 in materials and a lot of labor. This was way below the yard estimate of $30,000 at a minimum, plus transportation costs. Before you start such a project, consider the following.
- When you work with epoxies you need to follow the manufacturer’s application instructions very carefully. This is especially true for overcoat times (minimum and maximum) and for washes. Both water washes and solvent washes are required. Also, as little as a 10-degree difference in temperature can make a big difference in the time you have to work with. Be especially aware of direct sunlight. If you do not have experience laying up epoxy laminates, cover a rowboat first and keep track of temperatures and cure times. Practice on something you can throw away. You will be spending thousands of dollars on materials, and you can create a bigger problem than you started with if your work is not done correctly.
- Grinding the gelcoat and mat off of a hull creates far more dust than most boatyards would ever put up with. A handheld peeler can be purchased that uses a suction bag for dust, but at some point you will probably have to do some serious grinding and have a lot of dust to deal with. You will probably need to be at a marina that can place your boat far away from any other boats. Or you may be able to work on your boat at your home. Sand-blasting is even messier than grinding and will not be tolerated unless you know your neighbors very well.
- Do not buy a hull that has moisture readings that are abnormal. A hull that does not stay dry after it has been dried out could be a total loss. A bad hull will absorb water from the air after it is dried. There is no way for you to know if a hull will stay dry until it has been dried, so don’t take a chance.
- Finally, this is not the kind of project that is good for someone who has only a few hours on a weekend to spend, preceded by a two-hour drive. You need to be at the boat a solid 16 hours a week for this type of project to work. And you need a very willing helper for a fourth of that time. On the plus side, if you have the time, most of the work is fun and you can end up with a valuable boat that will give you a long ride. The more you document your work, the more your finished product will be worth when it comes to selling it someday.
Possible cracking causes
What caused the star cracks in the hull? Here are some experts’ best guesses:
- There probably was a problem with the gelcoat resin. The same star cracks occurred on the inside of the hull in the bilge where water collected, but only where gelcoat was used. The interior gelcoat chipped off in pieces that were up to 4 square inches. But unlike the exterior coating, when the gelcoat in the bilge was removed, very solid, unhydrolyzed, laminate was exposed. This indicates there was probably also a problem with the mat layup outside the hull.
- The gelcoat was too thick: 1⁄8 inch and thicker.
- The first layer of mat was poorly wetted out, trapping a lot of air in the laminate.
- The first layer of mat was not laid up until the gel-coat had cured too long, creating a poor bond.
- Particles that attract moisture and trigger the destructive hydrolysis process were present in the mat laminate when it was laid up.
- Poor resin was often used in the 1980s and is having repercussions now.
Thank you to Sailrite Enterprises, Inc., for providing free access to back issues of Good Old Boat through intellectual property rights. Sailrite.com