A major refit for a 1967 Ted Hood 24-foot trailersailer
Issue 46 : Jan/Feb 2006
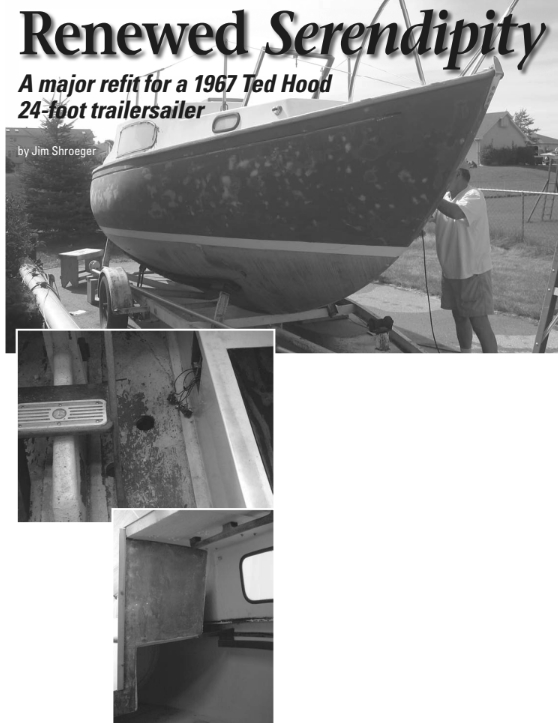
She was a wreck. When I first saw her, she was sitting on a derelict trailer with two flat tires. Her hull was faded from blue to dull gray. Somewhere along the way some intrepid soul who fancied himself a boat finisher had used a belt sander on the hull to try to remove the discolored gelcoat. (He was very successful.)
The companionway hatch and dropboards were missing. She had a foot of slimy, bug-infested water in her bilge and over the cabin sole. The cabin cushions were wedged in the cockpit. What remained of a winter cover was flying in the breeze like a well-used gale warning flag. The deck was completely covered with pine-tree needles and other sticky stuff. The acrylic cabin windows were either missing or had turned milk-white with age.
In spite of all this, I fell in love with her. What could inspire such emotion? Beneath it all she was a Paceship Westwind 24, circa 1967. The Canadian-built Westwind was designed by Ted Hood and is, in my opinion, one of the sweetest trailerable sailboats ever made.
After doing a little detective work, my wife, Barb, and I discovered that she was for sale and the owner was highly motivated. He was moving and was not able to take the Westwind with him. The asking price was $2,500, but we whittled it down to $1,700. The owner threw in three pickup truckloads of miscellaneous marine gear to close the deal. (We eventually sold most of the items for more than we paid for the boat, but that is another story.)
Unique hull design
The Westwind is 24 feet long overall. She displaces 4,625 pounds, draws 2 feet 6 inches with the board up and 4 feet 8 inches with the board down. She has a unique “perch belly” hull design featuring an internal keel that weighs 2,600 pounds. Belowdecks she has a traditional layout with a midship galley, V-berth, two quarter berths, and a head forward under the V-berth. The main cabin has 5 feet 8 inches of headroom.
When I got her home I began to make job lists that grew longer and longer. I had plenty of time, so I divided the list into warm-weather jobs and winter jobs. (We live in Northern Lower Michigan.) It was August when we bought our Westwind, and I began work on the topsides. It was not long before I developed a real dislike for belt sanders and anyone who ever used one anywhere near a fiberglass boat hull. I spent three weeks filling, sanding, fairing, re-sanding, and re-filling until all traces of the belt sander’s gouges and grooves had disappeared.
It was a great day when I decided the hull was smooth enough to apply the first coat of primer. We decided on Interlux finishes. The primer was Interlux Top Coat (gray), the topsides eventually were coated with Interlux Toplac (Lauderdale blue), and the deck, cabin, and cockpit received Interlux Brightsides (bright white). All these paints were one-part polyurethanes and promised high gloss and durable wear factors. I selected Interlux because I was planning to use a brush to apply all finishes. Our research indicated that Interlux leveled up the best when a brush application was used. We were not disappointed, but I am getting ahead of my story.
Winter cover
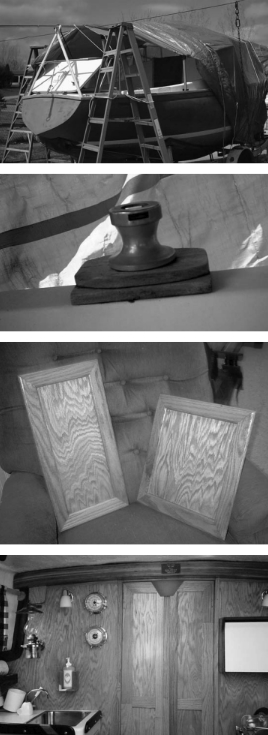
Soon after the first coat of primer was on and dry, Mother Nature announced winter’s arrival. Consequently, the next step was to create a cover that could withstand a Michigan winter but still allow me to get aboard to take measurements and make patterns. A trip to Home Depot turned up a reinforced nylon tarp. Fortunately, we got several Sunfish masts with our truckloads of “bonus stuff.” Two of these made an excellent ridgepole. Two pieces of 3⁄16-inch mahogany underlayment were hinged together and made a “roof” over the cockpit area. The tarp was spread over the ridgepole, tied to the trailer, and voilà! a winter-proof boat cover.
Now the indoor phase of the project was started. In addition to an addiction to belt sanders, the previous owner had an “all or nothing” approach to boat restoration. He had removed all the interior fixtures, wood trim, and electrical systems and replaced or saved nothing. Our project began with an empty hull and a partial cabin bulkhead. One good thing about starting with nothing is that there is nowhere to go but up.
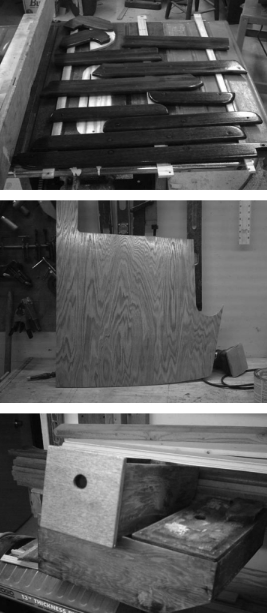
As the Westwind is a medium-sized trailerable, her interior space is “compact.” The original interior was done in mahogany. Because the cabin space was small we opted to use a light wood to create an airy and open feeling belowdecks. I found a significant amount of “culled out” oak molding at our local lumber yard. This material was offered at a reduced rate because it had defects. It was perfect for what I had planned. With sawing and planing, I converted the molding into planks that measured 3⁄8 inch thick, by 2 1⁄2 inches wide. These planks were used to create all the interior trim for our Westwind.
Items made from this material include: a laminated mast support beam, four laminated main-cabin window frames, new oak flooring in the main cabin, stiles for the doors between the main cabin and the V-berth, frames for all cabinet doors and all drawer fronts, trim for instrument boxes, main-cabin curtain rods, swing-away curtain holders for the forward ports, hanging-locker items, and numerous pieces of trim throughout the interior.
Another source of economical fancy wood we found was shipping pallets. I obtained many board feet of Philip pine mahogany for free. You have to be persistent and hang around your local lumber yard — in our case, Home Depot — and sooner or later you will come up with mahogany shipping pallets. Just be sure you remove all the nails before running them through your planer. I used the free mahogany to frame the companionway, trim the companionway hatch, and also to make two beautiful winch pads, a boom prop, and several other trim pieces. I still have a good selection for our next round of projects.
As the winter progressed so did my collection of finished interior components. The list included window frames, new cabin doors, new tongue-and-groove oak floors for the main cabin, new cabinet doors and drawer fronts, a new mast support beam, and numerous pieces of new and restored trim. We were able to salvage the original sea rails, most of the bulkhead trim, an original swing-out dish rack, the original companionway slide, the original forehatch, and the original Paceship identification plaque with our boat’s hull number. These were refinished and added a nice touch of class to the interior.
I also created new hatchboards, a screened forehatch insert, and a screened hatchboard for warm buggy nights.
Hatch and portlight repairs
Another area of concern was the acrylic windows and fore hatch. These had the appearance of the inside of a milk jug after it has been left sitting in the sun for a week. They had to go. A local glass shop reproduced the exact shape of the saloon windows and the forehatch top. We also replaced two non-opening windows in the V-berth with Beckson opening ports, which improved the ventilation 100 percent.
By the time I had completed my “to do” restoration list, Mother Nature had just about finished up with her winter activities. So on a relatively warm day in May we took the winter cover off Serendipity. (The name means an aptitude for making accidental fortunate discoveries. In a word, lucky.)
Once the cover came off the exterior improvements began. The first thing was to re-sand the primer that had been applied the previous fall, then closely examine the hull for any imperfections that had been missed. After that, the second coat of primer was applied, followed by two coats of Interlux Toplac. Other paint jobs included sanding and applying three coats of red bottom paint, cleaning, priming, and painting the cabin and deck areas (except the non-skid sections, which were thoroughly cleaned) and the entire cockpit. Additionally, all interior fiberglass areas were primed and painted with marine-grade enamel.
When all painting chores were completed the interior work began. The first job was to rewire the entire boat. I discovered that the U.S. Coast Guard has an electrical code that most marinas adhere to. If your boat’s electrical system does not meet this code you could be denied access to their electrical hookups. Most new boats do not have to worry about this little fact, but if you are restoring an oldie you had better check out the electrical codes. I’m about as electrical as a dead battery, so we hired a certified electrician to do the new wiring. He had a code book that clearly stated the requirements for marine wiring. It was well worth the $600 we spent to have the job done correctly.
Months of work
Reconstruction of the interior took almost two months of fitting, sanding, refitting, bleeding, and cussing. When the dust had finally settled, all the wood chips had been swept up, and all the stain and varnish had dried, we stepped back and looked at an elegant interior. The light-oak stain on the oak interior gave the cabin a golden glow that was warm and cozy. It was a place where we felt at home. With the addition of the curtains, some instruments, interior clock, barometer, oil lamp, and new cushions for the V-berths and quarter berths, Serendipity was transformed into a beautiful lady.
Strangely, the most expensive portion of the entire project was not part of the boat restoration. Back in the 1980s we had a larger sailboat and had the opportunity to spend several months cruising the North Channel in northern Lake Huron. We have always loved that area and have planned to return someday. Serendipity, with her shallow draft, is a perfect boat for North Channel cruising. Getting her there on her own bottom would take more time than we have available. To solve this little problem, we decided to have a special road trailer built that would take Serendipity and us to the cruising grounds more quickly than sailing her there. The final product cost $4,400. Before you say “Wow! That’s a lot,” stop and figure that having a trailer saves you launch and haulout fees and possibly even winter-storage costs. Just one year’s fees for marinas in our area equal half the cost of our new trailer. So our trailer will pay for itself in two years.
Hurdle to overcome
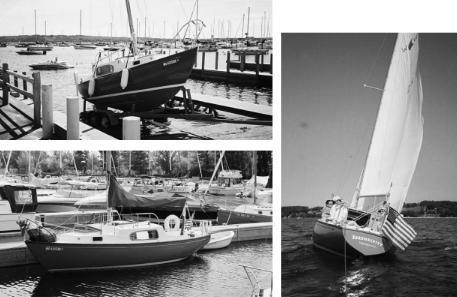
All the interior work and exterior refinishing was done. The only hurdle to overcome was to get Serendipity from her winter restoration area to her new slip at our local marina. Trying to use the rickety trailer that she was already sitting on would be like asking a beetle to carry a Volkswagen. After a few inquiries about competent crane operators, we contacted a crane service. The operator knew his stuff. There were some anxious moments . . . such as when we had moved the old trailer from under the boat and discovered the new trailer was too heavy to move by hand. Eventually, though, Serendipity came to rest on her new set of wheels without any disasters.
The rest was easy. A short trip to the marina, an official christening and launching, followed by a summer season filled with sailing fun and friends. Serendipity turned out to be a real lady. She received many compliments wherever we went and did not fail to impress us with her seaworthiness and easy handling. We had a summer-long date with a real lady, and we enjoyed every minute.
Would I do it all over again? You bet. Was it worth it? Without a doubt.
It is difficult to explain the wonderful feeling you get when someone recognizes your efforts by saying, “That sure is a great looking boat! Where did you get it?” That’s when I get to tell Serendipity’s story all over again.
Thank you to Sailrite Enterprises, Inc., for providing free access to back issues of Good Old Boat through intellectual property rights. Sailrite.com