Varnished teak goes under wraps
Issue 88 : Jan/Feb 2013
Our 1983 Tayana 37 cutter, Cetacean, has a profusion of glorious teak brightwork on deck. The gleaming varnish is a pleasure to look at but a major commitment to maintain. Our experience has been that we can mitigate the Sisyphean task of keeping brightwork bright by protecting it with canvas covers. Cetacean came with custom Sunbrella canvas covers for her caprails and handrails. The covers — when we use them — have been helpful in shielding the varnish from physical damage and exposure to ultraviolet light.
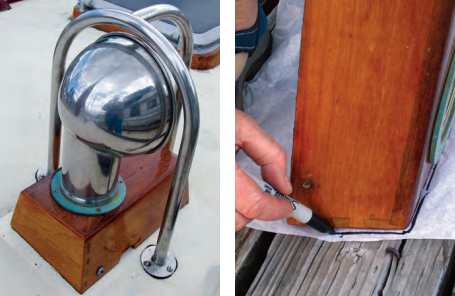
Cetacean has four teak Dorade boxes, each with a metal cowl that screws into into a bronze fitting attached to the box. The cowls pull fresh air into the cabin and the boxes help keep moisture out of the cabin. They are also decorative. After my husband, Ron, laboriously stripped, sanded, and applied two coats of penetrating epoxy and seven coats of Epifanes varnish to them, the boxes looked beautiful. The varnish, though, would need unending maintenance. I decided his hard work should be protected: those gleaming boxes would get their own custom covers!
The plan
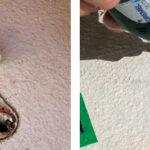
I figured the new covers would fasten to the teak boxes with Dot snap-fastener sets (the studs would screw into the wood; button and socket pieces would be fixed to the Sunbrella). I would fashion a string-closed collar (similar to a sweatshirt closure) for the cover’s cowl opening. The string would be secured with a plastic two-cord springlock fastener. I would also make a drain hole and finish it with triple zigzag stitching to seal the edges.
Making the pattern
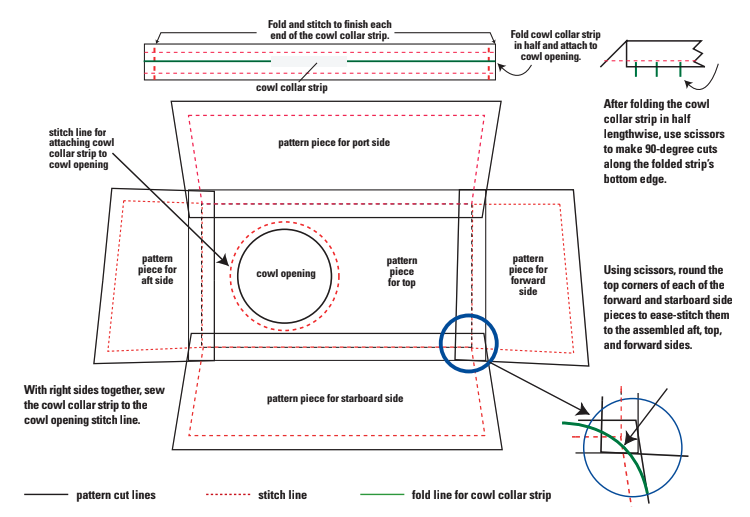
Creating the pattern for the covers posed some challenges as the four sides of each box have slightly different dimensions and angles. The shapes of the boxes on the boat’s starboard side mirrored those on the port side but the drain holes were shaped and located differently in each box. To deal with these differences, I made a single, slightly oversized, pattern and corrected for each box as I went along.
I unscrewed the starboard aft box from the boat and removed its metal cowl. Using a marking pen, I traced the four sides and the top of the box onto tissue paper and used these tracings to create my pattern pieces. The resulting pattern pieces had a slightly larger outline on all sides that allowed me to adjust them for the size differences between the boxes. The traced outlines served as the lines for stitching and I added a 5⁄8-inch seam allowance outside the stitch lines. I waited to trace and cut out the drain and cowl openings until after I sewed together the cover sides and top.
Fitting the pattern
I pinned the tissue pattern pieces together and fitted them to the starboard aft Dorade box. I then tried the assembled pattern on each of the other three boxes, adjusting the pieces as needed. Things got a bit tricky when I moved to the boxes on the port side because the pattern pieces needed to be reversed there. But the reversals fit just as well.

Prototype cover
Sunbrella is wonderful fabric but it costs a bundle, so I didn’t want to use it on something I might throw away. At my local fabric store I bought a remnant of a fabric that mimicked the look and feel of canvas and made a prototype cover out of that. It gave me a template to follow when I sewed the Sunbrella covers but cost less than $2.
Making the covers
Starting with the cover for the starboard aft box, I pinned each tissue pattern piece to the Sunbrella fabric and cut out the top piece and side pieces for each Dorade box. I recommend using pinking shears to cut out Sunbrella to help keep the edges from fraying. (Note: Cutting with a hot blade will melt the edges and prevent fraying. –Eds.)
Using tailor’s chalk, I drew stitch lines 5⁄8 inch in from the seam allowance cut line on each Sunbrella piece toguide the sewing assembly. I pinned the pieces together and adjusted them, double-checking the fit before beginning to sew.
Sewing the pieces together required some persuasion. I first sewed the forward piece and the aft piece to the top piece. Then, using scissors, I rounded the top corners of the port and starboard side pieces and began sewing everything in place. Rounding the corners eased the bulk of the forward and aft pieces around the corner curve of each side piece as I sewed. This reduced bunching and resulted in a nice fit for all the top corners.
I marked the box hem with tailor’s chalk, then rolled and pressed the bottom edge of the cover using a cold iron. Rolling the hem buries the exposed cut edges. On the right side, I topstitched about an inch from the cover’s bottom edge and then again 1⁄3 inch above the first stitching. The double topstitching reinforced the bottom edge and gave the cover a more finished appearance.
Cowl collar and drain hole
After assembling each cover, I unscrewed its Dorade box from the boat and removed the cowl. I placed the cover over the box, then turned the box over and traced the cowl opening and drain hole onto the fabric with tailor’s chalk. I cut out the opening with the pinking shears.
The pattern for the cowl collar started as a 4 x 12-inch strip, but I cut the fabric an inch longer to give me material to fold in and finish the collar openings. With the collar strip open and flat on my worktable, I made a 1⁄2-inch fold on the left and right sides. After folding in the ends, I topstitched each end to make finished openings for the drawstring. I then folded the collar fabric in half lengthwise and used the cold iron to crease the Sunbrella.
The next step was to attach the cowl collar to the cover. To ease the collar strip around the circular cowl opening in the main cover while sewing, I made small (1⁄3 inch) 90-degree cuts every 1⁄2 inch in the creased collar strip’s bottom edge. Putting the right sides of the folded collar and the cowl opening together, I attached everything with my sewing machine.
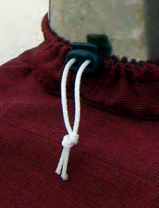
After the collar was attached to the main box cover, I topstitched 1⁄3 inch away from the top edge and added topstitching to the bottom edge. The top-edge stitching formed a tube for the cowl collar’s drawstring. I used a safety pin to guide a length of cord through one collar opening and out the other. I sealed both ends of the drawstring with a flame. I then drew the two line ends through a plastic two-cord spring-lock fastener, knotted them together, and pulled them through the fastener to tighten the cover around the neck of the cowl.
I folded over and then finished the edge of each drain hole with a zigzag stitch. I zigzag topstitched over each edge three times to seal it in place.
A too-short 2005 Sea of Cortez cruising adventure motivated Judy and her husband, photographer Ron Odenheimer, to prepare their Tayana 37 cutter, Cetacean, for a three-to-five-year voyage beginning July 2012. They left Portland, Oregon, crossed the Columbia Bar, and headed toward San Francisco Bay. From there the voyage will continue down the West Coast to Mexico, Central America, and beyond. Keep in touch at www.sailcetacean.com.
Thank you to Sailrite Enterprises, Inc., for providing free access to back issues of Good Old Boat through intellectual property rights. Sailrite.com