Low-stretch Dyneema has advantages over wire
Issue 89 : Mar/Apr 2013
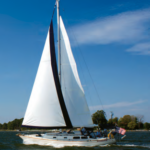
Our Liberty 458, Nine of Cups, just celebrated her 25th birthday. We replaced the lifelines the first year we owned her, using vinyl- coated 7 x 7 wire. It looked great for a few years but began showing rust spots. In year four, we replaced them again using uncoated 7 x 7 stainless-steel wire. Five years later, they were beginning to show a few broken strands and “meathooks” here and there; it was time to replace them once again.
This time we considered the new fiber technologies for our lifelines. Ropes made with these new fibers have a number of properties that make them good candidates for lifelines: high strength, low weight, high resistance to chafe, resistance to flex fatigue, good resistance to UV, and very low stretch. They are also easy to splice, so I can make them myself without having to order pre-made sections with swaged fittings. Before making the decision, however, we did a bit more research. They’re called “lifelines” for good reason and, before we trusted our lives to them, we needed more than the rope manufacturer’s assurance that they would live up to expectations.
After spending hours perusing the nautical discussion boards (where someone asks a question and then 24 “experts” with varying amounts of actual knowledge provide conflicting answers, all stated with authority, and then argue among themselves), we found one very good paper by US Sailing (see “References” on page 34). Their conclusion after considerable research was that, with a few caveats, the new Ultra-High Molecular Weight Polyethylene (UHMWPE) fibers were acceptable for use as lifelines. These UHMWPE fibers are sold under the brand names Dyneema (by DSM) and Spectra (by Honeywell). We decided to go ahead with the project.
We narrowed our choices down to Amsteel (Samson) or STS-12-75 (New England Ropes). Both are 12-strand single-braid Dyneema with extremely low stretch, high strength, and easy splicing characteristics; both can be ordered in a gray that looks remarkably like steel wire when installed; and both have strength equal to or greater than wire of the same diameter. We based our final decision on price and availability. The Amsteel won out.
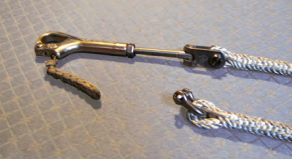
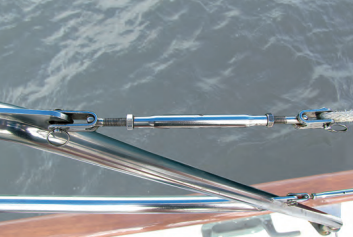
Our old lifelines incorporated turnbuckles in the fixed sections and pelican hooks at each of the gate sections. These fittings could be reused. To convert to rope, the only hardware we needed to purchase was a small shackle for one end of each section and a new threaded toggle jaw for each pelican hook or turn-buckle. The initial cost for converting to rope would be less than replacing the lifelines with wire. In the future, the replacement cost would be significantly less since we would need to purchase only the rope.
One drawback to using rope is UV degradation of the fiber in a sunny environment. While the rope has a UV-resistant coating, it is still susceptible to degradation. Testing has shown that the line will retain 60 percent of its tensile strength after five years of exposure. You can compensate for this by using the next larger size line. For example, if you have 1⁄4-inch lifelines, use 5⁄16-inch Dyneema.

Measuring and splicing
Two recommended methods exist for eye-splicing Dyneema. New England Ropes recommends the locked Brummel and Samson recommends the Bury. These methods can be found on the respective companies’ websites. The locked Brummel is more complicated than the Bury. On the other hand, while the Bury is simpler, it must be lock-stitched. I opted to use the Bury, but either technique will work. One important caveat, if using the locked Brummel technique: recent testing has shown the amount of tail that must be buried should be at least 72 times the diameter.

To calculate the amount of line required, I measured the line needed for each section and added the listed amount from the table to allow for the eye-splices (see “Splicing Allowances” on page 33). You need another couple of feet to use as twine for lock-stitching each eye-splice if you use the Bury splice.
Nine of Cups has 12 sections including the gates. Our wire was 1⁄4-inch, so I used 5⁄16-inch rope with a breaking strength of 10,500 pounds to replace our old wire. I measured the amount of rope needed (136 feet), then added 51 inches x 12 sections (51 feet) to allow for the Bury-type eye-splices and 2 feet for the lock-stitching for a total of 189 feet.
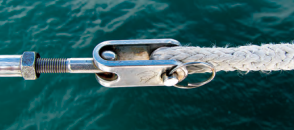
In the old wire version, each of the lifeline sections on Nine of Cups had a threaded stud on one end and a toggle jaw on the other. These were swaged fittings and could not be used with the new system. We replaced them with a shackle on one end and a threaded toggle jaw with clevis pin on the other. Be sure to purchase the threaded toggle jaw with the correct thread (right hand or left hand) for your turnbuckle or pelican hook.
Alternatively, you can do without the turnbuckles and use only shackles. Even the shackles are an option, as the lifeline sections can be lashed to their respective endpoints using Dyneema. After several years of use now, however, I recommend using turnbuckles for the reasons discussed below.
You will want to make the longest lifeline section first. That way, if you make a mistake and it is the wrong length, you can cut it shorter and use it for a shorter lifeline section. Before cutting the line, make the first eye-splice. Use the procedure for making the splices provided by either New England Ropes or Samson (see “References” on page 34). The directions on the New England Ropes site for the Brummel should be modified to note that the length of tail to be buried should be 72 times the diameter.
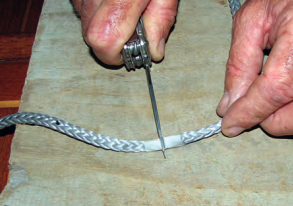
Attach this eye-splice to something secure, like a stanchion, and use a winch to tension the line. The length of line being tensioned should be at least as long as the lifeline section you are making. Keep the tension on the line for a minute or two, then release it. Repeat this pre-tensioning process four more times. What you are doing is removing the constructional elongation from the line. Next comes the tricky part. When you make an eye-splice, the line becomes shorter because the cover bunches up when the tail is buried. Add 2 inches to the line length, then measure, cut, and make the second eyesplice. You will get an idea of the chafe-resistance of this line when you try to cut it. It is not easy to saw through the line even with a sharp knife, and the knife will become dull after only a few cuts.
At this point, the lifeline section will probably be slightly too short. Repeat the pre-tensioning process, and it should fit. It is difficult to end up with precisely the right length, and one reason to use turnbuckles is to allow you to take up any slack at this stage.
After a little practice, the eye-splices became quite easy to make. Once I got past the learning curve, each section took about a half-hour to complete. All together, it took about 10 hours to complete the project once everything was on hand. The total cost for our boat was about $450, versus $620 for replacing the lifelines with new wire. Had I not already had the turnbuckles and pelican hooks, my total cost would have been about $630. In the future, replacing the line will cost about $315 once every five years.
Further discussion
Our new lifelines have now been in place for almost three years. We have since learned there is one more rope characteristic called “creep” that should be discussed. Stretch is the increase in length a rope undergoes when it is subjected to a given load, for example, 0.70 percent at 20 percent of breaking strength. Stretch is the ability to give but return to the previous size, like an elastic band. Creep, however, is a permanent increase in length that results from a material being under tension over a long period of time. Dyneema and Spectra have very low stretch properties but do exhibit creep.
Lifelines that are under tension will become slack over time and will need to be re-tightened periodically. On Nine of Cups, we hang our headsail sheets and furling lines from the lifelines when not in use. As a result, we have needed to tighten these sections every six months or so. Having turnbuckles in each section makes this an easy task. If you use only shackles to attach each section of lifeline, it’s not possible to take up the slack due to creep.
An alternative to using turnbuckles is to lash the end of each section to the stanchion. This allows you to re-tighten each section as needed and is less expensive than turnbuckles. As a friend recently pointed out, it has another advantage as well. If ever anyone goes overboard while attached by a tether, you can quickly cut the lashing so that you don’t have to lift the person over the lifelines to get him or her back aboard. Just make sure your lashing is at least as strong as the lifelines and check regularly for chafe.
Since we made our lifelines, there has been some controversy as to whether attaching an eye-splice to a small-radius shackle reduces the strength of the line, and some people recommend using a thimble in the eye-splice. I have not been able to find anything supporting this from the manufacturers but, other than the cost of the thimbles, I can’t see any reason not to add them.
Overall, we have been quite happy with our lifelines. Marcie likes to hang the occasional towel or swimsuit over them and there is never an issue with rust stains. Rope requires no polishing or waxing like stainless steel. I intend to continue using Dyneema when it’s time to replace the lifelines on their five- year anniversary.
David and Marcie Lynn have lived aboard Nine of Cups, their 1986 Liberty 458 cutter, since purchasing her in Kemah, Texas, in 2000. Since that time, they have sailed her more than 70,000 nautical miles in their ever-so-slow world circumnavigation and at press time were cruising Tasmania. Find them on their website at www.nineofcups.com or their daily blog at www.justalittlefurther.com.
Thank you to Sailrite Enterprises, Inc., for providing free access to back issues of Good Old Boat through intellectual property rights. Sailrite.com