Years of tender care revived a wilting Watkins
Issue 90: May/June 2013
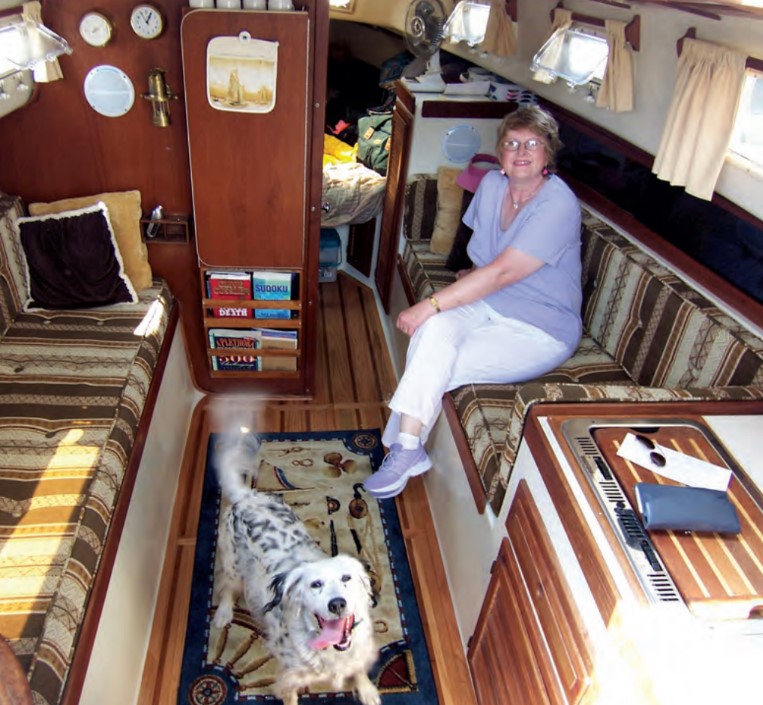
Her name is Sundew. She’s a 1978 Watkins 27 shoal-draft cruising sloop. She was named after an award-winning tulip in Holland. Sadly, when we found her she looked more like a faded rose than any kind of award winner. Her interior was crammed with gear, most of which was broken, antiquated, or just plain useless. She had been improperly placed on her cradle and the cradle supports were causing indentations in her hull.
We were interested because the price was right. The owner had been asking $15,000. After the survey report came back, we were able to buy her for only $5,000. She needed a lot of help — but with the money we saved and a willingness to put in whatever time was required to bring her back to life — I was sure Sundew could be an award winner again.
It took almost two truckloads to carry away the junk but, once we removed the clutter, we were able to assess the scope of the restoration project to which we had committed ourselves. We compiled a list of repairs and renovations that would take five years to complete. We began outside at the bottom and worked our way up.
The keel was saturated with water. We had to drill several holes through the fiberglass so the water could drain and it was almost two weeks before the interior of the keel dried out. This step was followed by grinding away fiberglass, laying in new glass, finishing, and finally applying new bottom paint. Surprisingly, the remainder of the hull exterior was in great condition and required no further attention. The indentations in the hull disappeared after she was repositioned on her cradle.
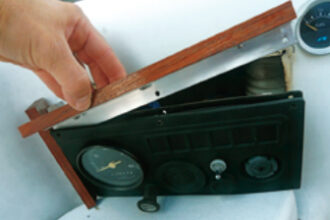
The next task was to replace the instruments that I’m sure were previously used by a fellow named Noah. We selected new Navman speed and depth gauges. Drilling holes through the hull to mount the new instruments’ sending units was a bit traumatic, but things went as planned. Next, we added a new West Marine multi-channel VHF. After that, we turned our attention to the interior.
From the sole up
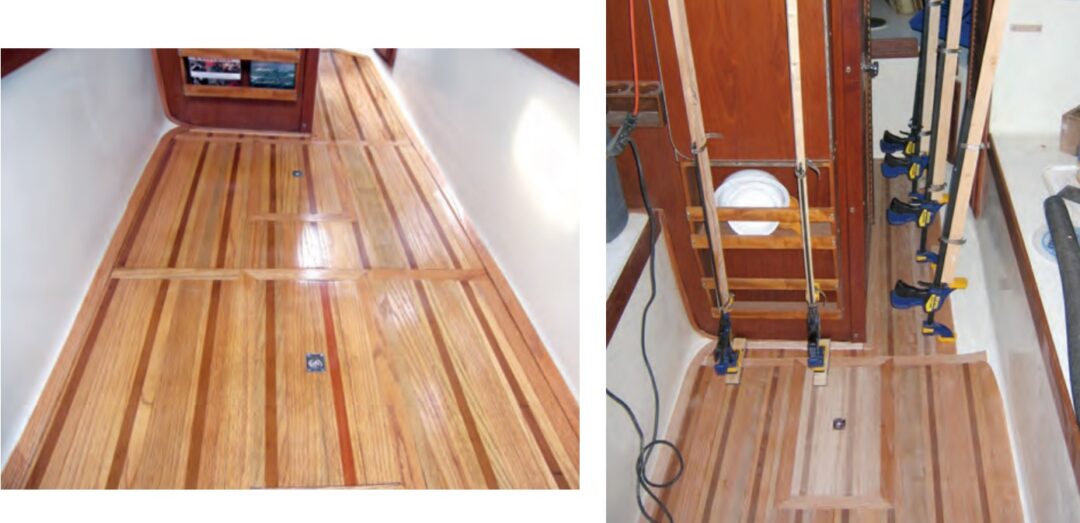
Sundew needed many things if we were going to turn her once more into a safe, enjoyable, and comfortable cruiser. The problem was where to start. Once again, we decided to start from the bottom, with the cabin sole. The previous owner had used self-stick carpet tiles to cover the sole. By the time we started our restoration, some of the tiles were missing and others had migrated to new neighborhoods. The cabin sole looked like a badly abused checkerboard. The first step was to remove and discard all the carpet tiles.
My goal was to create a traditional nautical cabin sole with materials we could easily obtain locally. We live in Michigan. At the time, I was working at our local Home Depot, which offered “cull” lumber. (Cull lumber is sold for considerably less than retail due to some defect.) I was able to procure 41/2-inch oak base molding in random lengths for 10 cents on the dollar. It took about three weeks to accumulate the quantity of molding I needed. At that time, the store received some windows shipped on mahogany pallets (really!). As the pallets were usually discarded, the manager was willing to let me cart off as much pallet mahogany as I wanted. With sufficient materials in hand, I was ready to begin work on the cabin sole.
I cut down the molding into 3 1/2-inch-wide by 3⁄8-inch-thick planks with a shiplap joint. Between the planks I set 3/4 x 1⁄8-inch mahogany inlays that produced a nice contrast with the oak planking. I also had to make several special shapes to frame out two bilge-access panels.
Once I had a sufficient amount of planking milled, I was able to begin the installation. I had decided not to use metal fasteners (I wanted no holes to drill in the fiberglass cabin sole and no screw holes to plug). The planking was to be fastened with 3M 5200. While 5200 is a great adhesive, it must be held solidly in place for 24 hours. This presented a problem since traditional clamps would not work. The solution was to use Irwin Quick Clamps, reversing one end. This converted the clamps into spreaders.
I used 36-inch clamps and, by adding 1 x 2-inch extensions of various lengths, I had spreaders that I could press against the overhead and exert sufficient pressure to hold the sole planks in place until the adhesive set. I found I could fit two or three planks per session. The entire cabin sole took three weeks to complete and turned out even better than I had hoped.
Deckhead embellishment
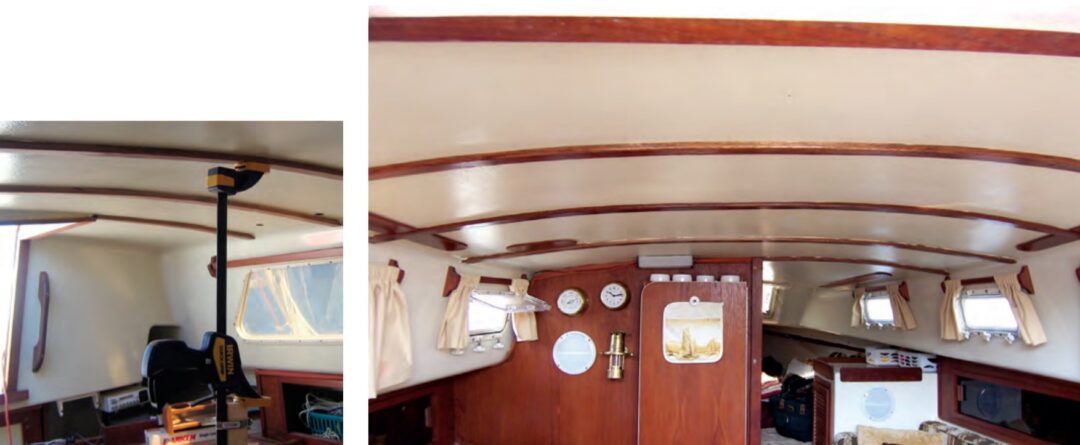
Moving upward, I thought the overhead in the main cabin was as plain as milk on a platter. The remedy was to install beams. To prevent the beams from looking cluttered, I divided the available overhead space into six equal sections, which placed the beams a little less than three feet apart. Each beam was made from two 2 x 1/4-inch mahogany strips laminated together to create a 2 x 1/2-inch beam.
To determine the lengths of the beams, I made two 2 x 1/2 x 5-foot pine strips. I held these one on top of the other with three rubber bands that allowed the strips to slide along one another. I held the strips in the location where each beam was to be mounted and slid the pieces outward until the ends made contact with both sides of the cabin, then marked the strips to capture the length. When I laid each strip on the actual beam, I was able to mark and cut it.
I installed these beams with the help of the Irwin spreaders, using 5200 as the adhesive. In each case, I positioned the beam in its predetermined location and used the spreaders between the overhead and the cabin sole to apply pressure to the beam until the adhesive set up. I pre-finished these beams before installing them. This was much easier than trying to cut in the varnish coats afterward.
It took a little over a week to laminate the beams, make the measurement strips, and install all seven. The completed project was yet another step in the creation of a nautical look for Sundew’s interior.
Furniture improvements
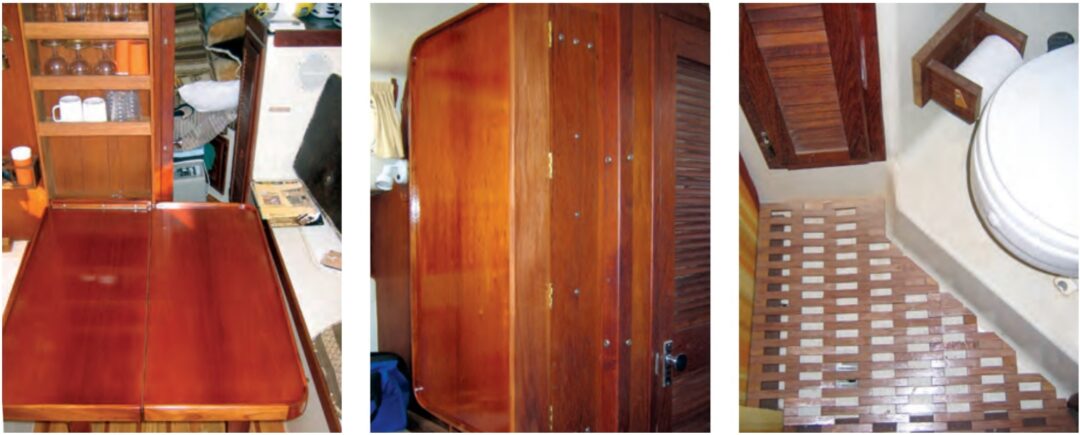
Next on the list was the dinette table. The original table resembled a cross between a fold-down ironing board and a Murphy bed. The legs had to be stored separately and were often buried when we wanted to use the table.
A trip to our local exotic-wood importer, plus $200, netted me a half sheet of 3/4-inch African mahogany plywood, several 6-foot 4 x 4-inch mahogany planks, and one 2-foot 4 x 4 mahogany block.
Using the old table as a size pattern for the new one, I made the main table body from the mahogany plywood and the sea rails (or fiddles) and the legs from the 4 x 4-inch stock. I cut the sea rails to 3⁄8 x 2 inches and used a band saw to cut the special rounded corners out of the mahogany block. I rounded the table corners to fit the sea rails.
I joined the table halves with a brass piano hinge and attached the entire unit to a bulkhead-mounted shelving unit with another brass piano hinge. A hinged mahogany cover provided a final touch by hiding the unfinished table edges and giving us an anchor point to secure the table in its upright position.
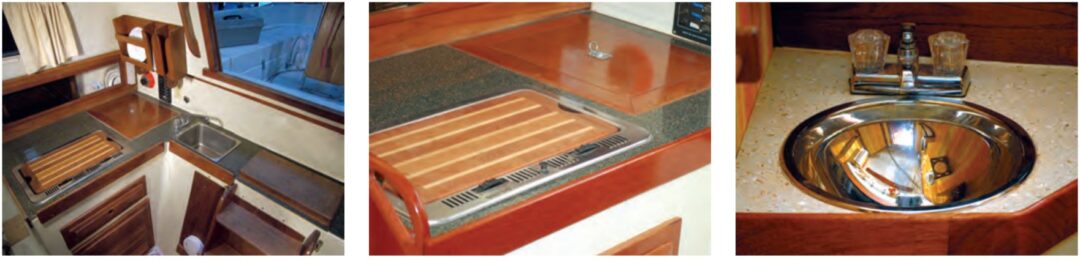
Sundew’s renovation also included new granite countertops in the head and galley. Normally, granite would be too heavy for use in a small sailboat. However, a company called Granite Transformations makes a granite product that is only 1/4-inch thick and light enough to work well in marine applications. As this is a special product, we had technicians from Granite Transformations do the installation. The result was unique and beautiful.
Once the granite tops were installed, I dug out the rest of my mahogany and fitted additional sea rails around all the new countertop areas. I also installed a new partial partition, with a handhold, between the galley and settee area.
The next project, a small grating for the sole in the head, was featured in the May 2007 issue of Good Old Boat. Sundew’s head is a bit small, and the challenge was to create a grate flexible enough to fit the various curves and bends of the head sole. I used brass brazing rods as the base for the grate. Each piece (there were nearly 200) was 5⁄8 x 5⁄8 x 3 inches, with 3⁄16-inch holes drilled horizontally through each end. To assemble these, I first made a template of the head sole. I threaded the wooden pieces onto the brass rods in an alternating pattern until the shape of the grating matched the template. A dab of epoxy in each of the perimeter pieces kept the grating in its finished form.
Creature comforts
All these renovations were made with the intent of adding a nautical atmosphere to Sundew’s interior. Next, I turned my attention to dockside amenities and creature comforts.
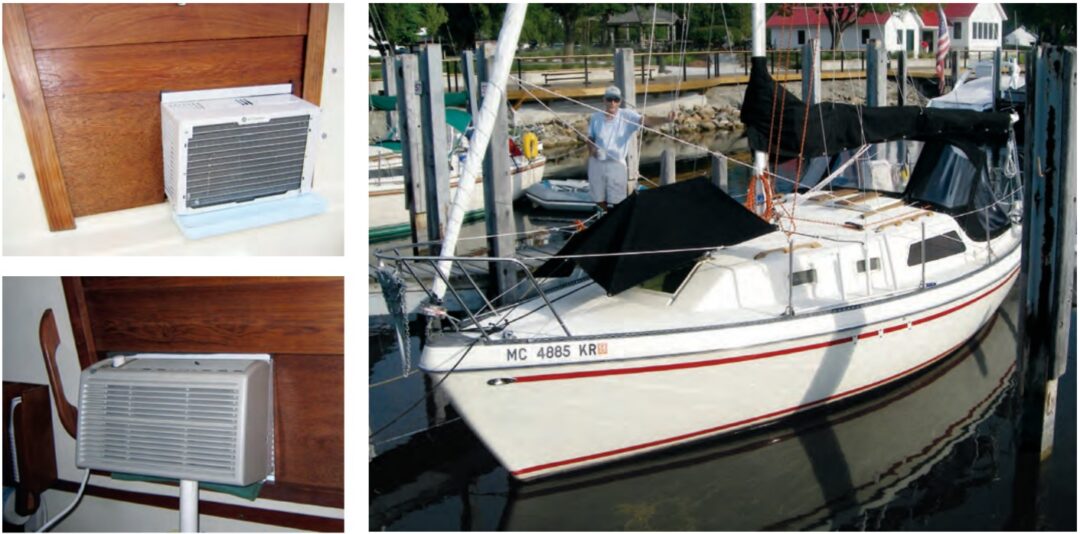
Michigan’s summers can deliver spells of 90-degree and hotter weather. We had cruised one summer when the temperature was between 90 and 100 degrees for almost two weeks. Sitting at a dock during a heat wave in a sailboat that has turned into a pizza oven is not a pleasant experience. That motivated me.
We found a room-sized air conditioner small enough to fit in the companionway and still allow us room to come and go. I shaped two filler boards to fit around the AC unit, made a closed-cell Styrofoam pad to support the unit on the bridge deck, and used the remaining dropboards to secure the unit in place. Adding an interior leg (made from an old turnbuckle boot) completed the installation. The total job cost less than $100.
The AC didn’t add much to the nautical look we were trying to achieve, but it sure made life belowdecks a lot more enjoyable. A more detailed account of this renovation was published in the July 2007 issue of Good Old Boat.
Another addition for dockside convenience was refrigeration. This was not the 12-volt, $1,500 system that replaces the old icebox. Our system was purchased at a yard sale for $20. It was a small dorm-sized refrigerator that I installed in an area that was used as a “collect all.” By changing the location of a chart rack and a small rack for navigation tools, I was able to secure the refrigerator opposite the galley on a shelf where it’s easily accessible.
Prior to acquiring the refrigerator, we paid nearly $20 each week for block ice when cruising. Instead, for approximately the cost of one week’s ice supply, we were able to have dockside refrigeration! We found that, even when unplugged, the fridge could keep things cool for an entire day. This was perfect for our cruises from marina to marina, and we gained dry storage by converting the old icebox to a storage bin. For trips longer than a day, we simply reloaded the icebox with block ice and sailed off, knowing we could plug in again at the next marina. During our cruise last summer we saved close to $200.
Shade and safety
The final two upgrades have to do with cruising comfort and safe seamanship.
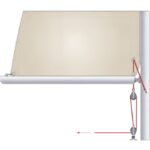
When we acquired Sundew, she was rigged so any sail change or adjustment had to be done on the foredeck. We have been in many bad weather situations where going forward was akin to taking a long walk on a short pier. No matter what you did, you were going to get wet! I decided to run all the lines aft. I led the mainsheet and jibsheet aft through several turning blocks and led the main halyard to a winch mounted on the cabintop. I also replaced the old Barients with two new self-tailing sheet winches. These changes made Sundew a comfort and a pleasure to sail.
The other improvement was to Sundew’s cockpit. She already had a dodger but I envisioned a more pleasant setting that required a Bimini. A representative from our local canvas shop took a few measurements and presently a new Bimini arrived. Weather curtains followed. They attach to the dodger and a stern curtain zips to the aft portion of the Bimini.
These curtains added protection from the weather but created an operational problem. Sundew’s mainsheet is attached to the aft end of the boom. With the Bimini in place it was not possible to use the mainsail. Under way, we could only use the jib. The solution to this little dilemma is the focus of our next project to be undertaken this year. We plan to install mid-boom sheeting. I am still researching the alternatives.
When we found Sundew, she was a faded rose. After five years of upgrades, renovations, and remodeling, she lives up to her namesake. Sundew has earned countless compliments and made us proud to be her owners.
Jim Shroeger began sailing more than 50 years ago in Jet 14s and progressed through a series of small to medium-sized daysailers including a Star. In the early 1970s, he and his wife, Barbara, and their two kids began their summer family cruises on the Great Lakes, which they continue to this day in Sundew, their Watkins 27.
Thank you to Sailrite Enterprises, Inc., for providing free access to back issues of Good Old Boat through intellectual property rights. Sailrite.com