Be prepared for visiting foreign ports
Issue 91 : Jul/Aug 2013
Flags have been flying for more than 5,000 years. One of their first uses was for identification at sea. It has long been customary for vessels visiting foreign ports to fly a miniature version of the host country’s national maritime ensign as a courtesy flag. On a sailboat, the proper etiquette is to fly this flag at the starboard spreader.
We have sometimes had difficulty finding courtesy flags prior to arriving in a country, and they tend to be expensive — $20 to $50 — when we do. For the most part, depending on the intricacy of the flag design, we’ve found that making our own is the easiest, least expensive, and most convenient way to go. The results aren’t perfect, but our courtesy flags pass the 20-foot visual test when flying at the starboard spreader. While I’m all for saving money, saving time counts as well, so I cut corners when possible. A simple courtesy flag, not counting labor, costs less than $1. Adding an emblem or other detail increases the cost, but no courtesy flag has ever cost me more than $4.
Designs and colors
Shortly after moving aboard, I purchased a book showing country flags of the world so we could identify foreign-flagged vessels and also with a thought to making courtesy flags. Nowadays, it would be just as easy to download free clip art of country flags for places you intend to visit. Books about making your own courtesy and signal flags are available, and so are kits, but I found it pretty easy to figure out myself.
I purchased a yard each of nylon flag fabric in various colors along with all the other materials I needed from Sailrite when we started cruising in 2000. Though I’ve made lots of flags, I’ve never had to replenish my stock. I’m sure there are other sources, but Sailrite had everything I needed in one convenient online catalog and the prices were reasonable.
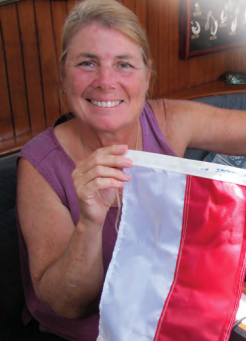
If you’re heading for the Caribbean or Bermuda, a flag with a plain red field is easy to make. Just sew two pre-purchased 3- x 5-inch British ensigns to the canton and you have a courtesy flag for Bermuda and for the British Virgin Islands. An all-navy field flag with the same British ensign in the canton constitutes a courtesy flag for the Cayman Islands, Montserrat, and the Turks and Caicos. As I write this, we will soon be heading to Asia, so I chose to make the simple red and white flag of Indonesia for illustration purposes.
Simple assembly
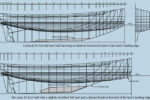
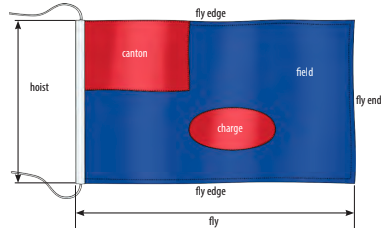
First, decide what size flag you wish to make and the appropriate ratio of length to width, then measure and cut the fabric. Increase the width and length measurements to allow for seam allowances on all sides.
I like to keep things easy. Since the Indonesian flag is bi-colored with two horizontal color fields (red over white) and I wanted a finished flag of about 12 x 18 inches, I measured a 7- x 20-inch strip each of red and white nylon material. Note that the measured pieces include an extra 1⁄2-inch width on all four sides of each strip. This allows for finishing the outside rough edges as well as for adding a seam allowance needed to join the two colors lengthwise. Because the fly end requires a bit more fabric for reinforcement, I added 2 inches instead of just 1 inch to the longer dimension of both pieces.
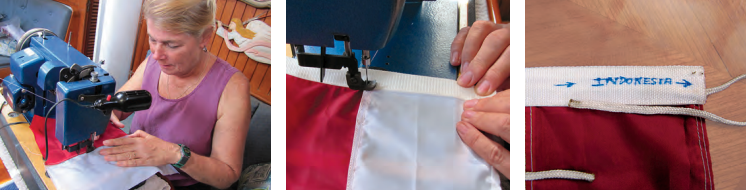
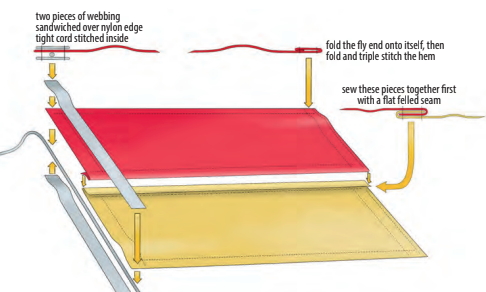
Sew the red and white strips together lengthwise. I use double-sided adhesive basting tape to keep the pieces in place while I sew them. The tape can be left in place after sewing. Sew the two pieces together, overlapping the edges so no raw edges are exposed and apply two rows of stitching. The field of the flag is now complete.
Next, finish the top and bottom fly edges using two rows of stitching to secure the edges firmly in place. The fly end of the flag takes the brunt of the wind action. It flaps and perhaps hits against the stays on occasion. With this in mind, it needs extra reinforcement. Using basting tape, fold the fabric over 1⁄4 inch onto itself, and then fold over another inch. Stitch three rows across the width of the fly. Triple stitching will provide the reinforcement necessary to allow your flag to fly longer without fraying. Make sure you know which end is the fly and which is the hoist, by the way. Otherwise you might finish with an upside-down flag!
I make the hoist with 1-inch webbing (from retired jacklines). I cut two pieces of webbing the width of the nearly finished flag. I’m not picky at this point — if the flag’s width is 12, 12 1⁄2, or 11 3⁄4 inches, it’s fine with me. Measure your flag and sandwich as much of the hoist end of the finished flag as you can, but at least 1⁄2 inch, between the two pieces of webbing. Stitch only the inside edge to the flag to secure it temporarily.
The plan diverges at this pointto accommodate two methods for attaching the flag to the halyard. Grommets add a nice touch to the hoist of the flag and allow the flag to be attached to the flag halyard with line or flag clips. An easier and less costly solution is to use an odd piece of small stuff (a 24-inch length of 1⁄8-inch line will do) stitched into the hoist. The flag is just as easy to attach to the halyard using this method. We have loops in the halyard so we can attach our courtesy flags with tiny bowlines.
If you decide to use grommets, stitch around all four edges of the webbing. Then add grommets evenly spaced at each end of the hoist and you’re done. If you choose not to use grommets, first lay a 24-inch length of 1⁄8-inch line between the two pieces of webbing, then stitch all four edges of the webbing, sewing the line into place at the same time.
Fun with flags
An easy first project is to make an all-yellow quarantine flag. The Q flag must be flown when entering a new country until you have been legally cleared into that country. Just cut out the yellow fabric and finish the edges. Add webbing to the hoist with grommets or line for attaching to the halyard and voilà . . . a new Q flag.
If you’re not going to another country any time soon, you could make your own signal flags. These are easy, economical, and fun. Even if you don’t race, you can use these flags to dress your boat for special occasions or to spell out the name of your boat.
What about the U.S. flag? I find it too difficult and complex to make with all those stars and stripes. I went shopping on eBay and found I could buy a quantity of U.S. flags made of nylon for about $5 each. Although less expensive than those at the local chandlery, they seem to hold up for about 3 to 6 months (depending on wind, weather, and sun), or about as long as I’d expect the more expensive varieties to last. Since they’re cheaper, I’m still ahead financially if I replace them more often.
I didn’t stop at courtesy flags. When we want to celebrate a holiday in port or at a deserted anchorage (and we do celebrate every holiday), we fly holiday flags. Rather than wasting my white nylon for these flags, I have used old canvas sail material for the field and cut out a simple but appropriate design, such as a green shamrock or a red heart, from felt and stitched it on. Sometimes, I just remove one design and stitch on another using the same white flag background. Having a white flag aboard also allows us to surrender in any naval games in which we might participate.
Marcie Connelly-Lynn and her husband, David, have lived aboard Nine of Cups, their 1986 Liberty 458 cutter, since 2000 and have sailed more than 70,000 nautical miles. They’re currently exploring the south coast of Australia. Visit their website: www.nineofcups.com.
Thank you to Sailrite Enterprises, Inc., for providing free access to back issues of Good Old Boat through intellectual property rights. Sailrite.com