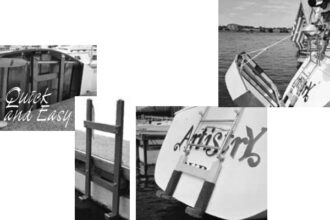
Bridge the gap twixt dock and deck
Issue 93 : Nov/Dec 2013
My wife and I have been the proud owners of Anastasis, an Islander 28, for seven years. She was very well equipped when we bought her, truly a “turnkey” boat. Over the years we nevertheless discovered that irresistible boater’s urge to make a number of upgrades, including a chart plotter, a newer autopilot, a backstay adjuster, and a new asymmetrical spinnaker.
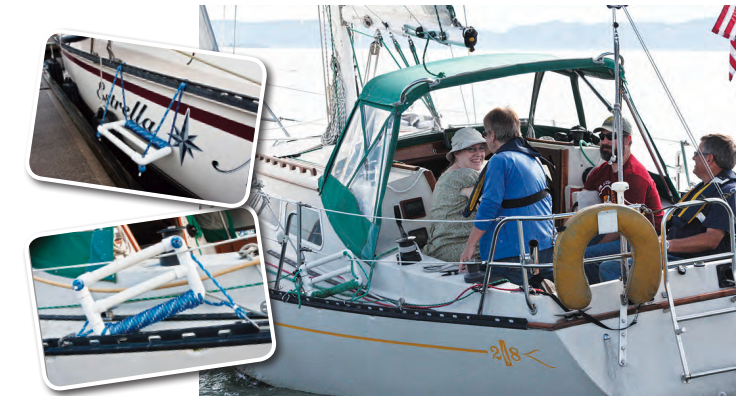
But one upgrade we made early on has been the least expensive and we use it every day we board our boat. Within months of taking possession of Anastasis, I built a single-step boarding ladder. If I were to say it has proven its worth, my wife, who found it difficult to board the boat without it, would certainly agree!
The step is designed to attach to our boat’s perforated aluminum toerail and could no doubt be adapted to boats that don’t have that feature. It has become a popular item in our marina. Several people have asked me to build them one and others have copied it. It can be built easily in two to three hours, including final installation.
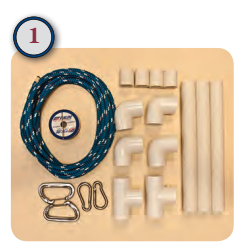
Materials
- 5-foot length of 1-inch schedule 40 PVC pipe
- Four 90-degree 1-inch PVC slip elbows
- Two 1-inch PVC slip tees
- PVC cement, gray (small bottle)
- PVC primer (small bottle)
- Two 3 1⁄8-inch stainless-steel carabiners without eyes or
- Two CAMP Nano 23 climbing carabiners
- 25 feet of 3⁄8-inch Sta-Set rope
- Sail needle and Dacron sail thread (I used FSE Robline)
Pieces of pipe
From the 1-inch PVC pipe, cut three 12-inch pieces and four 2 1⁄2-inch pieces. Lightly sand the markings on the 12-inch pipes (for appearance) and all the cut edges so they’ll slip easily into the elbows and tees for assembly.
Assembly
From this point on, things happen fast as the cement sets quickly. It’s a good idea to practice the assembly steps before applying cement to any of the pieces. When dry-fitted, the smaller parts can be pulled apart with the help of channel-lock pliers.
Read through this section a couple of times and practice at least twice before attempting to glue the pieces together. The order I used is important as it makes allowances needed for the pipes with the elbows and tees to line up. When gluing these pieces together, it’s very likely that the finished lengths of the 12-inch pipes with the tees and elbows attached will not be exact, since they may not be pushed onto the pipes to the same exact depths.
To get the elbows and tees to align correctly, I recommend that you have a workbench with enough area to lay all the parts flat and properly aligned as you glue them together and a strong backboard to push against. A piece of plywood laid next to a wall will suffice. When you do the actual gluing, a rubber mallet will help you set the connections to the right depth.
How you apply the cement is important, so read the instructions on the container. First wipe the pieces to be joined — inside an elbow, for example, and the outside of the pipe — with the primer, then apply the cement liberally to both surfaces. Keep a rag handy to wipe off excess glue.
If you follow this sequence, all should turn out well:
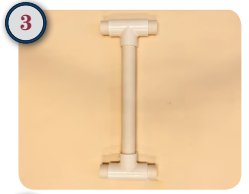
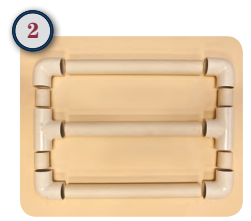
- Glue the two 1-inch tees to one of the 12-inch pipes, one at a time. When you glue the second tee, make sure you’re holding the first tee flat on your work surface. This will ensure that the tees remain properly aligned.
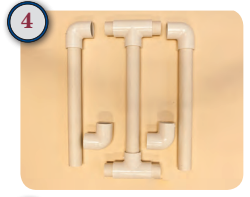
- Mark the 2 1⁄2-inch pipes in the middle for reference (1 1⁄4 inch) and glue the four pipes into the ends of the tees. Make sure you push them all the way in, and do so as quickly as possible. (You should barely see your reference marks.) Your mallet will help here.
- One at a time, glue all four elbows onto the ends of each of the other two remaining pipes. Push the elbows onto the pipes as quickly and as far as possible. Make sure they are aligned parallel.
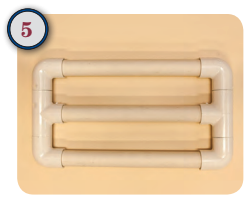
- Select one of the pipes with the elbows glued on. Lay it alongside the pipe with the two tees on your work surface and glue the elbowed pipe to the 2 1⁄2-inch extensions on the teed pipe. Use the backstop or wall as a brace. You have to do both ends simultaneously, so work quickly.
- Repeat step 4 on the opposite side. Allow the glue to dry and take a deep breath. The fast and furious part is completed!
Rope risers
With the step platform lying flat, drill 1⁄4-inch pilot holes in the center of each elbow. Follow up with 7⁄16-inch holes for the Sta-Set rope to pass through. This job is far easier to do with a drill press. Drill slowly with little pressure so the drill does not chip the plastic.
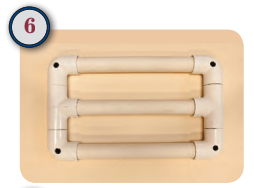
The object now is to install the Sta-Set so the step platform will be suspended approximately 12 inches below the deck of the boat.
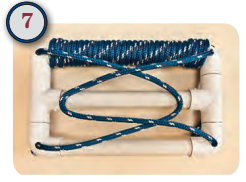
- While holding the step platform in a horizontal position, thread the rope through the right-hand hole closest to you.
- Tie a stevedore knot or stopper knot, leaving 4 to 6 inches extra, and pull it tight. (A great reference book on knots that I keep on board is Pocket Guide to Knots by Lindsey Philpott.) The stopper knot gives a much better finished look, but the stevedore knot is smaller and locks very well. Now pull the rope tight against the step to further tighten your knot.
- Mark the rope with a Sharpie pen where it comes through the top of the step, then measure 26 inches as a starting point and mark the rope again. Now thread the end through the inside right hole and stop where the mark on the rope reaches the top of the step.
- Pinch the rope against the hole where it comes through the step so it won’t move and wrap the rope around what will be the 12-inch rail on the boat side. Beginning at the hole it emerged from, wrap the rope all the way to the hole in the next elbow. This wrapping will be the chafe guard to prevent the step from scratching the gelcoat.
- Feed the rope through the hole in the elbow from the bottom and pull it tight. As you tighten, rotate the wraps on the pipe so they tighten too.
- With your Sharpie, mark the rope once again as a reference where it comes through the elbow on the top side. Then measure to the same measurement used in step 3 and mark the rope once more. Feed the rope through the final hole and stop when the mark meets the top of the step. Now mark the rope at the bottom of the step as a reference for your stevedore or stopper knot.
- Feed the rope through that hole from the top of the elbow and pull it through until both marks emerge from the bottom of the elbow.
- Tie another knot, lining it up with the second mark you made on the rope, but don’t tighten it yet. This way, you can adjust it until the top mark on the rope is again on the top side of the elbow. I started by making the bottom mark sit just inside the knot and barely visible. This takes some fine-tuning until you can completely tighten the knot with the mark exactly on top of the elbow. You may be tempted to cut the extra rope off below the knot. Don’t do it yet; this should be done after final installation.
Final installation
At the boat, determine where you want to position the step and clip the carabiners onto the two rope risers on the step platform. Position the step and attach the carabiners about 8 inches each side of the center of the step (so they are about 16 inches apart). Adjust the step until it is level. Eyeball it or check it with a 9-inch level when nothing is moving. Use your weight on the step to finish tightening the knots and the wraps, checking that the step platform is still level in all directions. Take one final visual check to make sure everything looks right.
When satisfied, finish the job with a sail needle and Dacron sail thread. Pinch the lines together at the bottom of the carabiner and sew a couple of stitches through the rope. Wrap the thread tightly 10 to 15 times around both parts to make a seizing, then stitch again through the bottom of the wraps a couple of times and tie off the thread. Do the same to the other side. When done, and you’re satisfied with the final installation, make sure the stevedore or stopper knots are tight. Once all is secure, you can cut the extra line on the bottom of the step, leaving about 1 1⁄2 inches, and finish off the two ends.
Alternate installation
If the toerail has smaller holes or is fitted inboard of the edge of the deck, the carabiners may settle at too much of an angle and not work effectively. In that case, I recommend that you make the rope-loop risers 1 or 2 inches longer. Take a 3⁄8-inch-diameter aluminum rod and bend 1-inch 90-degree angles on each end of the rod about 24 to 28 inches apart, depending on the hole spacing in the toerail. Pass the loops through the holes in the toerail. Then slide the prepared rod through the loops on the backside of the toerail and insert the 1-inch ends of the rod through the holes in the toerail. This will prevent the rod from moving. Adjust the step so it’s level and slowly push it down to tighten the loops around the rod.
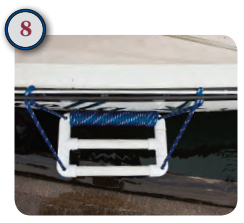
It’s not necessary to sew the loops because they will not move. I recommend sewing them anyway once the step is properly set to make it a quick setup on the other side of the boat.
Even if you can use carabiners, you might find it preferable to use this alternate installation.
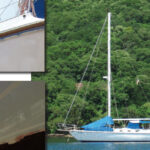
Project completed — you now have a great boarding step that can be fitted port or starboard as needed (top inset photo page 32). On a boat that has double lifelines, the lower lifeline gate can be led through the step as a way of stowing it while under way (bottom inset photo, page 32). If this is not possible, the step can be pulled up and laid on the deck while still attached or you can remove it while you are sailing. All aboard!
Mike Holtzinger is a senior pastor who started sailing in his teens by rebuilding an El Toro. He moved to a Lido 14 and raced it during his college years. Sailing was then put on hold until he and his wife became empty nesters. They sailed first a 1980 MacGregor 25 and then a 1976 Islander 28. They have completed six cruises during the last several years, exploring Puget Sound and the Salish Sea as far north as Princess Louisa in British Columbia.
Thank you to Sailrite Enterprises, Inc., for providing free access to back issues of Good Old Boat through intellectual property rights. Sailrite.com