Outsourcing and insourcing assure the best results
Issue 105 : Nov/Dec 2015
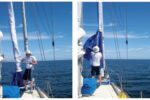
With just a few days left until landfall on our 2,800-mile passage from Mexico to the Marquesas, we noticed the steering felt funny. Looking over the side, we saw that the starboard rudder of Ceilydh, our 40-foot Woods Meander catamaran, was missing. It had broken off at the hull. We had a replacement rudder fabricated in Tahiti and air freighted to us in the Marquesas at considerable expense.
Our remaining rudder was, by association, suspect, though it did get us to Australia. We emailed the boat’s designer who admitted that the original rudder stock was probably a bit undersized. My husband, Evan Gatehouse, did some of his own naval architectural engineering calculations and confirmed this opinion.
A second new rudder was in our future. We could have had it built professionally in Australia, but we chose to do it ourselves, subcontracting out a few parts of the job that required the skills or equipment of specialists.
While having a rudder break off is an obvious reason to seek a replacement, it’s not the only reason a sailor might want to build a new rudder.
Age – Fiberglass rudders tend to fill with water, eventually leading to failure of the wet core or failure of the stock or internal framework due to corrosion.
Poor engineering – The original stock or internal metal structure may have been undersized and become deformed in use.
Poor shape – You want a more modern rudder shape for better performance.
If you are replacing “like with like,” as in the case of an aging but otherwise adequate rudder, you can probably do this yourself without any outside design advice as long as you stick to the original specifications for the shape, the stock material, and the laminate. In any other case, we advise consulting a naval architect before proceeding.
Be prepared for some extra costs if the rudder stock diameter must be increased to achieve the necessary strength. That would mean that the rudder bearings and the quadrant might have to be changed as well. Before you go that route, however, you might ask the naval architect if, by specifying a higher-strength metal for the stock, you can avoid an increase in diameter.
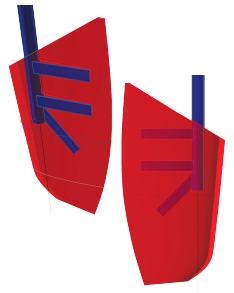
Keep in mind as you start to plan your new rudder that fiberglass boat rudders have three basic elements: the rudder stock with the internal reinforcing webs attached to it, the core, and the skin.
The stock
The rudder stock transfers the torque from the steering system to the rudder blade, usually through metal webs or tangs welded to the stock that push against the core. (In a spade rudder, the stock must also withstand very high bending forces –Eds.) Instead of solid round bar, some stocks are made of heavy-wall pipe (of larger diameter) to save weight. If your existing stock performed adequately, replacing it with the same material and size makes the most sense.
Metal webs welded to the stock transfer the torque to the core, which in turn transfers it to the skin. You could weld webs made of a less expensive stainless steel to a higher strength stainless-steel stock as long as the two alloys are galvanically similar.
We selected 2205 stainless steel for its higher strength (see “Rudder stock materials,” page 47) and increased the size from 11⁄2-inch to 2-inch schedule 80 nominal pipe size. This new stock has about 4.5 times the bending strength of the original. Because our rudder stock is attached to the transom externally, we avoided the issue of fitting the larger rudder bearing into the hull.
The core
The core forms the shape of the rudder, ideally creating a low-drag foil and providing the lift forces that turn the boat. Solid wood, plywood, expanding foam, and PVC/SAN foam blanks have all been used for rudder cores.
Solid wood is inexpensive and was often used on older boats. If replacing a solid wood core, use epoxy to glue together solid pieces of a maximum width of about 2 inches. Rip the wood from a larger piece and, when gluing up the blank, end for end the grain pattern on alternating pieces to minimize warping. Wood is harder to shape than foam.
Plywood is less commonly used but can be found in some rudders. Water can easily wick through plywood, so even a small leak into the rudder will lead to deterioration. Given the availability of modern foam cores, we suggest avoiding plywood as a core.
Expanding two-part foams are often used in production rudders that are molded. They’re harder to use in replacement rudders built in two pieces because the outside skin must be constructed before the foam is poured in. It’s also easy to distort a rudder shell by using just a little too much foam. If you go this route, choose a foam with 5 pounds per cubic foot or higher density to give sufficient strength. Typical flotation-type expanding foam will have a lower density.
Standard boatbuilding foam cores, including cross-linked PVC foams like Divinycell and Klegecell or Corecell SAN foams, are often the best choice. Use a minimum density of 5 pounds per cubic foot, or 7 to 8 pounds per cubic foot for boats larger than 40 feet. Thin foam is usually easier to find in full sheets than thick foam, but it’s easy enough to glue pieces together to build up the desired thickness for each half of the rudder. We used Corecell M-Foam.
The skin
The skin provides the structural strength for the rudder blade. For a small cost increase compared to woven roving, use stitched double-bias (biaxial) fiberglass fabric with the weave running at +/- 45 degrees to the fabric length. It drapes much better over curved rudder shapes and has higher strength for a given thickness. We used Ampreg 22 marine epoxy resin for its higher strength and better waterproof properties compared to polyester resins.
When rebuilding an existing rudder, measure the thickness of the old skins and duplicate them. A single layer of 9-ounce double-bias fabric will be roughly 0.02 inches thick when laid up by hand, so a 1⁄4-inch-thick skin will need 0.25/0.02 inch = 12 layers. If you choose a heavier fabric, say 12 ounces, then you’ll need 9/12 ounces x 12 layers: nine layers. Our relatively small rudder needed five layers. You may wish to apply a final layer of woven 6-ounce cloth for a smoother outside skin.
The rudder’s shape
Perhaps the most intimidating part of rebuilding a rudder is shaping the core. It’s best done with templates taken off the original rudder. If the shape is a regular trapezoid, use one template for the top, one in the middle, and one for the bottom of the rudder. For an elliptical shape, use a few more.
If you don’t have the original rudder, or if you are redesigning it for any reason, the low-cost software Profili (15 euros or about $17) can provide scaled templates for airfoil-shaped rudders with trapezoidal and elliptical shapes. You’ll need to specify the airfoil name, the height of the rudder, and the chord length (fore-and-aft dimension) at the top and bottom of the rudder (see “Drawing Airfoils,” page 47).
Preparing the core
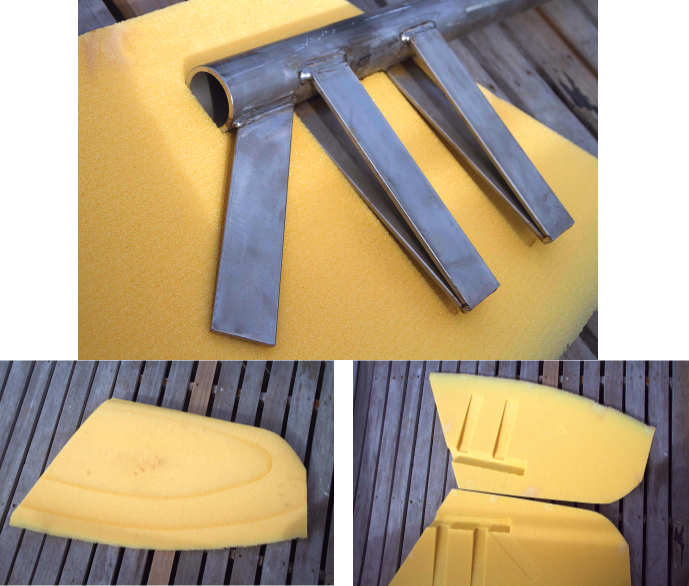
To fit around the stock and webs, the core must be made in two halves. Depending on how you construct your rudder, the process may change a bit, but the steps are roughly the same. For our rudder, Evan created a more sophisticated three-dimensional shape in a CAD program and included the inside cutouts for the rudder stock and webs. We sent the file to an NC (numerically controlled) milling company that milled the foam on a 3-axis computer-controlled milling machine.
The machined surfaces required about 15 minutes of light surface sanding to remove the tool marks, but it saved hours of sanding work and allowed for a more complex shape than we could have created by hand. The cost for this machining was about $400. A naval architect can probably create a similar shape for you and save you considerable time in the construction . . . but with the addition of design fees and the cost of milling.
If you are shaping the rudder core by hand, after you cut the rough outline of the rudder for the left and right core halves, you’ll need to cut out the recesses for the stock and webs. A router works well for the thin recesses for the webs and roughly cutting out the shaft recess. You might do the final shaping with a die grinder or more slowly with a rotary tool like a Dremel.
Preparing the stock and core
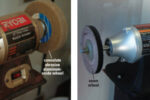
Check with your metal supplier or a welding fabricator for advice on which welding electrodes should be used with which alloy for the webs. You’ll also have to have the shaft machined for a keyway for a quadrant and/or a tiller connection at the top. Take the old stock if you still have it so the machine shop can copy the required machining directly.
Most machine shops also have the ability to weld the webs to the rudder stock. We had a machine shop cut the webs for the rudder stock from 316L flat bar and weld them to the stock.
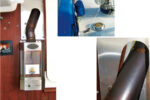
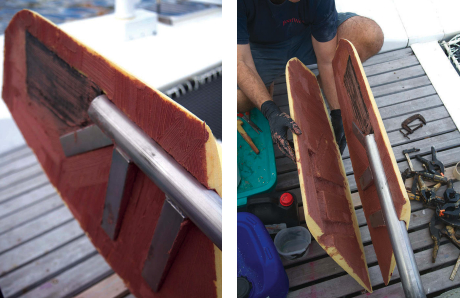
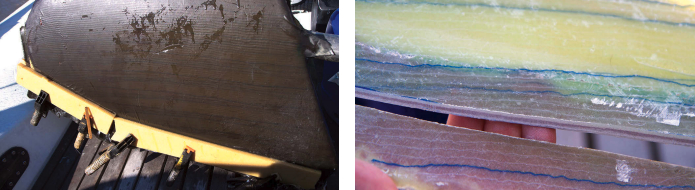
We glued the left and right sides of the cores together and to the stock and webs with an epoxy mixture thickened to the consistency of mayonnaise or peanut butter with colloidal silica and micro-balloons. We also added a few layers of carbon fiber inside the cores below the metal stock to stiffen the blade (the old core was made of wood, which is a bit stiffer than the foam we used).
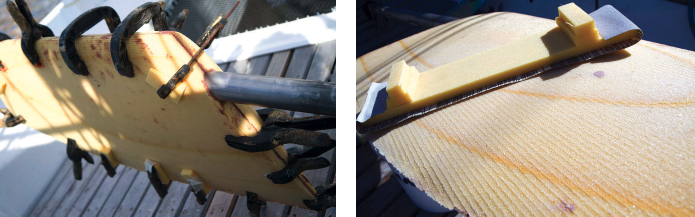
For this stage, use ample amounts of epoxy and don’t worry about the excess that you squeeze out when you clamp the two halves together; this is no place to skimp on quantities. Clean up the excess and leave it to set overnight.
If your core was NC cut, you can apply the fiberglass skins. But if you are starting with rectangular foam blanks, get out a sander and your templates. Foam sands with little effort. It’s easy to cut away too much, so take your time and check often with your foil templates. If you overdo it, fill any hollows with a fairing compound after you’ve laid up and let cure the fiberglass.
Laminating
The easiest way to apply the fiberglass is to support the rudder with the stock horizontal and the leading edge up. Put down a clean plastic dropcloth to catch resin drips.
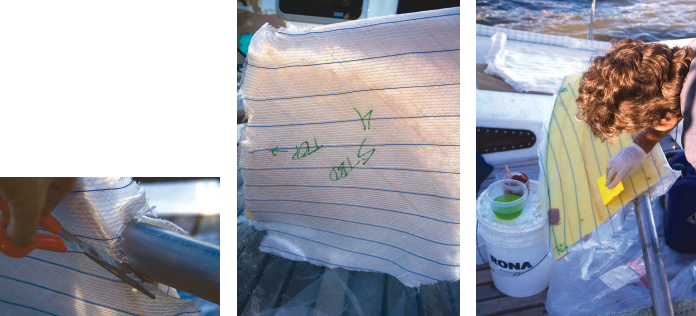
Pre-cut your pieces of cloth to the correct shape. Drape the first layer of cloth on the dry core. While you can pre-wet the core and wet out the cloth on a flat surface covered with plastic first (you’ll save some resin this way), the wetted out cloth is awkward to handle and difficult to align correctly on the wet rudder. For this job, we applied the cloth dry and wet it out on the rudder.
Apply an ample fillet of epoxy resin and some small tabs of glass where the stock meets the core. This is where water typically gets in.
At the end of your laminating session, cover the wet layup with peel ply, which will absorb the excess resin but will not stick to the laminate. It also flattens out the glass cloth. Peel ply is a thin woven nylon or polyester cloth. It’s available from specialty fiberglass suppliers, but we’ve always gone to a fabric store and bought a few yards of cheap ripstop nylon. Apply it over the final layer of fiberglass while the resin is still wet. When you peel it off the next day, after the fiberglass has cured, it leaves a very smooth surface.
It’s hard to get the trailing edges of the rudder’s two sides to stick together nicely. One trick is to take a few wooden battens, cover them with Mylar packing tape so they don’t stick to the laminate, and clamp the edges together.
After the fiberglass had cured, we removed the peel ply and trimmed the trailing edge with a jigsaw. While we’ve often mixed our own fairing compound, for this job we used a commercial epoxy fairing mixture. (We used Jotafair from Jotun, but Awlfair from Awlgrip is similar and more widely available.) It’s more costly than making your own, but it goes on like butter and speeds up the fairing process because you’ll probably have to apply fewer coats to get a great surface finish.
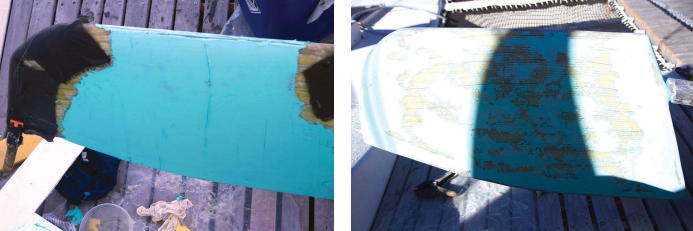
Even with a computer-shaped core, slight imperfections can creep in during the laminating process, so we sanded using a longboard and 80-grit sandpaper. The longboard was a 20-inch-long piece of 1⁄4-inch plywood with a wooden handle screwed to each end. Using a longboard ensures that you’re not creating hollows or hills in the final shape. The shape was really good and we spent only about a half hour with the longboard. A light sanding with a 6-inch random-orbit sander and 220-grit paper completed the fairing.
To prevent rudder hum, trailing edges on raceboat rudders are often chamfered at a 45-degree angle to the vertical edge. This is well worth doing on a faster boat. A few passes with a sander held at an angle will achieve this quickly.
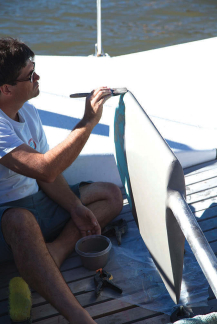
The final step is to apply a coat of epoxy primer and then two coats of antifouling to complete the rudder.
Time frame
Because we outsourced the shaping of the core, it took only five partial days to build our new rudder.
Day 1 – Smooth out core machining marks and glue to stock.
Day 2 – Apply fiberglass skins.
Day 3 – Fairing compound in a.m., sand in p.m. Apply second coat of fairing compound.
Day 4 – Final sand the fairing compound, paint with epoxy primer.
Day 5 – Apply two coats of antifouling.
The result exceeded our expectations — a sophisticated rudder shape with a much stronger stock that should be good for many more years of service.
Diane Selkirk is a writer whose work has appeared in many sailing and outdoors magazines. Evan Gatehouse is a mechanical engineer and naval architect who has worked for firms such as Farr Yacht Design, Robert Allan, and Riverside Marine. Currently they and their daughter, Maia, are six years into a circumnavigation aboard Ceilydh, a modified Woods Meander 40 catamaran. Read about their passages and adventures at http://maiaaboard.blogspot.com.
Thank you to Sailrite Enterprises, Inc., for providing free access to back issues of Good Old Boat through intellectual property rights. Sailrite.com