Stand proud and tall (if you can) once you’ve repacked or adjusted your boat’s stuffing box
Issue 23 : Mar/Apr 2002
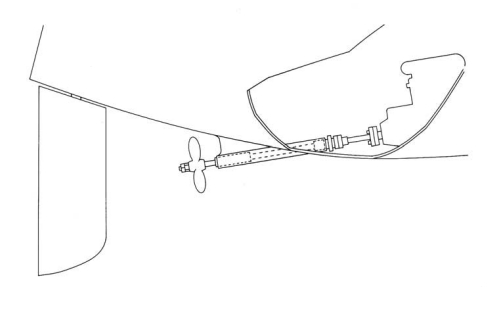
A stuffing box by any other name — shaft seal, packing gland, rotating seal, packing box — is of interest and concern to all owners of inboard-powered boats.
Sailboats in particular, because of their narrow keels and engine placement, are a nightmare when it’s time to adjust the stuffing box or replace the packing. In some boats, unless you are a contortionist, about all you can do is look at the stuffing box. You can’t quite touch it, at least not with tools that fit. There are special stuffing-box wrenches. I even bought one in a moment of weakness. But in the space that is available, they work no better than my 50-something-year-old, square-jawed, small monkey wrench and medium channel-lock pliers.
The long and short of it is that traditional stuffing boxes require some access and attention, and designers and builders will normally have made this possible, if not easy. In fact, if stuffing boxes were not so important, they could easily be ignored. As a matter of fact, they generally are ignored in spite of their importance, unless they leak too much.
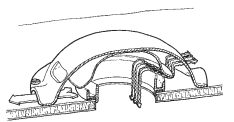
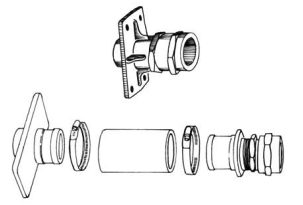
Stuffing boxes come in two kinds: rigid and flexible. The rigid types are hard bolted to a structural member while flexible ones are attached to the boat by a heavy-duty rubber hose and hose clamps. Most sailboats have a flexible stuffing box. This discussion will focus mainly on the flexible type of installation, but the same principles apply to either method of mounting.
When I was building small commercial tugs, I used a rigid-mounted stuffing box. I have seen old wooden sailboats with a long deadwood (cavity through which the shaft runs) with an externally mounted stuffing box that faces aft and outboard instead of facing forward and inboard. These have to be adjusted during a yard period or by a diver. The reason for using external stuffing boxes on wooden boats is that there is no way to apply antifouling paint to the long narrow hole in the deadwood. The worms would eat the shaft log right up. In fiberglass construction, this problem is eliminated.
Different requirements
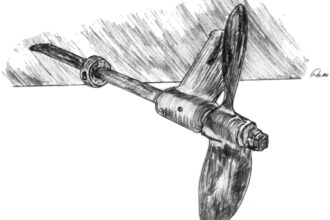
The problem with any inboard marine drive is that we want one end of the prop shaft to be in the water while the other end is in the air of the machinery space. We want to prevent the water from entering the hull, but we want the shaft to rotate freely and not heat up at the seal. We would like to prevent the water from entering the hull when the shaft is stopped but allow a little water to cool the shaft when it is turning. Too little cooling water when the shaft is turning, and the shaft will be scored and will heat up or bind; too much water, and we will have to pump the bilge too often. Better too much water than too little, though. In the case of a conventional stuffing box with a packing, this means we may have to tolerate a little leak when the shaft is turning, but we would like to have none when the shaft is stopped. For many stuffing boxes this is the ideal adjustment.
Many types of machinery use this same device. Externally driven water pumps all use stuffing boxes or shaft seals of some sort. On ships and oil rigs, ballast pumps have stuffing boxes sealing 3-inch shafts.
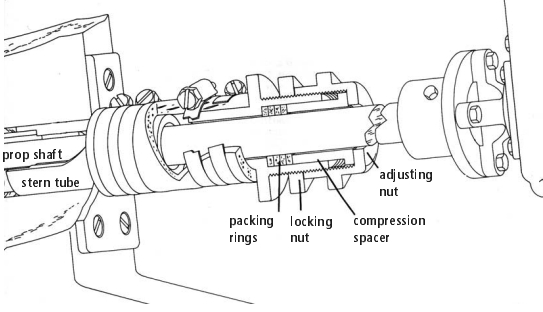
On fiberglass sailboats, flexible stuffing boxes are mounted to the shaft log with a special hose. The cylindrical cast-bronze housing contains the packing rings and compression spacer. An adjusting nut forces the spacer against the packing rings, which causes them to compress and seal against the shaft. A locking nut prevents the adjusting nut from rotating after adjustment is made.
Snug enough
In a perfect world, theshaft nut would be snug enough to prevent water from entering the boat when the shaft is stopped and loose enough to allow some cooling water to circulate around the shaft when it is turning. This water will make a slow drip into the bilge. This perfect world is what we are trying to achieve when we pack and adjust our stuffing boxes. But it is a relatively difficult thing to achieve. Too tight, and the shaft overheats, gets scored, and permanently drips. Too loose, and the stuffing box drips all the time so we must frequently run the bilge pump to dispose of the water. If you have a traditional stuffing box with flax packing, a cool running seal with a slight drip is about the best you can hope for. There are rare stuffing boxes with flax packing that are so fitted and adjusted that they neither drip, nor overheat. It is possible, but don’t hold out for this. In most cases a little drip while running is as good as it gets.
Our choices for packing are greatly expanded from when our fathers owned powered sailboats. At the low-cost end of the packing choices is flax packing lubricated with tallow and/or paraffin. This packing is a satisfactory choice proven by years of use. There are improved flax packings that use PTFE (Polytetrafluoroethylene) as the lubricant. PTFE is sometimes known as Teflon, a DuPont brand name. Relatively new are packings made of PTFE and lubricated by PTFE. These and the flax packings, with either natural or PTFE lubricants, must have additional water lubrication and cooling; they typically have an occasional drip when the shaft is turning.
Truly dripless
Up the scale in cost and performance are packing systems that use alternating flax and PTFE packings, both lubricated with a PTFE paste. These packing systems can achieve true dripless performance because they do not need any water flowing through them to function properly. The PTFE paste takes the place of the water. While these systems are suitable for sailboats, they are not necessarily a good choice for high-speed powerboats. If the shaft diameter times the shaft RPM exceeds 1,000 feet per minute, the paste may not stay in place. Typical sailboat applications are around half this figure.
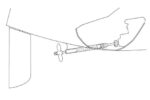
Graphite packing is also available, but its use is controversial. The controversy has to do with graphite (a form of carbon) being high on the galvanic scale. It is thought that this may cause corrosion of the shaft. Nigel Calder mentions this material and the controversy in his book, Boat Owner’s Mechanical and Electrical Manual (from which the illustrations for this article were extracted. Our thanks to Nigel, artist Jim Sollers, and McGraw Hill/International Marine for permission to do so. -Ed.) but says he has used graphite packing for seven years without problems.
I have tried Syntef, which is a brand name for the system that uses the paste and alternating rings of flax and PTFE. I had mixed results. Maybe I did not understand how to pack the claylike substance into the stuffing box. Syntef is also sold as a lubricant to add to traditional flax packing to allow you to compress the packing tighter with no adverse binding of the shaft. This allows you to seal out the water more completely.
Dry bilges
My boat has a conventional stuffing box packed with Teflon-impregnated flax packing. By careful adjustment, and changing out the packing every three years, I have been able to maintain a dry bilge (at least it was not filled by a stuffing-box leak).
One way to check if your packing is too loose is to see if it’s dripping when the shaft is stopped. If it drips in this condition, it’s too loose. Tighten it until the drip just stops. No more, or it will be too tight. Run the engine in gear for a little while. Then stop the engine and feel the stuffing box. If it is just warm to the touch, you probably have it adjusted correctly. My Teflon-lubricated stuffing box never drips, but the shaft never gets more then a little warm. This is perhaps better than should be expected from this kind of packing.
Beware the shaft
Incidentally, never touch the shaft with the engine running and the shaft turning. It is all too easy for the shaft or coupling to grab a piece of your clothing and wrap you into the shaft. Any internal combustion engine is stronger than you are, and it will not stop just because something is wrapped on its shaft. I once witnessed the result of a 1 1⁄2-inch nylon hawser being wrapped into the prop of a tugboat. The hawser was secured on deck and became rigid. The engine continued to run until it tore itself off its beds, breaking all four mounting feet. It almost destroyed the tug before it was shut off. All this happened in a second, a very expensive second for the tug’s owner.
Over the last decade, two types of seals have been made available to the boating industry that completely eliminate the need for packing.
Face seals use two hard, flat, smooth disks. One is stationary, and one turns with the shaft. The sealing surfaces are normally two different materials to prevent galling. Face seals are used to seal automotive air conditioners.
Lip seals force a very narrow circular “lip” against the shaft with a spring that surrounds the lip. Lip seals are used to seal pump shafts and automotive wheel bearings.
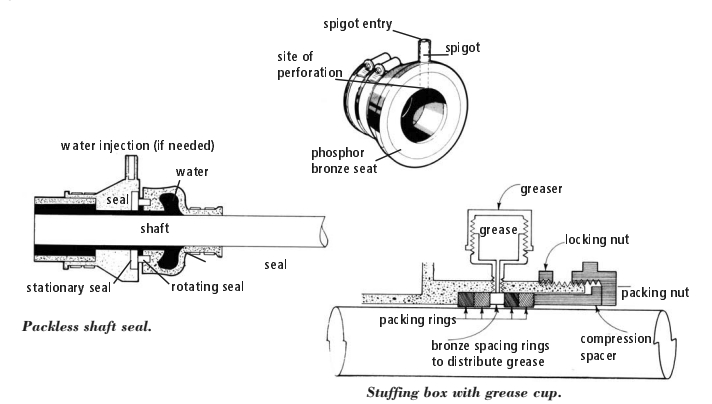
In the marine industry, these sealing systems are called “packless,” which distinguishes them from the traditional stuffing box that uses a packing. Several manufacturers make packless seals. PYI markets a Packless Sealing System using a face seal, and AB Marine markets a sealing system called Orca, which uses lip seals.
Weigh advantages
It is an expensive job to convert from the traditional stuffing box to these newer devices, and one must weigh the advantages carefully. To install a new system, the boat must be hauled out, the shaft pulled, the old system removed, and the new installed. This is a very popular option on new construction, but I’m not sure of its usefulness on older boats compared to the expense of the purchase (about $200 for a 1-inch shaft) and installation costs.
Some years ago I installed a new diesel in an older Pearson Commander that had never had an inboard engine. The owner decided to install a packless sealing system. It was a new installation, and he had already spent the money for the haulout so the only added cost was the packless device itself. I read the instructions and carefully installed the system. To my amazement, when the boat was launched the seal leaked like a river. I realized that the stationary seal was cocked at an angle to the rotating seal and was, therefore, letting the sea in. I snapped the stationary seal into correct alignment with its rotating counterpart, and the leak stopped. The manufacturer said the spring within the rubber bellows was too weak and allowed the misalignment. Newer models of this seal have a stronger spring. Even with its weaker spring, the boat has had this system for more than 12 years without a problem.
Constant pressure
One of the newer systems uses a nitrile bellows and water pressure to produce a constant pressure on the stationary flange. Today, the learning curve has been overcome, and the products are very good, but do you really need them? I’m not such a traditionalist that I ignore new better ways to do something, but a little effort with some other packing materials may create your “perfect world” at little cost and minimal effort.
Let’s say you have a constantly dripping stuffing box and want to fix it. Where do you start? The first step is to determine the shaft size. Measure the shaft with a caliper and then back off the stuffing box lock nut and unscrew the stuffing box nut. Measure the gap between the face of the shaft and the inside of the stuffing box. For a 1-inch shaft this will probably be around 1⁄4 or maybe 3⁄16 inch. Try fitting a small piece of narrow wood, like a cut-down popsicle stick, in the space. Keep cutting the wood down until you have a slip fit with no wobble. Once you have determined the correct size of the shaft and the packing, you can buy your packing. Packing is sold in most marine catalogs and repair facilities.
The stuffing box can be repacked while afloat . . . but with caution. You cannot stop for a rest in the middle of the operation. Be sure you have all the tools you will need or a trusty helper to get them for you. A few old towels are always good to have on hand. Along with wrenches to back off the stuffing box lock nut and stuffing box nut, you will need a sharp knife, an ice pick, and a corkscrew. They sell a packing remover that looks like a corkscrew with a flexible handle to allow it to work parallel to the shaft. You’ll have to decide if you really need one. I usually have enough room between the stuffing box and engine coupling to use an old corkscrew parallel to the shaft.
Make your own
You may have bought your packing in pre-cut rings or in a long rolled strip. If you don’t have pre-cut rings, you will have to make them. You must do this before you remove the old packing if you are doing this job with the boat in the water. To make rings, wrap a tight helix of three to five turns on the shaft or on another shaft of the same diameter. Then make a diagonal cut across the rings with a sharp blade. This should produce rings that are sized to fit your shaft. Make five if you are unsure how many rings are in your stuffing box. Before you remove the old packing, make sure the new rings fit the shaft properly.
When you are sure of your rings, use the corkscrew to reach into the stuffing box cavity and remove all of the old packing. Get it all. Poke around with the ice pick. If you feel something soft, you still have packing in there. Remove it. At this point there will be some water running in over the shaft. This will not be a gusher, but a steady and controllable stream. Slow the influx with towels.
Fit the first packing ring around the shaft and slide it into the packing cavity, noting where the two ends butt together. Fit the next packing ring with the butt joint offset from the first butt joint. Space the joints evenly at either 120 or 70 degrees, depending upon how many rings your stuffing box is designed to use. Continue in a similar fashion until all sections are around the shaft and inside the packing cavity. Push them in hard so you can slide the compression spacer down onto them and start the packing nut on its internal threads. Once the nut is started, turn it in by hand as far as you can. For the last turns, hold the stuffing box with your hand and use a wrench to snug up on the packing. Clean up the area and get ready to start the engine. (Perhaps I should remind you to remove the towels from the bilge. That’s where mine usually end up.)
Check for leaks
Start the engine and engage the forward gear. Observe the stuffing box. Depending on how tightly you packed it, it may leak a little, not at all, or a lot. If it leaks a lot, stop the engine and take up a quarter turn. If it leaks only a bit, take an eighth of a turn. If it does not leak, back off a quarter turn and run the engine again. By trial and error you will come to the correct stuffing-box adjustment. Once you have adjusted it where you want it, tighten the locking nut and keep your eye on it until you’re sure all is well. This probably took more than an hour, but think of all the money you saved and the knowledge you gained. The packing will wear in over time, and it will need to be tightened up a little more. But that’s easy now that you know how.
There are several variations on the standard traditional stuffing box. If the shaft log is especially long and there is insufficient water supply from the sea to cool the shaft, water will have to be provided from the engine cooling water. No matter that it is hot, it will provide a water lubricant anyway. Special stuffing boxes are built with an injection pipe to allow insertion of water from the engine. Some stuffing boxes have a grease fitting and grease distribution ring built in as part of their casting. The original boatbuilder usually knew what type of stuffing box was required for the boat and provided the correct hardware.
Notched nuts
In rare instances, the old stuffing box will be so corroded that it will need to be replaced. If you want to stay with the traditional style but have a hard time gaining access to adjust the packing nut, consider the stuffing box from Spartan Marine. It uses a notched packing nut and notched lock nut so it may be tightened or loosened with a hammer and flat-bladed screwdriver. Other than Spartan’s, all the other traditional stuffing boxes are pretty much the same.
Before you get all cleaned up and out of the bilge, there is one more job. The stuffing box assembly is secured to the shaft log by a heavy-duty rubber hose. This hose is mounted to the stern tube by stainless-steel hose clamps, and here is the potential problem. On most boats you can only see about 270 degrees of these clamps. The most important part — the part facing down into the bilge — is almost impossible to inspect. Ask your assistant (you do have one, don’t you?) for a dental mirror or any inspection mirror on a handle. Slide the mirror under the stuffing box hose and shine a flashlight on the mirror. It will light up the entire underside of the stuffing box hose and let you evaluate the hose clamps. If they are rusty, they need to be replaced. This job may be harder than adjusting the stuffing box, so be prepared. Most builders chose perforated hose clamps for their price. But they do not last as well as the boats on which they were installed.
If you have to replace the hose clamps, get the non-perforated 316 stainless-steel clamps or stainless-steel exhaust hose clamps with a tee bolt found — at great expense — at your favorite marine supplier. Check for the correct size. Do not be cheap about this. Your boat can sink much faster from a broken hose clamp than from any small leak in the stuffing box seal.
While you are in that awkward position, inspect the hose. It should be five-ply exhaust-type hose. This will last a long time, but sometimes it will split. If it looks questionable, try to feel how bad it really is. Changing it out is a yard job, and a very labor-intensive one at that. If it needs to be done, then do it, but examine it carefully first. It could just be the surface layer that is split. Maybe you can get the remainder of the sailing season out of it safely. If you think it needs to be replaced right away, make a yard appointment and get it done. Some general catalogs, as well as Buck Algonquin and Spartan can supply new shaft-log hose.
Not all jobs on a sailboat are fun. This one certainly falls in that category. But you get a great feeling of accomplishment from completing the job, along with an added sense of safety knowing that one potential leak has been removed.
Go ahead: you can try to stand up straight now.
Thank you to Sailrite Enterprises, Inc., for providing free access to back issues of Good Old Boat through intellectual property rights. Sailrite.com