Simple solar-heated system is gravity-fed
Issue 57 : Nov/Dec 2007
It’s known as the “Shower Dilemma.” Most pocket cruisers and older boats are not equipped with the luxury of a hot, freshwater shower. It’s up to the boatowner to find some way to keep clean while enjoying life under sail. Some rely on shoreside facilities or jump overboard. Others use solar shower bags, water heated on the stove, or plastic spray containers. More complex solutions involve electric or gas-heated water tanks or make use of the engine’s heat exchanger. A few cruisers convert their dinghies into full-sized bubble baths.
The sailing life does not have to be like camping. A lover of life’s creature comforts, I wasn’t happy with existing shower methods. Solar bags and plastic containers aren’t easy to refi ll and are awkward to store. Heating water on the stove is time-consuming, and I don’t have the power requirements or storage space for a water heater. Undeterred, I thought about how I could have an on-demand, private, indoor hot-water shower without electricity, running the engine, awkward refills, or space-hogging clutter. It had to be low-cost, elegant, and easy.
I found a solution that works in my Bayfield 29, Angel. This simple system is integrated into the boat with only minor changes. It’s solar-heated and the water is gravity-fed. The water tank is conveniently refilled using the same manual foot pump that provides water to the sink’s faucet. I refill the shower’s hot-water tank from inside the cabin with my big toe. It’s that easy. One disadvantage is that a series of dark and cloudy days will produce a lukewarm shower. In addition, hot water isn’t available late at night or before sunrise. And fi nally, I had to drill a 1⁄2-inch-diameter hole in the cabintop for the hardware installation.
The solution
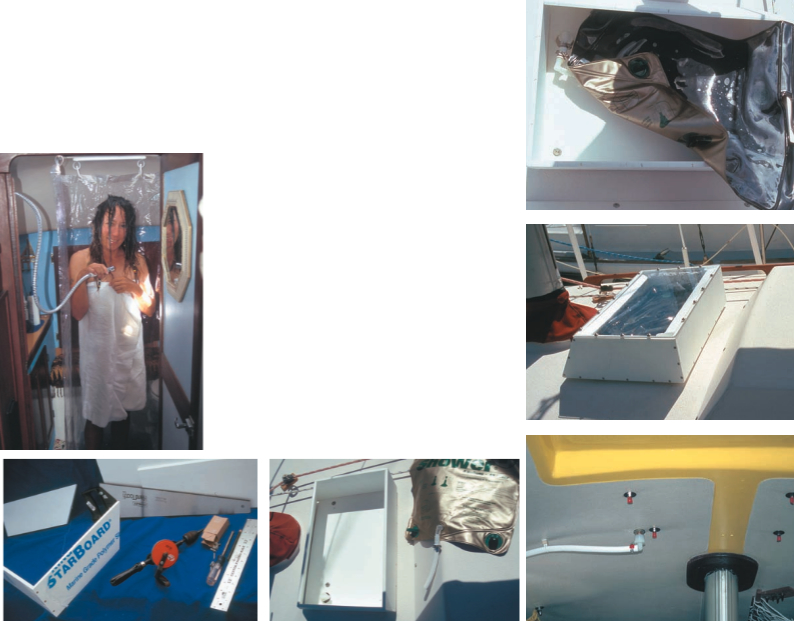
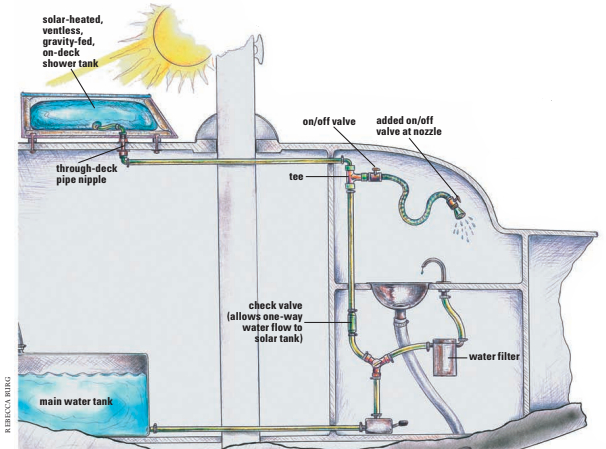
I mounted a low-profile, 5-inch-tall box with a clear acrylic cover on Angel’s cabintop in an unused area just forward of the spray hood (polycarbonate can be used in place of the acrylic). The box’s footprint is no larger than the average hatch. It’s lined with insulating foam around a 4-gallon solar bag, which serves as an unvented hot water tank. Weighing no more than 31 pounds when full, this solar tank is drained and refilled using a single through-deck fitting hidden by the box. Gravity routes the hot water belowdecks to a shower hose and low-pressure nozzle.
Plumbed into the boat’s freshwater system, the solar tank is refilled from below with the help of the sink’s manual pump. For an initial cost of about $200, this permanent shower can be custom tailored to almost any vessel.
Solar tank
First, determine your desired water capacity and select an appropriate-sized solar shower bag. Serving as the tank, the solar bag will be contained inside an insulated box. A 4-gallon bag was plenty for my small vessel. For the box material, I used StarBoard, a durable, user-friendly plastic. It’s like working with wood, but without the splinters. To figure out how much StarBoard I needed, I filled a 4-gallon solar shower bag to capacity and took its measurements. The bag must fit snugly inside the box without sliding. Allow enough room for at least an inch of foam insulation between the box and the bag. Thicker insulation may be needed for boats in cooler climates. No insulation is used over the box’s solar-collecting, clear acrylic top face. A white 27- x 30-inch StarBoard sheet, 3⁄8-inch thick, was enough to build Angel’s box.
As an amateur in the world of building things, I first made a mockup of the box using foam core from a craft shop to check my measurements before cutting the StarBoard. I slanted the box’s face back for aesthetics and ability to shed deck-sweeping waves. The end result was a 5-inch-high box with a 15- x 18-inch footprint and a top opening of 11 x 18 inches. Without access to a machine shop, I used basic tools to make the box in the cockpit while at anchor. A long metal ruler and wax pencil marked the pieces, and I was able to cut the plastic easily with a 20-inch crosscut hand saw. Rough edges can be squared and dry-sanded with a wood block. I used a hand drill, countersink bit, and stainless-steel flathead wood screws for assembly. Clamps or the helping hands of a friend are needed to hold the pieces together and line up the box’s sides for drilling. I rounded the sharp corners and edges with sandpaper.
Through-deck plumbing
Next I needed a hole saw and an electric drill to cut a 1 1⁄2-inch hole in the bottom of the StarBoard box for the through-deck plumbing. The location of this hole should be near an inside corner of the box close to the hose barb on the solar bag.
For the box’s solar-collecting cover, I cut a 1⁄4-inch-thick, clear acrylic sheet, measured to fit over the opening. I used a hand hacksaw, a bi-metal 12 x 24 blade, and a constant dribble of water on the blade while cutting the acrylic. Avoid flexing the brittle plastic while cutting it. Round the top edges of the acrylic cover by dry-sanding with 120-grit sandpaper. Next, locate and drill the holes for attaching the acrylic lid to the finished box.
To fasten the top cover, I drilled the StarBoard for a #6 screw, but the acrylic must be treated differently. I drilled holes in the acrylic that were just larger than the diameter of the screws. The manual drill and a sharp bit worked well for the acrylic. Round-head screws with finish washers hold the acrylic lid in place. The box does not have to be watertight.
Here’s a handy plastic tip: when re-inserting a screw into plastic like StarBoard, first gently turn the screw in the opposite (counterclockwise) direction. It should “fall in” the existing thread. Once you locate the first thread this way, turn and insert the screw normally. This prevents stripping the threads, something that’s easy to do on soft materials like plastic.
Gravity-fed tank
Using the finished box as your model, find a suitable spot on the cabintop or deck. Remember that this gravity-fed tank must be higher than the shower nozzle. Basically, the tank should be higher than your head when you’re in your chosen shower spot inside the cabin. If you have a small boat you may have to shower sitting down.
Once the box’s location is determined, install the through-deck plumbing. For Angel, I used a 1⁄4-inch bronze pipe nipple (plastic may be used since it’s well above the waterline) and two bronze hex bushings with 1⁄4-inch female thread to 1⁄2-inch male thread. The length of the nipple depends on the thickness of the cabintop. A 2-inch length worked for Angel.
I used a 1⁄2-inch drill bit and a rattail file to fair out the hole in the cabintop, which fit the pipe nipple perfectly. On boats with cored decks, the coring must be removed from around the inside of any hole drilled in the deck. Tape off and fill an oversized hole with epoxy. Then, once the epoxy has set, re-drill the hole the correct size. When tightening the bushings, I had to add one large fender washer to serve as a backing plate and spacer for the best fit. When tightened, both bushings should lock the nipple in place similar to installing a through-hull. The installation should be immovable and secure. I used BoatLife’s Life Calk as the sealant.
The 1 1⁄2-inch hole in the box’s bottom should sit over the newly installed the box and attached to the through-deck fitting. Assuring that the hole and fitting were lined up, I permanently mounted the box on the cabintop with four 1⁄4-inch through-bolts, fender washers, and lock nuts. Feet made of leftover pieces of StarBoard accommodated Angel’s curved surface. The solar shower bag is placed in through-deck fitting with a piece of hose and hose clamps.
Once installed, I padded the fittings to protect the solar bag from chafe. I also lined the inside of the box with closed-cell foam cut to fit. This serves as insulation, helping the water stay warm on cool, windy days and retaining heat for a while after sunset. Foam pads sold in the garden section of the hardware store as kneeling pads are an ideal source of closed-cell foam. No air vent is required; the bladder-like solar tank is refilled and emptied through the same hose and fitting. To prevent annoying drips, especially between metal and nylon, I mated all threaded parts with Life Calk.
Belowdecks
I installed an ordinary 1⁄2-inch garden hose Y-valve under the sink counter. Using this valve, fresh water from Angel’s foot pump can be directed to the sink faucet or diverted to refill the solar tank. As I was not sure about back pressure and possible stress on the foot pump, I installed an inline 1⁄2-inch check valve in the hose above the Y-valve on the shower pump-up side. Using the foot pump, I can effortlessly refill the shower from inside the cabin. At first, it took some guesswork to determine how many pumps would refill the bag, especially since the bag isn’t completely emptied after I shower. Angel’s common-sized marine foot pump produces 4.3 gallons per minute. Those who have boats with electric pumps may have to experiment to see how long it will take to fill the bag. I’ve found that overfilling simply causes the excess water to seep out of the shower bag’s fill cap with no harm done.
I attached a 1⁄2-inch nylon female hose elbow to the interior end of the through-deck fitting. I ran opaque marine/RV 1⁄2-inch water hose from the elbow to the shower area and made a foam covering for the fitting that protruded belowdecks to protect unsuspecting guests’ heads. Once the solar bag was pumped up for the first time, I pushed out all air bubbles that were trapped in the bag.
A shower hose and low-pressure nozzle with standard 1⁄2-inch pipe fittings were “teed” into the system along with an in-line garden hose on/off valve. For an indoor shower stall, I use a 17- x 23-inch-wide plastic tub that is 5 inches high. It catches the water, which I pour into the sink after showering. Originally an under-bed storage bin found at a department store, the tub’s short height allows me to slide it out of the way when not in use. A plastic shower curtain protects the cabin. After it’s dry, I bundle it up and secure it with Velcro in the corner where it’s out of the way.
Adjusting solar energy levels
Slanting the front face of Angel’s box reduced the size of the top opening and the amount of sunlight entering it. But this didn’t seem to make a difference in my southern cruising grounds. On a sunny 70°F day, my solar box will show water temperatures higher than 122°F by noon. When cruising the tropics and subtropics, the water is able to get too hot and I partially cover the box with a snap-on piece of Sunbrella. Those in northern climates may wish to experiment with black lining inside the box and around the solar bag. Take care when experimenting with this; you don’t want to end up creating a solar oven capable of melting a plastic shower bag. The simplest solar ovens will easily reach temps of more than 150°F. For boats in high latitudes, the box can be built with a wider top for greater exposure to sunlight.
This shower solution can be perfected and customized to meet the unique needs of your boat. With a bit of careful planning, creativity, and a few tools, you can be enjoying a luxurious hot shower with no electrical demands or refill hassles.
Rebecca Burg comes from a long line of fishermen, mariners, and coastal dwellers. An artist and writer, she singlehands and lives aboard her Bayfield 29 but never far from the Morgan Out Island singlehanded by Bill Robinson.
Thank you to Sailrite Enterprises, Inc., for providing free access to back issues of Good Old Boat through intellectual property rights. Sailrite.com