Don’t let wear and tear stymie your cruising plans

Issue 105 : Nov/Dec 2015
While we were anchored in Micronesia, a large well-found yacht arrived in port on a tight schedule. She was bound for the Marianas and then mainland Japan via Okinawa, a passage of about 3,000 nautical miles. The season between winter storms and typhoons when it is safe to cross this expanse of ocean is short and the crew was understandably anxious to push on. Unfortunately, on the last passage, the tack webbing had failed on the only genoa they had aboard and the crew had no way to repair it.
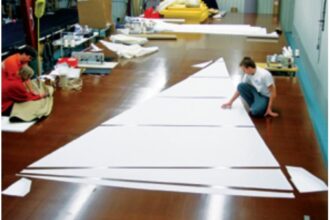
When we laid the sail out to inspect the damage, it was clear to us, and to the crew, that this failure presaged others to come and the sail would require extensive work before the yacht could put to sea. There was no time in their schedule to buy a new sail or to send this one to the nearest sail loft in the Philippines, so the repair had to be done in the marina parking lot with materials on hand.
Gearing up
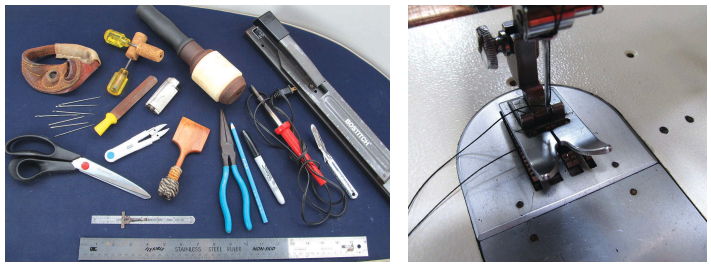
Every sail-repair project is unique, but most require the same techniques, which are fairly easy to master, and employ the same tools. You can get a head start on acquiring the necessary skills if you can attend a workshop or work under a sailmaker willing to mentor you. We were lucky enough to do both before we set sail.
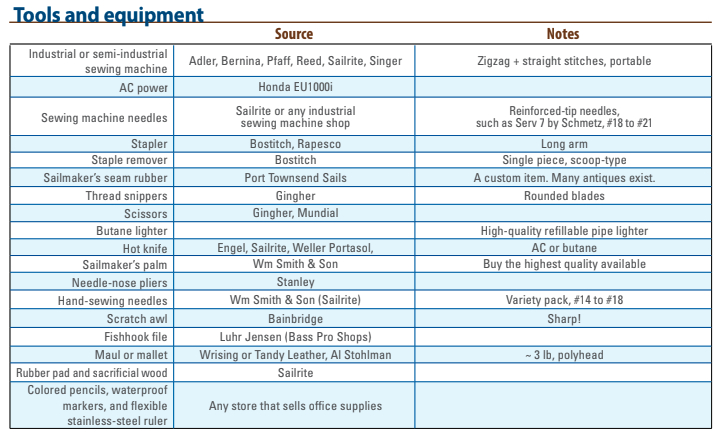
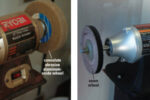
Most sail repair work is done using a heavy-duty industrial sewing machine that can take heavy-gauge round needles and V92 or V138 bonded polyester UV thread. Light-air sails like spinnakers are an exception. You can use smaller needles and thinner thread when repairing them. Home sewing machines are generally not robust enough to handle the heavy fabric and thread used on working sails. Most, though not all, machines used to sew sails are of rotary-hook design. They are usually very heavy and made with a body and gears of steel with few, if any, plastic parts. A monster wheel with a hand crank increases the punching power of the needle. The hand crank is also good for sewing thick assemblies and sewing small areas at slow speed.
Sails are sewn with zigzag stitches except in a few places, such as roller-furling luff tape, so your sewing machine should be capable of sewing straight and zigzag stitches at 6 mm or greater width. A two-point (or one-step) zigzag, which is the usual type, works for most sails. Machines are also classified by how they move the fabric sandwich: a walking foot or presser foot. Either will work, though a presser-foot machine allows you to choose from a greater selection of specialized feet for different materials and projects. Searching the Internet for a machine will yield thousands of potential candidates, though few are set up as portables in cases for carrying aboard. Popular brands include Adler, Bernina, Pfaff, Reed, Sailrite, and Singer.
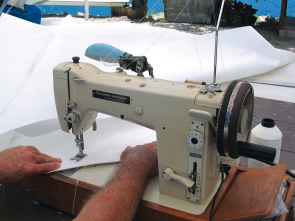
Our Sailmaker model was Sailrite’s top-of-the-line zigzag, rotary-hook, presser-foot machine when we purchased it new in the mid 1990s. It is a Brother TZ1-B652 made in Japan and fitted with a small AC motor, cogged monster wheel, and hand crank, all in a rugged wooden case. A later modification involved removing the clutch that would sometimes slip when we pushed the machine to the edge of its capabilities. Parts are readily available, though we have needed to replace few.
One reference says the Sailmaker will sew through 12 layers of 9-ounce Dacron sailcloth. We have sewn at least that much, sometimes a bit more, when sewing the corners of large cruising sails. It will also sew a whopping 12-mm-wide zigzag stitch. Its limitation seems to be the presser-foot lift height when set up as a portable machine. If it were set up on a sewing machine table and fitted with a knee lift, the presser-foot lift height would be greater. Whatever machine you choose, you will find its limitations. This is why sail lofts operate a variety of sewing machines.
In addition to machine sewing, hand sewing is often required when repairing sails. With the proper tools, hand sewing is relatively simple. The most important thing to learn is to handle the needles safely when sewing through thick materials. These very sharp, very thick needles can cause serious injury.
Machine sewing
Sewing heavy sails takes practice. Sewing machines are relatively simple mechanically, but the precise interaction of the parts is critical. Keep your machine well oiled and timed, especially if you keep it on board. Be prepared to stop working and service the machine whenever things go awry. With patience, you’ll solve the problem and be back at work again.
A sewing machine has two thread streams, the upper thread and the lower (or underside) bobbin thread, that cross and lock inside the fabric sandwich. The two threads cinch the fabric layers together, so if the stitch is to be uniform, their tension must be identical. The upper thread is continuously fed into the machine off the top of the thread spool. The underside thread on most sewing machine models must be wound onto a bobbin and is of limited length. When the bobbin thread has been used up, sewing must stop and a new bobbin substituted. If your sewing machine can wind a new bobbin from a separate spool of thread as you sew, that will save you some time. Our Sailmaker allows us to do this.

Before beginning to sew, baste your fabric pieces securely using an adhesive or staples. This prevents misalignment of the slippery fabric. Adhesives may be applied in the convenient form of double-sided sticky tape, called seamstick, or as a liquid, such as contact cement. Staples are an efficient way to baste fabric layers because dozens can be applied (and removed quickly afterward) and they leave no residue to attract dirt or mildew, a problem with adhesive-basted seams.
Before starting to sew, test and adjust your machine’s settings by sewing a stack of material similar in composition and thickness to your sail-repair project. This allows you to confirm the tension settings and adjust stitch size. Your sewing machine owner’s manual should provide instructions for adjusting thread tension.
The size of straight stitches is adjusted strictly by stitch length, but for zigzag sewing you need to adjust the length and width of the stitches to closely match those already on the sail you’re repairing. You may also wish to adjust the presser-foot tension to facilitate movement of your fabric assembly through the sewing machine.
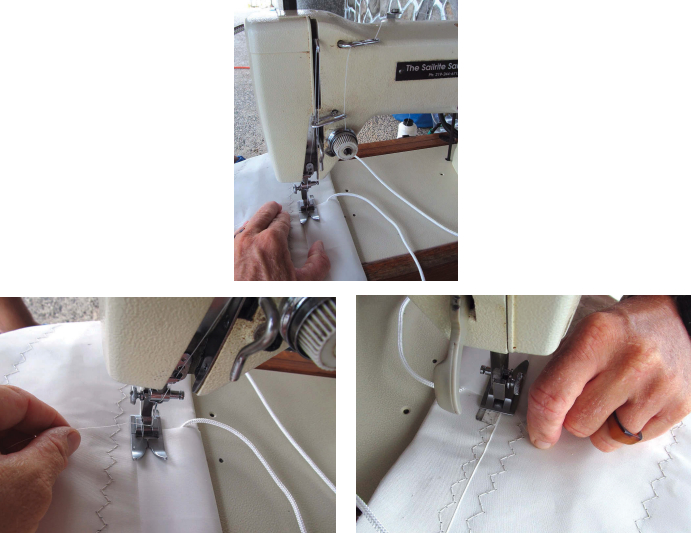
To start a seam, bring the bobbin thread to the top of the fabric. To do this, operate the machine by hand, rotating the pulley (or monster wheel) toward you to bury the threaded needle into the fabric sandwich and continue rotating the pulley until the thread take-up lever is at its highest point. Grab the top thread and give it a slight tug. The bobbin thread should pop up through the hole. Carefully guide both threads around the needle and under the presser foot, hold them taut, and begin to sew. Release the threads after a few stitches.
On straight seams, lock the end of the row by making a few stitches backward to the starting point of the seam before proceeding forward once again. Do the same thing at the end of the seam: back up over the last stitches a few stitches, then proceed again to the end of the row.
For single-point zigzag, lock the end of the row by making a bar stitch at the beginning and end of the seam. We do this by setting the stitch length to its minimum and then sewing while holding down the lever for sewing
in reverse. If the bobbin needs to be changed in the middle of a seam on long sail runs, lock the new zigzag stitches into the last few stitches made prior to the interruption. A hand crank helps you go slowly enough to make the new stitches in precisely the same holes.

Hand sewing
Hand sewing is used to finish, reinforce, or apply protective elements to a sail. The techniques are labor-intensive but simple to master. When at sea, hand sewing replaces machine sewing for emergency repairs, so learning to hand sew sails is valuable for offshore sailors.
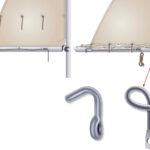
For hand sewing, you’ll need thread called twine, large triangular forged-steel needles, and a sailmaker’s palm. We use three stitching patterns most of the time: straight stitches for tacking down cloth or leather and for seizing rings and webbing, an X-pattern of straight stitches for securing webbing straps, and baseball stitches to join two pieces of leather or cloth along an edge or to secure a boltrope.
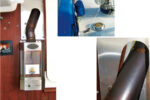
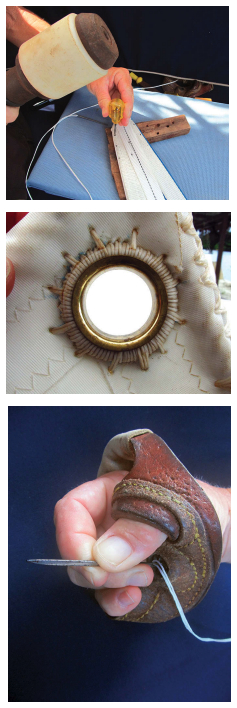
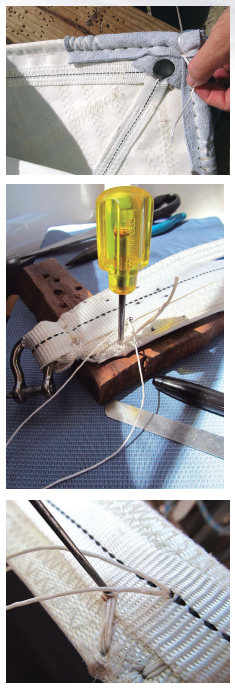
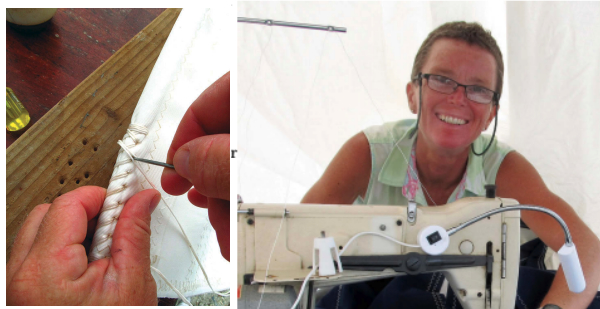
For thick assemblies, we first punch holes with a scratch awl and mallet against a sacrificial wooden block to minimize the pressure necessary to push the needle and thread through the material. This makes sewing safer and reduces fatigue. Some sailmakers recommend using a drill to make holes, but the drill bit can bind and rip the sailcloth fibers.
For Dacron sails, reinforcement webbing, and 4- to 5-ounce leather, we use UV-resistant waxed polyester hand-sewing twine, round, in medium weight (V-462 made by Heminway & Bartlett). Wax holds the strands or plies of the twine together and makes sewing easier. Once the stitch is made, the wax helps retain stitch tension. The quality of waxed hand-sewing twine varies, even between lots by the same manufacturer. You can apply wax manually to improve performance if twine plies don’t hold together well. The only drawback with wax is that it can collect dirt, an aesthetic rather than a functional problem.
The best sailmaker’s hand-sewing needles are made in the UK and are cast and forged. The shanks are triangular and smooth but the tips are very sharp. If you accidentally stick yourself, it will cause a painful puncture wound, so never pull or push a needle toward any body part. Use a fine file, such as a fisherman’s hook file, to keep tips sharp. For storage, wrap the needles in a cotton cloth that has been soaked in sewing machine oil and keep them in a plastic cylindrical container to prevent them from rusting.
A sailmaker’s palm is not a quaint relic of the past — it’s a critical tool for repairing sails because it allows you to safely and effectively thrust an ultra-sharp sailmaker’s needle through a thick assembly of webbing and sailcloth. In the middle of the sailmaker’s palm is a metal base called a thimble, iron, or eye. This metal base has small indents and is secured to a leather strap that wraps around your hand so the eye rests in your palm.
You need a high-quality right- or left-handed leather palm that fits your hand. Don’t scrimp here. The best is a medium to heavy sailmaker’s roping palm molded to fit your hand. To mold the palm, soak it in warm water until it is soft. Once it has softened, put it on your hand and shape it so you can easily grasp a sailmakers needle between your thumb and fingers and brace the needle eye against the palm’s dimpled metal eye. After the palm dries, oil the leather to keep it pliable.
Straight stitch
To begin stitching, measure out roughly 8 feet of twine, thread the needle, and double the thread back. Close your hand around the two thread strands at the needle and pull the thread between your thumb and forefinger from the needle to the end a few times to lay the two strands parallel to each other. Measure and mark for stitches. A short ruler and fine-tipped waterproof Sharpie marker work well.Using a scratch awl and mallet, pierce the assembly against a wooden block. It’s easiest to leave the assembly tacked to the block while you fit your palm. Remove the awl, place the eye end of the threaded needle in the center of the palm’s eye and, while holding the shaft of the needle with your thumb and all of your fingers so it’s perpendicular to the vector of thrust, pierce the hole and push the needle into the assembly with the palm.
Once the needle is securely seated, you can pull against the assembly with one hand as you push using the palm. Take care not to push at an angle to cause the needle eye to slip from the palm’s dimple or you could end up piercing the palm of your hand. Once you have pushed the needle as far into the hole as the sailmaker’s palm allows, pull the needle the rest of the way through from the other side. If you have a lot of resistance, use needle-nose pliers to pull, but don’t pull the point of the needle toward any part of your body.
Once the needle is through, pull the thread through until approximately 1 inch remains on the top side. Don’t knot the thread. Make your second hole in the assembly and, using the palm, pierce this hole with the threaded needle from the underside, as you did before.
It’s helpful to divide the two strands of twine and put the point of the needle between them as you pierce the hole. This keeps the two strands of twine parallel to each other when the stitch is formed. Now put the thread back through the first and second holes as you did before, creating a loop of waxed twine between the first two holes. Pull hard to firm down this first stitch and then continue on, piercing the assembly and setting stitches snugly in the same way according to the stitch pattern. When you have completed your stitching, go back and cut the 1-inch tail of waxed twine down to roughly 1⁄4 inch. Melt and crush (or rivet) this to flatten it and secure the twine where you began sewing.
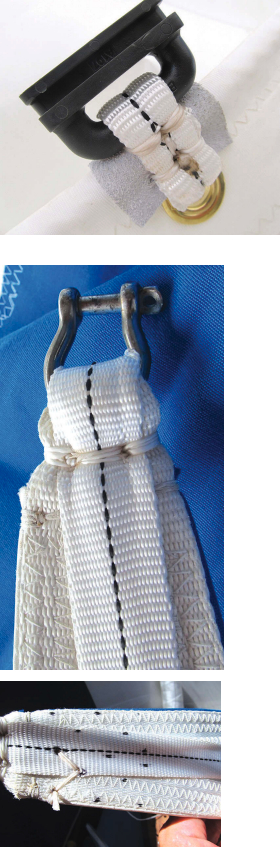
Seizing uses the same techniques and knots. However, when seizing a ring to webbing, at the clew for example, use many straight stitches through the same holes, pulling snugly with each pass, to ensure the seizing is strong enough to prevent the ring from moving against its reinforcement webbing. If there is play between the ring and the webbing, the webbing will eventually fail from chafe. Straight stitches are useful for tacking down materials used to protect the edge of a sail, such as leather chafe guard along the clew.
X stitch
An X pattern of straight stitches is used for sewing webbing to sails, particularly for 1-inch tubular polyester webbing. Some sailmakers also make a box pattern around the outside for additional strength. Measure and mark the stitch pattern by putting a dot at all four corners of small squares. Tubular polyester webbing usually has a dark center line; if your webbing doesn’t have this guide, make an additional mark in the center of the square.
If the webbing strap to be sewn is near the edge, we generally begin at the corner of the X nearest the edge and wrap one or two tight stitches around the edge of the sail. However, the optimal place to begin an X-stitch pattern is in the center of the first X, closest to the edge of the sail (or the ring). Pierce the center and push the thread through to the other side. Next, make a hole in one corner of the X away from the direction you will be sewing (or back toward the beginning), thread the twine back through to the top side and then back down through the center hole, up through the corner of the X opposite your first stitch and then back down through the center once again. At this point, you have created half of your X-stitch pattern. Pull on the thread firmly to ensure the stitches are tight.
Repeat with the remaining two corners of the X, completing the pattern by pushing the needle down through the hole to the opposite side. At this point, you have the tail of twine on the top side of the sail and the remaining thread and needle on the bottom side of the sail. You may choose to knot your thread and begin the next X in the same way or thread back to the top side of the sail through a hole in the corner of the next X down the seam.
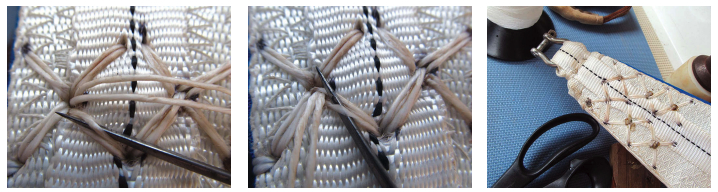
Whether you proceed down the webbing to the next X or make a knot here, the proper knot to use is a flat knot. Begin by inserting the needle under one of the strands of twine in the adjacent X stitch; outside to inside, taking care not to split either strand of twine. Rolling the needle as you insert it helps. Pull the twine through and back toward its standing part. Next, repeat this step, outside to inside, on the opposite strand of twine. Again pull back snugly toward the standing part. Complete the knot by inserting the needle and pushing the twine back through the hole the two strands emerged from, exiting on the top side. Pull the twine smartly until the knot disappears into the webbing. At this point, the tail left at the beginning of your stitching and the remaining thread and needle will emerge from the same hole. Trim the twine ends to 1⁄4 inch, smooth the ends together, then burn and flatten the twine to create a rivet knot. (See also “Seizing Slides and Slugs,” by Leslie and Philip, in the November 2012 issue.)
Baseball stitch
For a baseball stitch, make the first stitch perpendicular to the edge and one additional stitch through the same hole before bringing the thread over the edge and down the next hole on the opposite side. Continue the length of the seam with this cross-over stitch. Make one or two stitches through the last hole, bring the thread across the seam again, and work your way back up the seam, creating an X stitch between the holes and across the edge. Finish by overlaying one perpendicular stitch in the first hole. At this point, both ends of the thread — start and finish — should exit the same hole. Cut them both to 1⁄4 inch, smooth the ends together, and burn and flatten them to create a rivet knot. Alternatively, make a flat knot (described above) to improve the security of the stitching.
Conclusion
Although some professional sailmakers don’t believe sailors can competently repair sails, with a few skills, tools, and supplies and a wee bit of pluck, you can maintain your own valuable sails, especially where there is no sailmaker. The cost, time lost, and sometimes-impossible logistics of sending out for a repair will no longer dampen the dream or soak the pocketbook. Coastal or seasonal cruisers who learn to repair their sails benefit by learning how sails are constructed and also how to differentiate between construction techniques that last and those that do not. This knowledge makes these sailors better equipped to choose quality sails in the first place.
Many years ago in the Sea of Cortez, we helped a family on a 60-foot sloop repair seven panels of their mainsail that were blown out in a chubasco. As they were 400 miles from the nearest sailmaker and it was during the height of cyclone season, there really was no other choice. Their repaired sail looked like “frankensail,” but it was a functioning sail rather than a rag. About a week later, they hailed us on an HF radio net to report simply that they had “sailed to weather.”
Leslie Linkkila and Philip DiNuovo came to cruising and boat ownership as adults and quickly developed a passion for small-boat travel. In 2003, they quit their professional jobs and left the Pacific Northwest behind to cruise the South Pacific in their Mason 33, Carina. After giving Carina a refit in the Philippines, they sailed to Indonesia in September. Catch up with them at http://sv-carina.org.
Thank you to Sailrite Enterprises, Inc., for providing free access to back issues of Good Old Boat through intellectual property rights. Sailrite.com