Solving the problem of joining one to the other
Issue 52: Jan/Feb 2007
In the November 2006 issue, John Danicic wrote about installing an anchor windlass. One remaining issue is the creation of a strong rope-to-chain splice.
IF YOU ARE USING A ROPE-AND-CHAIN combination windlass to deploy and retrieve your anchor, you might wonder about the connection between soft flexible rope and hard chain. While deploying, you will hear the windlass change from a clanking racket, as the chain runs through, to a quiet hum, as the rope snakes out. That change in sound is a change in strength. An interface.
You are likely to have three-stranded anchor rode in your chain locker. It’s stiff to handle and tends to kink after the windlass stows it below a few times. It’s useable, if not the best, with most windlasses. Suitable splices for three-stranded rope include the back splice and the elongated splice (see “Three-stranded back splice to a single link” and “The elongated splice”, below).
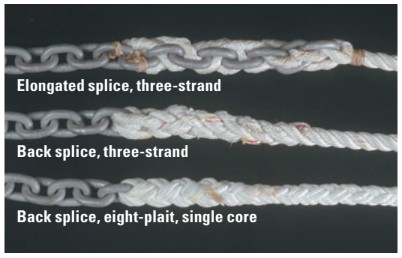
Square line, also known as eight-stranded plaited rope, is a single-core, extremely flexible and soft rope that resists kinking and coils neatly into the anchor locker with little or no tending. Because of its flexibility, the same length of eight-stranded plaited takes up less stowage space than the same length of three-strand. If you are installing a new windlass and need a new line and chain, go the extra mile and purchase single-braid eight-plait. This is the line recommended by many windlass manufacturers. Suitable splices for this one include the back splice to one link and a version of the elongated splice for square rope (Just the first of these is illustrated here, in “Back splice for square line”, below).
When you’re gathering your splicing tools be sure to include a hot knife. An old solder gun serves this purpose for me. A hot knife will sever and melt nylon fibers together leaving a relatively clean cut that won’t unravel.
Three-stranded back splice to a single link
This one is called a back splice to a single link because it is inserted through a link and then turned 180 degrees back and threaded against the twist of the line. When this splice is under load, the rope’s twist tightens to lock the backed strands.
The key to this splice for rope-to-chain windlasses is to keep it loose. Don’t snug it up on the chain too tightly. Remember, the splice will need to make a 180-degree turn on some windlasses.
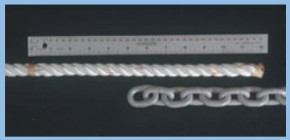
Measure and wrap. Measure off a foot of rope and tightly tie a constrictor knot with strong twine.
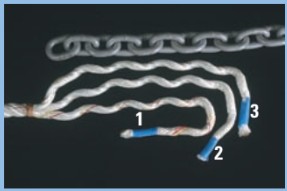
Decisions, decisions. Unravel the strands. Use a hot knife to seal the ends. Tape them tightly. From the constrictor knot, flatten the strands and decide on a middle strand. I like to mark this middle strand “2” and the outside strands “1” and “3.” Number it any way you want, but the strand you determine to be the middle is the starting strand.
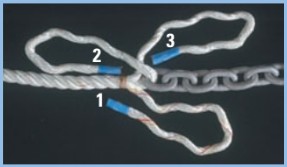
To begin. Start with this middle strand, Number 2, and insert this into the link.
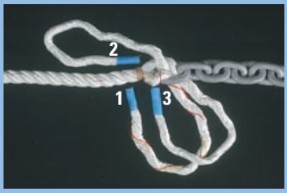
Both ways. Insert the other two strands into the link in the opposite direction from Number 2.
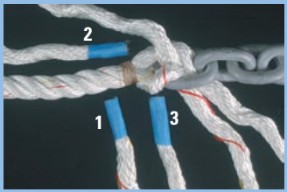
Do the twist. The strands tend to unravel a bit at this point so it is important, for neatness, to keep them tightly twisted.
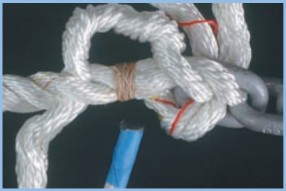
First tuck. Take Number 2 and go over a strand and then under the next strand. Always thread the strand against the twist. This is called a “tuck.”
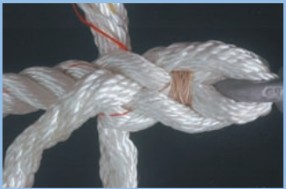
Over under. Take the Number 1 strand and go over one strand and then under the next strand. Do the same with Number 3. If you did it right, all three strands should appear to come out of the twisted rope at the same level but from between different strands. This is the most critical part of the splice. If you get this right, you are home free.
Pull all the strands tight against the link and the constrictor knot but not so tight that the link can’t move freely on the line. Yes, this is a potential source of chafe. If you make it too tight, the chain link and rope will form a hard spot and could bind or run roughly through the windlass.
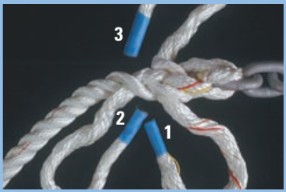
Tuck away. Do two complete tucks with all three strands, threading through against the wrap. Keep everything flowing in a counter twist pattern. Weave each over the next strand then under the one after that.
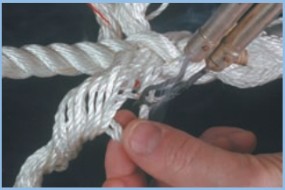
Taper down. After two tucks for each strand, take your hot knife and — from where the strand emerges from under a strand — cut off one third of the threads of each strand. Leave 1⁄2 inch or a bit more sticking out. You can clean these ends off later.
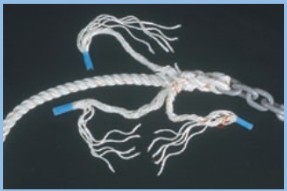
Slim and trim. Complete two more tucks with your now thinner strands.
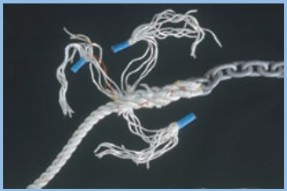
Taper to the finish. Cut off another third of the threads. Finish tucking the remains of the strands until there are no more to tuck. Pull firmly on the splice to smooth it out. Clean up the protruding threads, leaving about 1⁄4 inch sticking out.
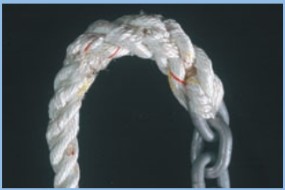
All done. This splice is not as flexible as the elongated splice and may jam up in windlasses if you weave your strands too tightly.
The elongated splice
This is a splice that I have not seen very often. It’s easy to make, flexible, and seems to be very firm and strong. This splice runs quietly through my windlass and into the chain locker below. It lacks that lump of stiff material common to other splices that tends to make a loud, sickening “clunk” no matter how loose you make it.
Alain Hylas is the inventor of the Spade anchor and of the elongated splice. He calls this splice “the only safe way to connect anchor warp to anchor chain.”
He explains, “You can also connect it with an eye-splice over a thimble and a shackle. It will be absolutely safe but has difficulty going through the bow roller, windlass, and then into the chain locker. The other way is the back splice, passing the strands through the last chain link. Although there are publications that prove that the loss of strength is negligible, I don’t like it, as every time a rope is sharply bent, it will lose about half its strength.”
Alain doesn’t remember where he learned this splice. “I’ve been sailing for about 45 years now, including 13 years of full-time cruising . . . during this time, I learned quite a lot.” (A square-line version of the elongated splice also exists.)
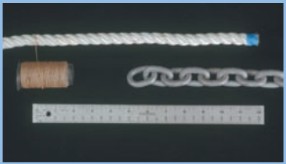
On your mark. Start with 12 to 14 inches of line. Make a substantial constrictor knot with waxed sail twine.
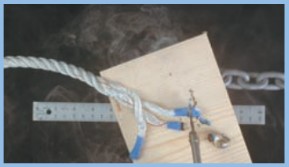
Ventilation. Unravel the strands after hot cutting and taping the strand ends. Number or mark each stand to differentiate one from another.
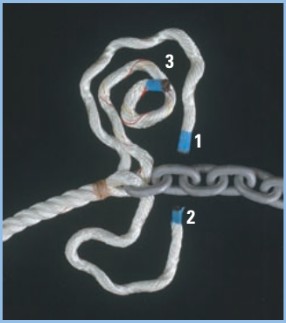
In and out. Insert Number 1 and Number 2 through the first link from opposite sides. Draw it up tight to the constrictor knot. Insert Number 3 in the second link. Keep the strands rolled tightly so they don’t begin to unravel.
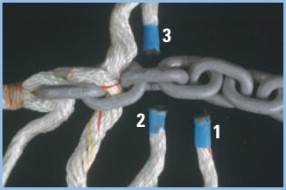
Repeat. After you have the first two links done, the rest is just a repeat. Two in from opposite directions, the third skips up to the next link. Do this until you run out of line.
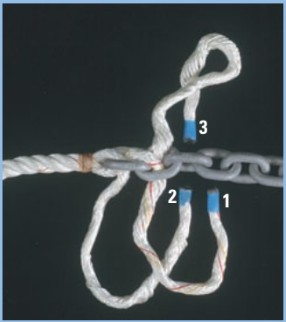
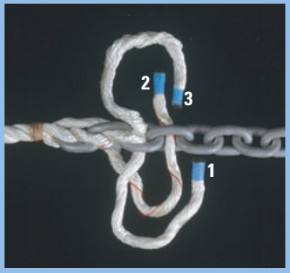
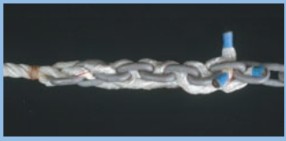
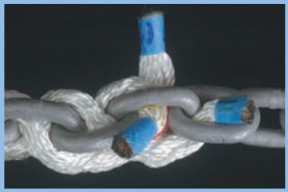
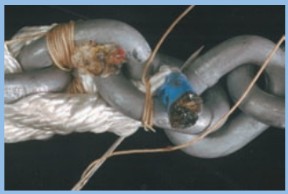
Tie it off. Using heavy waxed twine and a sail needle, tightly bind the ends to the chain links and then use the hot knife to cut off the excess. Keep the melted plastic ends as small as possible.
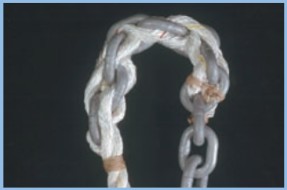
Around the bend. This elongated chain-to-warp splice is very flexible and goes though my chain-to-rope windlass with little or no trouble.
Back splice for square line
Square line, also known as eight-plait, is the line recommended by windlass manufacturers. Brait, by Yale Cordage is shown in the illustrations. If you’re in the lucky (or unlucky) position of needing new anchor rode, this is the way to go.
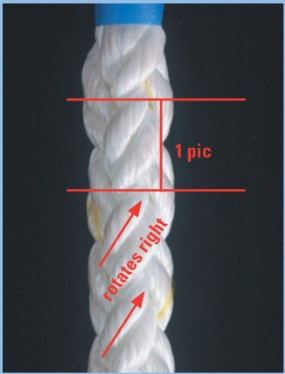
Learn right and left. Eight plait, sometimes called square line, has four distinct surfaces or sides. When you turn the rope 90 degrees, its top strands appear to rotate as a pair to the right; turn it another 90 degrees, and the top strands or pairs will rotate to the left. On each of the four sides there is a pair of strands rotating together in the same direction. Study the rope before you begin and learn the left and the right.
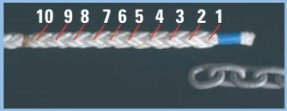
Count pics. Count 10 pics (or paired strands of yarn) back from the end and tie a constrictor knot tightly with waxed twine.
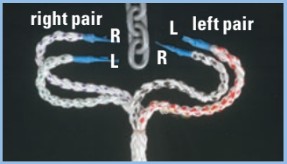
Unnerving unraveling. Unravel the rope to the knot and separate the strands into four pairs. Each pair has two strands of material traveling in the same direction. Mark each pair “R” for right-rotating and “L” for left-rotating. I marked each pair with different colors to help with the photos. Tape each pair’s ends, to form a point. This will help speed the tucking process.
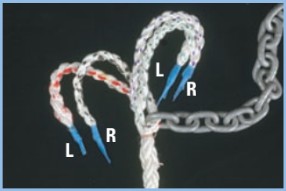
In, then out. Take a left pair and a right pair and thread it through the link. Then take the other left and right pairs and thread them through the link from the opposite direction over the top of the other two pairs.
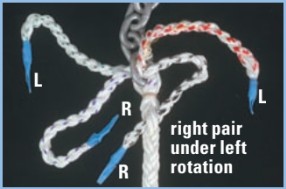
Tunnel tricks. Here’s where it gets tricky. Turn the line so you can clearly see “the rotates to the left” weave on the body of the line. Take a right pair and slip it under the closest left-rotating pair. You may need to use a fid or a pencil to create this tunnel. Remember, right pairs slip under left pairs from right to left. You will notice that your tucked pair will have a partner weave that it travels along with.
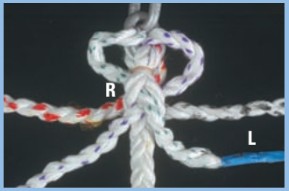
Still tricky. After you tuck both right pairs, turn the line so you can see the “rotates to the right” weave. Left pairs tuck under right rotating weave from left to right.
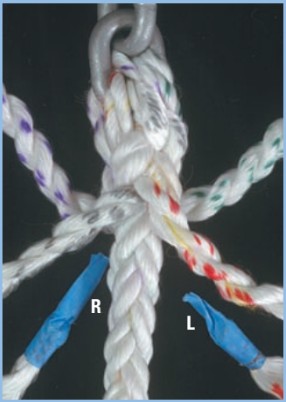
Confused yet? At this point you have done four tucks. Examine your work. Are both right pairs running from right to left under a left rotating pair? Do they have a partner weave under them running in the same direction? Are both left pairs running from left to right under a right rotating pair? Do they have a partner weave running in the same direction under them? If you answered yes to each question, good job.
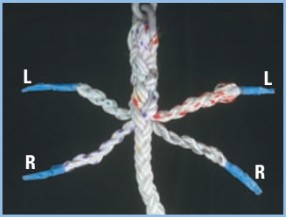
Tuck, tuck. Now, do two more complete tucks. Right under left, left under right, with all four pairs. The splice is taking on the look of the original rope weave, though a bit bulked up.
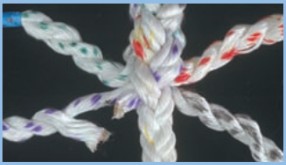
Thinning down. After making three complete tucks, cut one strand from each pair about 1⁄2 inch from where it exits from under the weave. Use a hot knife.
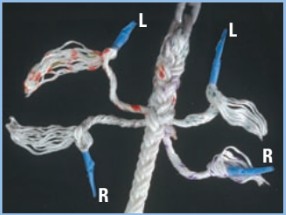
Twist and shout. You’re almost there. Tuck the remains of each pair in the same pattern as before until there is only about an inch or so of strand poking out. Keep a twist on the remains of the strands.
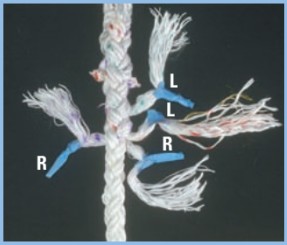
Pull tight. Once you have tucked as far as you can, pull the splice tight and then cut off the strands, leaving 1⁄4 to 1⁄2 inch sticking out.
All done. Now go and anchor out someplace nice.
One thing more. No splice should be trusted to hold your baby safely through the night without testing, right? Author John Danicic and Good Old Boat technical editor Jerry Powlas devised a test which surely will determine whether your carefully completed rope-to-chain splice is capable of holding a large boat in a heavy surge. We had fun with this concept and offer it in jest. Don’t try this at home, kids.
An extremely effective test — John Danicic
When I mentioned testing the strength of my splices, by using my brother’s car, to a certain technical editor who is revered for his expertise and methodical approach to solving problems, he gruffly fired off to me the proper way to proceed. Needless to say, I intend to outsource this test. His recommendation follows.
The best way to test a rope-to-chain splice is, in fact, using cars. Both cars should have a stout trailer hitch properly installed and an appropriate ball attached. The chain should be in the middle of the test piece with rope spliced at each end. This allows two splices to be tested at once. Typically, 100 to 300 feet of nylon rode is spliced to each end of the chain, which is usually 10 feet, just for convenience.
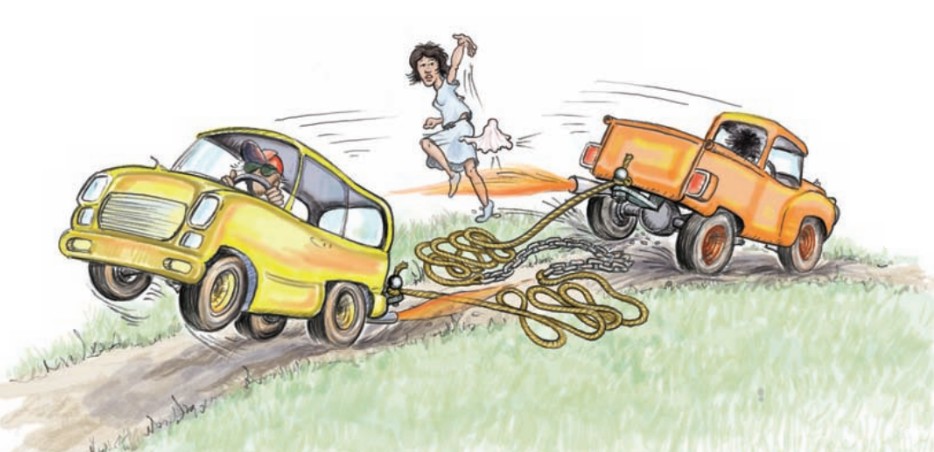
The ropes are flaked, not coiled, (very important, don’t coil the rope) in piles by the chain, and the cars are parked back-to-back next to the coils. A fair damsel with a clean white kerchief stands to the side where she can be seen by both drivers. When she drops the kerchief both drivers motor away at maximum acceleration, and the fair damsel runs like heck in a direction perpendicular to the axis of the test ropes and chain.
Naturally, something will fail. In some tests where splices do not break, the lighter automobile will be thrown over the heavier one. Occasionally, trailer hitches are torn from cars, which suggests shoddy installation work and, occasionally, splices or links or even rope will fail. Test drivers can expect some damage to their automobiles when parts of the test samples spring back toward them.
Spectators should be asked to keep at least three times the rode length away from the test site, and the fair damsel is typically decorated for valor at the end of each test cycle. The European Union has banned this form of testing, to the great disappointment of the Spaniards, who saw it as a humane alternative to bullfighting.
Thank you to Sailrite Enterprises, Inc., for providing free access to back issues of Good Old Boat through intellectual property rights. Sailrite.com