A veteran cruising couple tells what is working for them
Issue 49 : Jul/Aug 2006
We left in the pre-dawn mist. As the bird song heralded the break of a new day, I looked back and saw the islands of western Lake Superior receding in the distance. My husband, Ron, and I had been planning this venture for more than 20 years, yet it was with mixed feelings that we now headed east and eventually south.
Would we be able to trade rocky shorelines and pristine forests of conifer green (see Pages 44 and 45) for white sand beaches and palm trees bending to the wind? Would we be able to meet the challenges of long-term cruising? What about rough weather? With an open-ended agenda, our destination was unknown. We knew only that we were headed south to places where water stays in its natural state all winter long. We didn’t even know when we would return.
There were other uncertainties. As I looked over the boat, I couldn’t help but wonder — had we made the right decisions and preparations? Would our boat hold up to the rigors of extended cruising? Would it withstand the harsh realities of salt water and the punishing ultraviolet light of the lower latitudes? Did we have enough spares and backup systems?
Initially we had planned to begin full-time cruising much sooner. But jobs and other commitments pushed our departure further into the future. Fortunately, we were able to use this time to enjoy local cruising and work toward our goal by better preparing our boat.
Now at last we were really leaving. Everywhere I looked I could see projects from years past, reminders of all our efforts to make our boat a long-term cruiser. There were also the memories — some of which went back almost a quarter century.
Sailing background
We began in the early 1970s; our first “big boat” was a Coronado 30 designed by Frank Butler, the founder and current president of Catalina Yachts. By the second season we were committed to a goal of long-term cruising. Although the Coronado sailed well, we knew we wanted a bigger boat, one that could take us to distant ports, so we began to search in earnest. As a part of our research we read a book by David Parker. As an alternative to building your own boat, he suggested that you buy the boat that comes closest to your needs and then modify it. This sounded utterly simplistic. Little did we know the implications of that innocuous statement. We have often thought back to those early years and our ignorance as we began to pursue our goal.
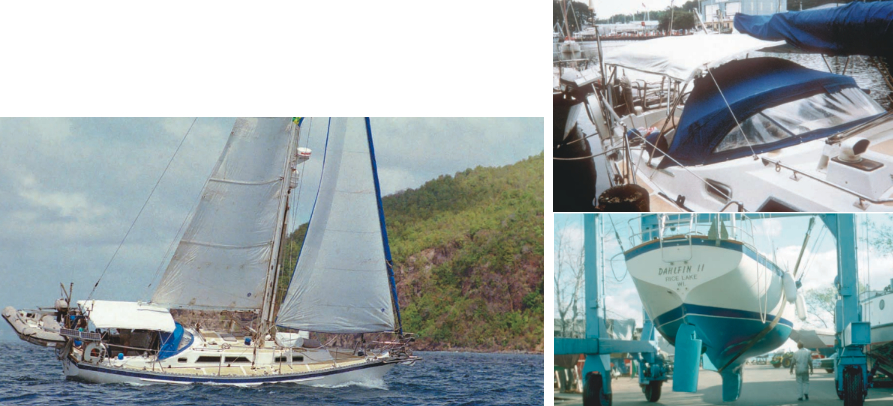
After a couple of years of searching the market, we settled on Alan Payne’s Columbia 10.7, which we bought new in 1978. It was listed as a “wide-body cruiser” with an 11-foot 4-inch beam that was quite a lot in those days for a 35-foot boat. (Today it’s common to see a 12-foot beam on a 35-foot boat.) We particularly liked the design and layout of the Columbia. The wide body provided interior space that, in those days, was only dreamed of in 40-foot boats. The wineglass transom was pleasing to the eye and provided the shape of a double-ender at the waterline while still retaining seakindly buoyancy in a following sea.
We hoped the partially shortened keel and extended skeg would lead to easy tracking, which was important with whatever self-steering system we chose. Yet the cutaway forefoot and lack of a long keel would still give us maneuverability in tight quarters. With the beam carried well aft, the roomy hull provided additional storage room that was lost in the pinched-in sterns of many contemporary designs. The stern even came with two molded-in 20-pound vented propane lockers ready to go. Finally, the boat was designed to carry weight — a characteristic that we appreciated over the years. The Columbia was everything we wanted. Yet right from the beginning — even in the first year — we began to make modifications.
We did our homework carefully, reading sailing books and periodicals. Early on we discovered that the requirements for a coastal cruiser and a long-distance passagemaker are quite different. We came to realize that, although we all face the same problems in equipping our boats, the solutions are as varied as the different kinds of boats and sailors out there. Articles abounded with different ways to reef the mainsail, what type of anchor to choose, the pros and cons of electrical vs. mechanical refrigeration, whether to use autopilots or windvanes for self-steering, and so forth.
Then, when we finally made a decision, there were no perfect solutions. In boating it seems that each decision is a compromise, often with a domino effect.
We realized there was a limited amount we could learn from reading. There comes a point where you really have to get out there and do it yourself to find out what works and what doesn’t. Living aboard every summer for three months gave us the opportunity to test our decisions and new systems. We soon found that things we would put up with for a weekend — or even a two-week vacation — weren’t tolerable over longer periods.
Over the years we’ve learned that outfitting a boat is an ongoing evolution. The words “trial and error” took on a new meaning for us. Often we’d try a particular idea only to discard it in favor of another, especially when a new product came along or the technology improved. When you have owned a boat as long as we have, you end up going through second and third generations of some systems. And there really is something in the adage, “If you wait until the boat is perfectly ready, you’ll never go.” Even though we started off with a boat in sail-away condition, the evolution continued as we fine-tuned systems, replaced parts of others, and installed completely new ones years after we left. On the following pages, we share some of the things we learned.
Cockpit
One of our first additions was a dodger. While this is a pretty common addition, there are options, depending on boat configuration and how and where you are going to use the dodger. Many use a dodger as the basis for
a full enclosure or add on a Bimini. This results in a dodger of very large proportions. But because we were sensitive to the aesthetics of our boat, we opted for a low-profile dodger that we thought enhanced the lines of the yacht. Three dodgers later, we have a design that we’ve kept over the years. We particularly like being able to look over the dodger for clear visibility, as opposed to the distortions one gets when looking through plastic, especially in rain. Even though our dodger is low, when it is combined with weathercloths, we feel we get adequate protection from the wind.
Cushions
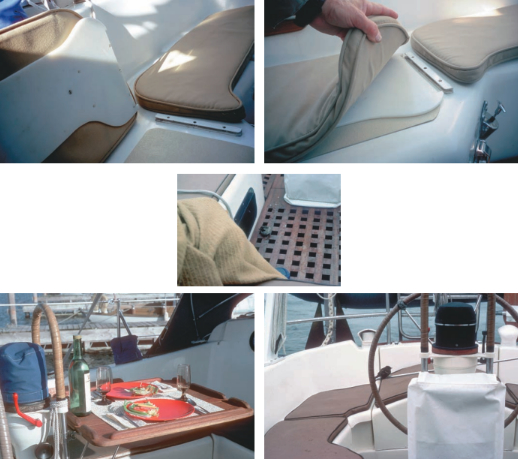
Since we spend a lot of time in the cockpit, we added cushions for comfort. However we didn’t want to take them below each time it rained or whenever we sailed in rough weather, so we had them made of closed-cell foam. The covers were made of Sunbrella that dries quickly.
Through trial and error, we designed a system to hold the cushions in place. We attach large pieces of plastic to the underside of the cushions. The plastic pieces fit into channel grooves screwed into the seats. Even in the roughest weather, the cushions are secure and don’t slip and slide. In fact, once they are in place they usually stay put for the season. We remove them only for winter layup or for hurricane preparations. We’ve gone through four generations of cockpit cushions.
Cockpit table
To complete our comforts in the cockpit, we made a foldable table that is nice when we have guests for happy hour. Fully extended, it provides just enough space for dinner for two in a pleasant anchorage. We also made a three-part cockpit grate, which looks good and hides the dirt that comes aboard on our shoes.
Dinghy and davits
One of the problems we all have is what type of dinghy to choose and how to transport it. Over the years we went through a progression of dinghies from a small Avon Redcrest to a sport-boat with an inflatable keel. We opted against the rigid inflatable boat (RIB) primarily because of weight.
In the end we opted for a dinghy/motor combination that could be pulled up on a beach easily. We also wanted a dinghy that could be deflated for storage when we left the boat for long periods. After a progression of motors we ended up with an 8-hp motor that enables us to cover large distances quickly. It not only gets us out of inclement weather faster, it is also able to punch through rough seas more easily.
What to do with a dinghy?
To transport a dinghy with the mother ship there are three options:
- Store it on the deck (fore or aft of the mast).
- Tow the dinghy behind the yacht.
- Hoist it on davits.
Even partially deflated, a dinghy stowed on deck is an obstacle to working the sails. So that was out for us. Towing a dinghy in rough weather was not an option. Thus, the addition of stern davits was another early modification on our traveling home.
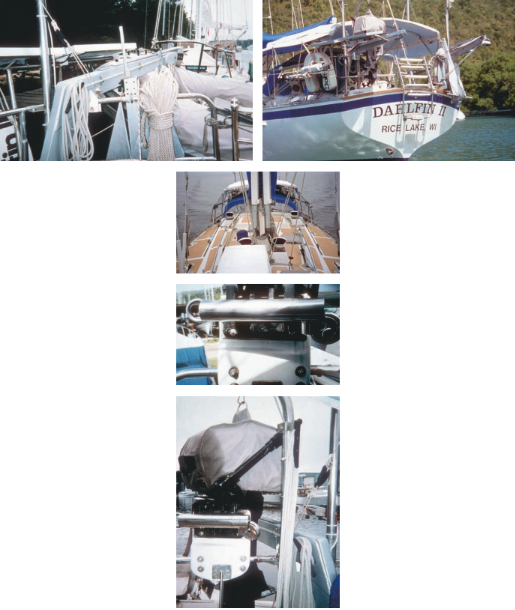
Fortunately, the wide transom of the Columbia allows it to support a large dinghy. We designed davits that were beefed up with a lot of extra support, had them custom-made of aluminum, and tied them into the stern rail. The davits are mounted high enough so that even in large following seas we have never had problems with the dinghy filling with water. When we were in sustained 35-knot winds, it was nice not to have to worry about the dinghy, which was held firmly in place with additional underbody straps.
For coastal cruising and in the Caribbean, davits worked very well. We knew, however, that if our cruising turned to long-distance passagemaking, we would probably be looking for a new alternative . . . yet another phase of the evolution of our cruising boat.
Safety and security
We purchased a four-person Avon life raft with a double floor. This was mounted on the foredeck forward and starboard of the mast. We also added an overboard bag — with extra water, rations, and a hand-operated watermaker — that was stowed in the cockpit locker. We carried a parachute anchor and a drogue but used the drogue only a couple of times.
With the dinghy stowed on davits, we could no longer stow the man-overboard pole on the backstay. We moved the pole (with a connected strobe light) to the cockpit lifelines where we mounted it in a long horizontal tube with a quick-release mechanism. We added a Lifesling, two horseshoe life preservers, and a heaving line to the stern pulpit. We put a radar reflector high on the mast. Within the companionway and throughout the boat, we added vertical handholds in strategic locations. We glued non-skid to the companionway steps.
To lift our 60-pound outboard motor to the stern pulpit, we designed a stainless-steel crane with a four-part tackle. Over the years the stern pulpit sprouted a few poles to support antennas and a stern light.
It’s especially nice on a boat when you have a system that does double duty. In the interest of low maintenance, we removed the teak handrails on the coachroof and replaced them with stainless-steel tubing that goes around the entire roof. To this we added four stainless cars (two for each side) so we can attach our safety harness tethers for foredeck work. The cars are designed to slip easily over the supports of the tubing. We also added a number of stainless-steel pad-eyes in the cockpit as harness line attachment points.
In some areas, particularly in parts of the Caribbean, security is a problem. Dinghy theft in many areas is rampant, with the main prize being the outboard motor. For this reason, we raise the motor each night and secure it to the stern pulpit with a formidable stainless-steel motor lock. While no lock is completely theft-proof, this one is very difficult to remove even with large bolt cutters.
We also used the motor lock whenever the motor was mounted on the dinghy. To secure the dinghy when ashore, we had a couple of large plastic-covered cables with locks and even a 5⁄16-inch chain for extreme conditions. If we were anchored in an area known to be relatively safe, we would leave the dinghy overnight in the water cabled to the boat but without the motor. Otherwise we would raise it on the davits each night. Cruisers without davits often raised their dinghies “on the hip” with a halyard.
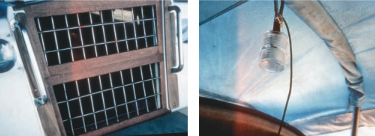
Another problem in some Caribbean areas is swim-aboards who may board your boat at night with the intention of robbing you. To keep these intruders out of the cabin, we made two substitute companionway hatchboards using a grill of 1⁄4-inch stainless-steel bars that could be locked from the inside. Although we used these only rarely in areas known for theft, the lockable grill structures gave us a feeling of security when we were asleep down below. Probably the best deterrent for swim-aboards was a low-draw mega anchor light we hung in the cockpit each night that illuminated the whole aft end of the boat. We tried setting motion detectors in the cockpit, but they never worked that well for us.
Exterior modifications
To increase light and ventilation belowdecks, we added a number of exterior hatches and ports. We put one hatch in the head, another in the main cabin directly over a kerosene lamp we installed. We added two 3- x 10-inch opening ports in the aft part of the main cabin: one in the galley and one over the nav station. Not all of the original small ports opened; except for the four larger windows in the main cabin we changed all of them to opening ports with screens. After a few years, the larger ports began to leak. We removed them and designed new, more streamlined frames . We constructed them of aluminum angle stock, which, when installed on the coachroof sides, prevented further leaks.
We also added five deck prisms to bring more light into the cabin. We cannot say enough about these, as they bring in seven times the amount of light for the size of opening, while adding none of the heat you get in the south. Finally, we bug-proofed the entire boat. All hatches and every orifice leading into the boat were covered with fine-mesh screen. The companionway has a day screen that is easily moved and a night screen that is held firmly in place with Velcro. We found these efforts to be particularly worth-while in areas with no-see-ums.
We read that mast steps were an important asset on a cruising boat. Not caring for the choices that were on the market, we designed our own and had them custom-made of 1⁄2-inch round aluminum stock. We quickly learned that a downside of mast steps is their ability to snag halyards. We solved this problem by running a thin line along the outside edge of the steps almost the entire height of the mast. For years we held these lines in place with vinyl tape. However, since tape comes off over time, we recently attached to the outside edge of each step small aluminum tubes through which the lines are strung.
It took only a couple of scrapes before we realized we needed hull protection. Initially we put on rubstrakes made of wood with a fiberglass covering. Over time, water worked in between the wood and fiberglass and produced bubbles and cracks. We made a second set of strakes of solid fiberglass, using the first as patterns. We through-bolted the new strakes to the hull and used a 3⁄4-inch stainless-steel cap. These strakes have provided more strength for the hull and easy maintenance over the years.
Paint jobs
Eight years after we bought our boat, there was a lot of talk about blisters forming on boat bottoms under the waterline, particularly in salt water. Even though we had no blisters at the time, with our long-term goal in mind, we proceeded with an epoxy barrier job. We ground off all the old bottom paint down to the gelcoat and worked up to 4 inches above the waterline. (Like all cruising yachts, we raised the waterline a number of times.) We laid on five coats of epoxy and added the first coat of bottom paint before the last coat of epoxy was fully dry.
Probably the biggest project we ever took on was repainting the hull and deck with Awlgrip. Our decision was not just cosmetic. We wanted to provide extra ultraviolet protection for our aging gelcoat. While it’s one thing to paint the hull, it’s quite another to paint the deck. We did all the prep work. We removed almost every piece of deck gear and bagged and categorized each. Anything that was not removed was masked off. Although we had contracted to have the boat professionally sprayed, we did all the sanding for initial prep as well as in between the two primer coats and two coats of Awlgrip.
At this juncture we were faced with the domino effect. As long as all the deck gear was off, it seemed a perfect time to change the non-skid. After some research we settled on TBS, a product made in France. This is a composite non-skid material made of polyurethane resin and granules. Because it is made of a polymer, it is resistant to ultraviolet light and does not crack. TBS comes in sheets that can be cut to size and glued to the deck with industrial-grade contact cement. The TBS has served us well over the years. It is non-abrasive yet provides a grip that improves when wet.
All in all, the deck and hull painting and adding the non-skid were stupendous efforts. But when we were finished it was like having a new boat. With the new port, rubstrake, altered bootstripe, and whale strip, our boat seemed quite streamlined. Yet this was just one part of our preparations for long-term cruising.
Part 2 of “The Evolution of a Cruising Boat” will appear in the September 2006 issue.
Thank you to Sailrite Enterprises, Inc., for providing free access to back issues of Good Old Boat through intellectual property rights. Sailrite.com