Advice for avoiding problems with your roller headsail
Issue 54 : May/Jun 2007
It was 3 A.M. The wind had reached the forecasted gale force, and somewhere in the marina I could hear the sound of a jib dying. I knew the sound before I saw the sail. I’d heard it before. A roller furler had unfurled. Fortunately, the boat was pointed right into the wind so the really bad things had not started happening yet. I grumbled, dressed, got a flashlight and a winch handle, and walked through wind and spray to the far pier where the jib was snapping like the flags on a used-car lot.
There was no saving the sail. Parts of it had already gone off downwind, and the remaining part had split from roach to luff about 7 feet above the deck. I expected that. I had come over to refurl the sail before it snagged in the rigging. If it caught the rigging, or if the sheets were still attached and the wind shifted as forecast, the boat would heel in her slip and probably tangle her mast with the boat next to her. As it turned out, the sheets were attached to the part of the sail that was hopelessly tangled around the stay and furler. There would be no refurling this one before daylight unless the wind went down first. I dropped the sail in several parts and tied them to the bow pulpit with the halyard. The tatters of cloth would never be a sail again.
Despite the high cost, roller furling is one of the most popular rigging upgrades. The arguments for it are compelling. You need have only one sail, and it will be easier to handle and much faster to furl. In addition, roller furling is typically promoted as roller reefing, meaning that one simply rolls in the sail to the size needed for the wind conditions. Treating this complex system as if it were that simple, however, would be a mistake. There are some subtle, but very important, things you should know and practice in order to make roller furling work really well on your boat.
Installation and maintenance
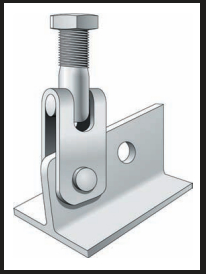
Start by comparing the installation of your furler with the manufacturer’s instructions for installing it. Make certain that the instructions were followed and that any previous owners have not degraded the installation. It is critical that the connections at the ends of the furler, masthead, and stem-plate be toggled so the furler can move in all directions without damaging end fittings. It is common to see furlers that can move fore and aft or side to side, but not both ways. If they cannot move in both directions, they risk the loss of the mast.
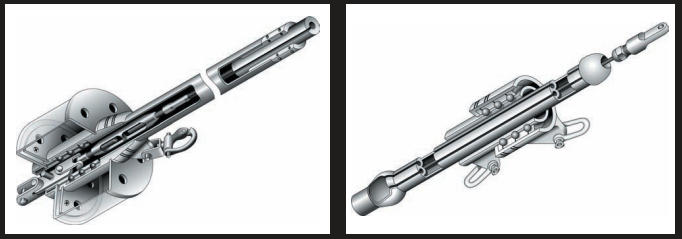
Some furlers attach the drum to the lower turnbuckle instead of the stemhead. These designs need a specially designed turnbuckle with a beefed-up lower stud to take the added side loading. Attaching the furler drum to the lower turnbuckle opens the design up to two additional failure modes. If the bearings become stiff from corrosion or if the furler is rotated under heavy loads, high torsion stresses are directed to the turnbuckle. This can cause the lower stud to unscrew. These stresses can also unlay the headstay. Either of these failures can lead to the loss of the mast. Keep the bearing system running free.
While you have the manufacturer’s literature out, read the section on owners’ maintenance. In many cases there will be some washing and rinsing to do to keep the bearings clean and free. You may be asked to ease the halyard a little when rolling the sail in or out and when the sail is not in use. This keeps the bearings from being distorted or the races from being dented. There may be some parts that wear and need to be replaced on occasion. The plastic slides in the halyard swivel can wear enough for the swivel to cock and bind. You may even want keep some of these parts in stock aboard so you won’t be caught short just before a cruise or, worse, during one.
Halyard wrap
The worst problem you can have with a furler is halyard wrap. You will be confronted with a partially furled sail that will not budge. It will not furl, and it will not unfurl. Nor can you lower the sail with the halyard. Sorting it out may require a trip up the mast, which may or may not be possible. Sailors have been known to ride out a thunderstorm or even a gale with a full genoa because they had no other choice.
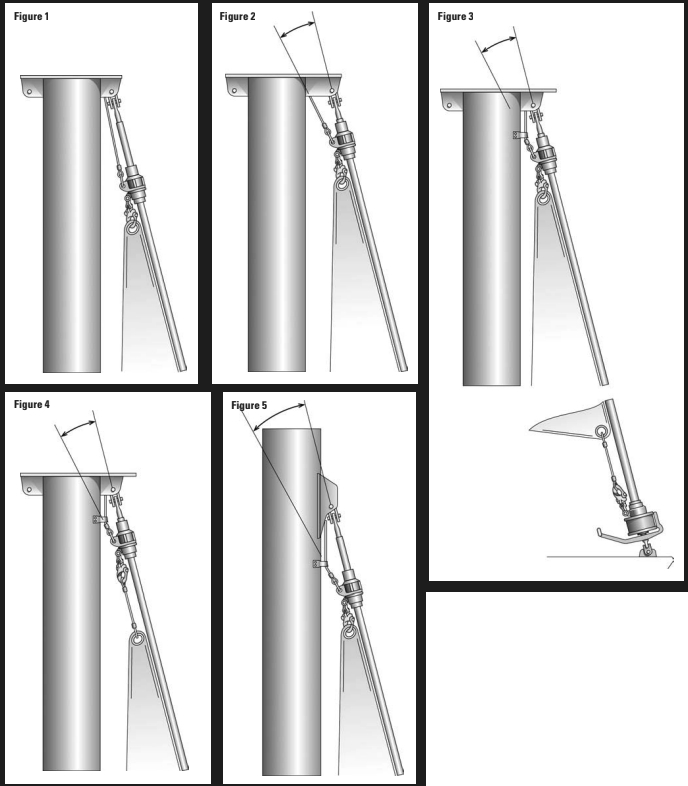
Properly set up, halyards don’t wrap. What is critical is that, with the sail fully hoisted, the halyard must not run parallel to the forestay. It must lead away from the stay at the top by an angle of 5 to 10 degrees (see illustration on Page 22). This is often accomplished by attaching a fairlead to the mast below the mast sheave. Ideally, the upper swivel is as far up the foil as possible but stopped just short of coming off the foil at the top. This can be accomplished by adding a pendant to either the head or tack of the sail. Walk around a marina sometime and look at all the furlers with long halyards running parallel to the forestay. These are likely to be a disappointment in just the conditions when their crews need them to work flawlessly.
So what do you do if you are on a boat that has halyard wrap? If it happens in benign conditions, you may be able to unwrap the jib from deck level or you may have to go aloft. Once the jib has been unwrapped, you can disconnect the tack of the sail at the furler and hoist the sail up as high as it will go. Then use a short piece of line to make up the difference at that end and re-connect the tack to the furler. Control the luff tension with this line so the sail sets properly. Test for proper furling. This fix has worked for me a couple of times when I was on a boat that had a bad case of halyard wrap. The trick is that when the halyard is jammed up tight at the masthead, there is no halyard available to wrap. Don’t think of this as a permanent fix. Do it right, making up the difference with a stout piece of cable when you get back to port.
If you find yourself in enough of a blow that the sail cannot be rolled, furled, or struck, and you need to reduce sail area, it is possible to force the sail to furl by powering through a dizzying series of 360-degree turns until it is rolled up on the stay. This may seem hokey, but it can be very appealing if the thing is stuck and you absolutely must get it furled.
A hanked-on sail sort of guy, I learned the hard way on a friend’s boat that there must always be some tension on the halyard whenever the furler rotates. If the halyard is free (not cleated) it will wrap for sure.
Burying the furling line
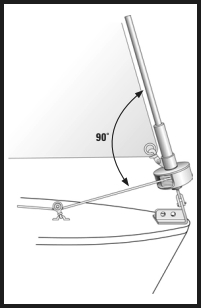
Most furling units have a kinship with casting reels. A fairly small line is rolled up on a fairly large spool. Just as on casting reels, things can go wrong with this simple process. You want the line to roll evenly and tightly onto the spool. Keep a little tension on the furling line as you unfurl the sail and a little tension on the jib sheets as you furl it. Inspect the furling line on the spool and refine your technique so you get the line to lay evenly and tightly as the sail rolls out. The location of the furling line fairlead block should be such that the line leads into the drum at 90 degrees to the stay (see illustration on Page 23). This will prevent backlashes and burying the line into itself as the upper coils crush into the lower coils. It is good to have this block as far aft as possible to minimize how far from perpendicular to the headstay the line is when it is rolling onto one end of the drum or the other. Although you will see sailors put the furling line on a winch, many furler manufacturers recommend against this practice.
Sail trim
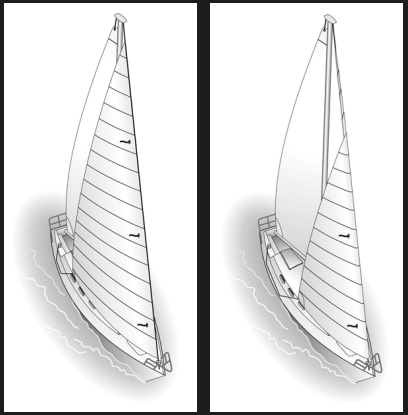
When the boat is close-hauled and the jib is roller reefed, the jib’s sheet-lead angle may need to be changed. I’m told on good authority that this may not always be the case, but I have never been on a boat with roller furling where the sheet block did not need to be moved as the sail was reefed. If you simply roll in more and more sail as the wind speed picks up, you will notice that you can’t point very high and, in extreme cases, the leech of the sail will flap about three-quarters of the way up. After a while, the sun cover may even separate from the sail in this area because of the flapping.
As the sail is reefed, the jib sheet-lead angle must be changed. Usually the fairlead block must be moved forward as the sail is rolled in, and backward as the sail is rolled out. If you do this properly, the jib will point much higher and pull much harder. Sailors with hanked-on jibs or with luff groove foils will set their jib lead blocks by watching a series of telltales along the luff of the sail. They head up and watch to see which telltales lift first. Ideally, they should all lift together. If the top telltales lift first, the jib has too much twist in the top part and the jib block needs to be moved forward. If the opposite happens, there is not enough twist so the block should be moved aft. Moving the jib lead forward as the boat turns further off the wind will also help keep the sail properly trimmed.
Roller-furling jibs are often made today with markers in several places along the foot. These are stopping points for reefing, which the sailor can use to match with jib lead block positions determined beforehand by the use of telltales.
What if you find yourself on a boat where nothing has been marked or predetermined? A few general rules will get you close. First, it is never right to have the leech flapping. Moving the block forward will correct that. When a sail looks right, it is probably close. Second, study the sail when it is full and match that look when it is reefed. Maintain about the same amount of twist. If you have the jib lead block too far forward, it won’t hurt the sail. Instead, you will lose some power and the boat won’t point as well. Nor will it hurt the sail if you have the block a bit too far aft, so long as the leech does not flap. You will have a bit too much twist and the boat will be somewhat depowered, which is actually a trick that racers use in certain circumstances.
Securing for a blow
Every time you leave your boat you should secure for a blow unless you have absolute faith that you know what weather will come to her before you return. In the case of the roller furler, it is absolutely essential that the sail cannot — under any circumstances — unfurl.
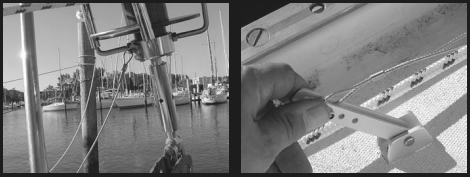
When the sail is completely furled, have enough line left on the drum so you can wrap the jib sheets around the sail several more turns. These final turns — plus whatever else you can do to make sure that the furling line is securely cleated and the sail cannot unfurl by accident — are critical measures to take in storm conditions and whenever you leave the boat unattended. You may be able to mechanically lock the drum with a carabiner or drill it for a locking pin. As mentioned already, high winds can and do unfurl headsails aboard unattended boats. Nothing good happens after that. One furler design, Reef Rite, has a locking pawl and release wire. This allows a more positive locking of the drum when not in use and also takes the load off of the reefing line when the sail is partially rolled into a reef.
Changing sails for conditions
A lot of experienced sailors who enjoy the convenience of roller furling own several headsails. Some will mount a smaller jib in spring and fall when the winds are stronger. Some will actually carry several jibs on a cruise and change them much as a sailor without roller furling would, except not as often. There is much to be said for this. A purpose-built roller-furling jib is different from a sail designed for a luff foil or hanks. Among other things, it will have a flatter cut. No matter what the differences are, any roller furling sail will be at its absolute best when it is not furled at all, and its performance will deteriorate as it is furled. To put it another way, a purpose-built furling 110 will outperform a furling 150 rolled up to the size of a 110. By changing to the sail that will not need to be furled as often or as much, these sailors enjoy better boat performance.
If several jibs are carried, the skipper will need to plan the sail changes with a little more care. Changing up — from smaller to larger — is not a problem, but changing down takes some anticipation since removing any sail without hanks in a blow is more difficult. The sail will, at some point, be held only at the tack, head, and clew and can be hard to control in a blow. Using several crew for the change is very helpful as is ducking into shelter for the change. The Reef Rite furler departs from standard design practice by having larger grooves and “Kiwi slides,” which are essentially slugs sewn to the luff at the spacing of hanks. This design allows the changing of jibs to be as simple as it is for sails with hanks.

In very high winds, a separate, dedicated storm jib is a very desirable sail. It will perform much better than the small triangle of a large jib almost fully furled. A very small jib can be carried on a separate stay if the boat has one, or a Gale Sail by ATN, http://www.atninc.com, can be mounted right around the furled genoa. This looks like a good solution since the sail can have good shape and can fair the luff on both tacks.
The modern roller furler is a sophisticated device that has evolved over the years. Properly installed and used, it can be very reliable and give acceptable performance. Roller furlers are seen on long-distance singlehanded racing boats and bluewater cruisers. Indeed, roller furlers are the rig of choice today for everything but racing. If you have a furler or intend to install one, you will get better and safer service from it if you take the time to understand and maintain it and use it as it was intended.
Thank you to Sailrite Enterprises, Inc., for providing free access to back issues of Good Old Boat through intellectual property rights. Sailrite.com