Here’s a rigging project you can do yourself
Issue 72 : May/Jun 2010
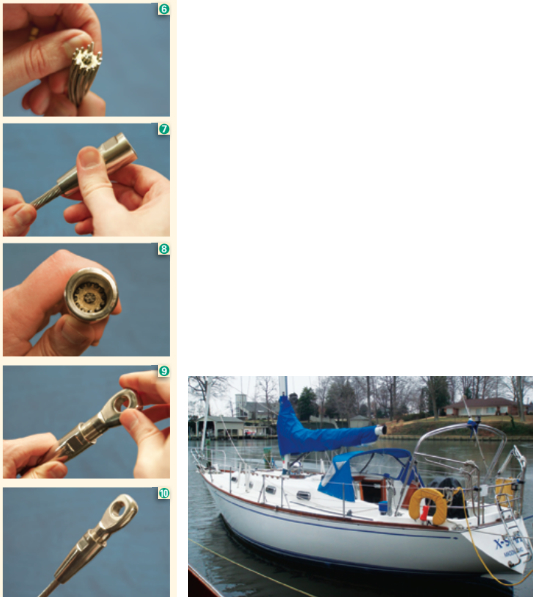
My best friend Adam’s new-to-him Tartan 37, Audentia, had never left the dock with him at the helm. He’d purchased her in February, and there is ice on the Chesapeake in February. She was berthed at a private dock in Whitehall Bay, just north of Annapolis, when Adam bought her. I had seen the boat before he did — Adam is a pilot with the Air National Guard stationed in Mississippi, so I became his ad hoc broker in Annapolis. I scoured the listings, talking to real brokers and diving into leads with the excited enthusiasm that accompanies any boat search, bolstered by the fact that I would not be writing any checks.
As a professional captain, and having just completed two boat searches in the past three years (for my father’s Wauquiez Hood 38 and for my Allied Seabreeze yawl), I had the experience and confidence to fulfill my responsibility and find Adam the right boat. There are a lot of Tartan 37s out there, so the search was extensive.
Adam wound up buying his boat on my advice, after flying home to see her for himself. Unfortunately, on the day of the sea trial, she was iced-in, so her maiden voyage would have to wait. By the time the creek had thawed, Adam’s dock lease was up and he planned to move her across Chesapeake Bay to the Eastern Shore. His insurance required a rigging survey, which revealed cracked swaged fittings on the backstay. He asked me to replace the backstay for him before we moved the boat.
The backstay
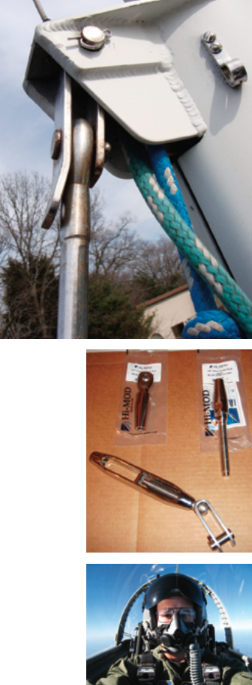
I’m a firm believer in using mechanical, rather than swaged, fittings for all of a boat’s rigging, and talked Adam into going with the relatively new Hi-MOD fittings made by Petersen Stainless Rigging in the U.K. (and distributed by Hayn Marine in the U.S.A.) for his new backstay. The Hi-MOD fittings work on the same principle as the ubiquitous Sta-Lok and Norseman fittings, that of using mechanical compression to keep the wire in the fitting. They have a clever addition to the inner cone, a crown ring, which keeps the unlayed wire strands perfectly spaced inside the fitting.
We ordered the wire and the fittings from Rigging Only. Once we had the wire and pin measurements, which required the first of many trips to the masthead, the guys at Rigging Only were very helpful in determining pin sizes and turnbuckle sizes for the new stay.
Measuring
The first step was to measure the old stay and determine what, exactly, we actually needed to replace. The rigging survey required the replacement of just the swaged fittings, not the wire, but Adam decided to scrap the whole lot and replace the stay entirely, including the turnbuckle. We weren’t sure when the rig had been replaced last, and this Tartan had recently completed a circumnavigation with the previous owner. Better safe than sorry.
We used a simple wire gauge to measure the wire thickness (to the nearest 1⁄32 inch), the pin diameter on the chainplate, and the pin diameter at the masthead. With these measurements, the guys at Rigging Only advised us on what size Hi-MOD fittings and turnbuckle to order. We ordered the wire about 3 feet too long to give us room to botch the age-old rule of “measure twice, cut once.” Once the shipment arrived, complete with detailed instructions for assembling the Hi-MODs, we set to work.
Removing the old stay
The key when replacing any piece of rigging on a sailboat is first, before actually disconnecting it, to properly support the mast wherever the wire is to be removed. To create a temporary backstay, I positioned one of the genoa sheet blocks as far aft on the track as possible, rove the main halyard through it, and cranked down hard with the genoa winch.
Up to the masthead I went to remove the fitting and lower the stay. Before removing the pin, it’s imperative to tie a long, small line on the stay with a rolling hitch and lash it firmly to something solid at the masthead — the full weight of the backstay will at once be in your hand when that pin comes out, and dropping it on deck accidentally is not an option. I slowly lowered the backstay with the lashing line while a helper below slowly pulled it onto the dock, preventing it from touching the deck at all. With the old stay removed, it was time to build the new one.
Cutting and fitting
The easiest and most precise way to get the stay length correct in one go is to measure it against the old one. We stretched the old stay out on the dock, unscrewing the turnbuckle to its maximum length.
The next step was to assemble the Hi-MOD fitting to one end of the new stay. We chose to do the lower part, including the turnbuckle, in order to have something with which to compare.
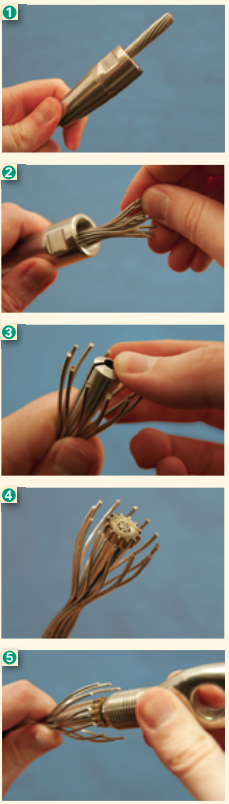
Assembly is surprisingly easy and intuitive. First, slip the body of the fitting onto the wire, then unlay the end of the wire. This is amazingly easy: with your fingers, simply twist the wire in the opposite direction to the lay and it should come right apart. Slide the cone onto the core of the wire and add the slotted crown ring unique to Hi-MOD on top of this. Now carefully twist the wire, this time in the direction of the lay, to bring the strands back together around the cone and the slotted ring. This is a bit tricky the first time, but once the strands are in place, the slotted ring keeps them there. Be sure to screw the whole lot together in a trial run, then disassemble it and re-assemble it using permanent thread locker (the red tube) on the outer fitting. This whole process takes mere minutes.
We aligned the new turnbuckle with the old one and stretched both wires out along the dock. The trickiest part was to measure the other end correctly — you must account for the length of the new eye fitting for the masthead before you cut the wire. I was surprised to find that a 32-tooth hacksaw cuts through the stainless-steel wire with moderate effort. It’s essential to smooth the newly cut wire end with a file before assembling the Hi-MOD fitting. Follow the same process as with the bottom fitting and you have a brand-new backstay.
Installing the new stay
Adam chose to forgo, for the time being, both a backstay adjuster and SSB-antenna insulators on the new stay, for budget considerations. As he’s not a racer, once we conservatively tuned the new rig, the odds of his adjusting it were slim even if he had an adjuster. He’ll add insulators before he goes cruising, but that’s still years away.
To install the stay, I followed the same process as when removing the old one, this time in reverse. We attached the turnbuckle to the backstay chainplate, leaving it unscrewed to give me plenty of slack. I went up the mast a third time, but without the stay. Once at the masthead, I hoisted the stay with the same line we used before, making sure to lash it down to something before trying to fit it. It’s amazing how heavy that wire is when you try to hold it with one hand and fit the pin through the masthead. We got the measurement correct, thankfully, and the stay went back together with no problem. Once I was back on deck, I tightened the turnbuckle.
Helpful hints
We tuned the rig at the dock, but I left the cotter pins out. I wanted to get the boat sailing and re-tune the rig if needed before locking everything down. Once we’d done this, I replaced the cotter pins with new stainless-steel ones. I almost always replace old cotter pins when I’m working with rigging.
The rig will need to be checked every few weeks, as the new stay will undoubtedly stretch under load when the boat is sailed hard a few times. In a worst-case scenario, the stay would have to be removed and shortened with the saw, but with the Hi-MOD fittings, this could be done quite easily without having to purchase any new parts.
Ideally, Adam would have replaced all the rigging at once, thereby getting a better price for buying more material and also having the peace of mind of a brand-new rig. However, considering both the rigging survey and our own surveys turned up only the questionable backstay, we felt comfortable leaving the old rig intact for Chesapeake Bay sailing. He intends to replace the rest of the wire before heading offshore.
Many world-cruisers recommend using the same diameter wire for all of a boat’s rigging. I agree with this and intend to re-rig Arcturus, my Seabreeze, using this philosophy. By using the biggest wire size required by the rig for every shroud and stay, I will beef up the rig and need to carry fewer spares when far from port. One length of wire and a few Hi-MOD fittings will be usable for any part of the rig that may need to be repaired, even under way. The only headache with this theory is the need to upgrade the chainplates in many cases. A rig is only as strong as its weakest link, and often the wire is stronger than the chainplates.
We both learned, quite painlessly, that DIY rigging solutions on old boats are quite feasible and can be quite enjoyable as well.
Andy Schell is a professional captain, rigger, and freelance writer. He lives aboard his yawl, Arcturus, and runs sail training and navigation workshops with his father, also a captain. Andy and his fiancée, Mia, are currently in Florida, fitting out for their spring transatlantic to Sweden, Mia’s home country.
Thank you to Sailrite Enterprises, Inc., for providing free access to back issues of Good Old Boat through intellectual property rights. Sailrite.com