A clever trick to keep old dogs working
Issue 107 : Mar/Apr 2016
On my 1983 Hunter 30, the nine opening ports in three different sizes — all manufactured by Gray Enterprises — were getting shabbier each year. Gray ports, used by Hunter and many other sailboat manufacturers in the 1980s and ’90s, have injection-molded plastic frames and opening plastic lenses that are secured with screw-down dogs.
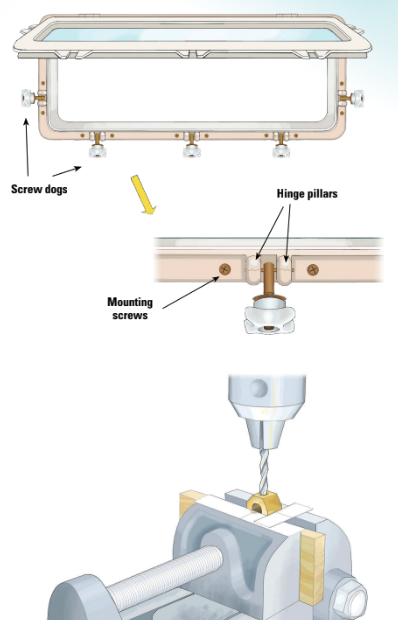
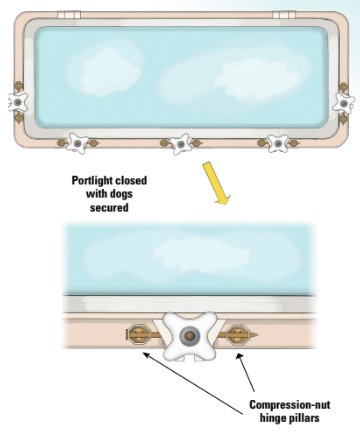
A typical opening port has an outer frame that is fixed in the cabin side and a lens that is attached to the fixed frame with hinges, usually at the top. When closed, the lens is secured against the fixed frame with dogs that engage ears on the edge of the lens. To open a port, you unscrew the dogs enough so they can flip down or sideways out of the way, then raise the hinged plastic lens and secure it in the open position with a hook of some kind. To close the port, you lower the lens, flip the dog mechanisms over the ears, and tighten down the dogs with the screw knobs.
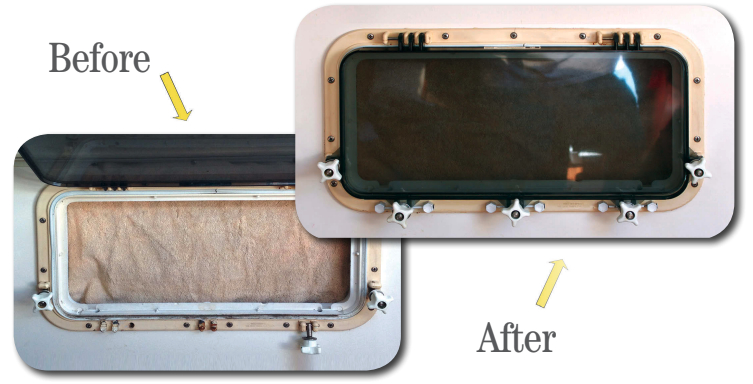
Over time, the lenses in my ports had dulled and crazed and developed many cracks, and the rubber gaskets between the port frames and lenses became hard and leaked. The traditional method to stop annoying leaks is to tighten down the dogs. Unfortunately, as the plastic port frames age, the plastic becomes brittle. The hinge mechanism for the dogs is a pin that runs through a pair of plastic pillars molded in the frame. Screwing down the dogs to stop leaks caused many of these pillars to crack. Several of the pillars on my ports have failed to the point that the dog mechanism simply fell off. A few years ago, I replaced all the port lenses. This improved the internal ambiance but did not address the cracked pillars and missing dogs.
Replacements a no-go
I investigated replacing the old ports with new metal ones. Although beautiful, the available metal ports did not come in all the sizes I needed and fitting them would have required significant modifications to the cabin sides. In addition, the cost of the metal ports was well outside my budget.
Pompanette, Inc., which manufactures Bomar ports, sells direct replacements for the Gray Enterprises ports. You can order the complete ports or selected parts from the Hunter Sailboat Owners website, but the frames are not sold separately and the cost of the complete port is upward of $110 for the smaller ports and more for the larger ones. This put the direct replacement option for nine new ports at well over $1,000. This was still more than my meager budget could stand.
Another obstacle for me was that, to replace them, I would have to remove the old ports during the sailing season, which is not an option because my boat is on a mooring. Since taking my boat out of service during the sailing season was also not acceptable to me, I started searching for a way to repair the dogs that would be simple, strong, and aesthetically pleasing.
Functional and cheap
I searched online for ways to make the repair using just the tools in my workshop and at minimal cost for materials. I saw a few pillar-repair options that might work. In the end, I came up with the idea of completely removing the broken pillars and replacing them with new pillars made of brass 1⁄4-inch pipe compression nuts. (I am well aware that brass plumbing fittings are not suitable for use below the waterline, but I judged this application to be OK.)
Compression nuts have a tapered hole in the bottom that can accept a mounting screw and would make installation easy. I would mount the new pillars in the existing screw holes in the port’s frame on either side of each dog. They are a little farther apart than the original pillars, but I would not have to drill new holes into the brittle frame or the cabin sides.
I started with the large starboard port in the main cabin, above the stove. The lens was new, but two of the bottom dogs had broken away from the supports and the third didn’t look too secure. I decided to remove the last remaining dog and repair all three bottom dogs at once. The two side dogs were still serviceable. Like most sailors, I save almost everything, so I still had the parts for the old dogs and could use them in the repair.
Cut, clean, and replace
To prepare the frame to accept my compression-nut replacements, I had to remove what remained of the original pillars from the plastic frame. They were molded into the port frame such that the top of the pillar was contiguous with the channel for the weather stripping. I used a hacksaw blade with no handle to cut a groove about 1⁄16 inch deep in the top of each pillar to separate it from the channel. It was then easy to cut off the pillar from the bottom with a hacksaw blade until it separated from the frame.
Because the two pillars for each dog are close together, I cut away two at a time. I did this three times, removing all six bottom pillars on the port. The finished cuts were not quite flush, so I smoothed the frame with sandpaper until it looked neat and clean.
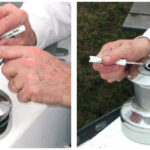
The next step was to prepare the compression nuts to become the new pillars. The dog assemblies I had saved had 1⁄8-inch stainless-steel hinge pins. To prepare my compression-nut pillars, I drilled a 1⁄8-inch hole in the side of each compression nut. The hole needed to be high enough from the bottom of the compression nut for the new hinge pin to pass above the mounting screw. I drilled the holes on my drill press, but I could have also placed the compression nut in a bench vise and used a hand drill.
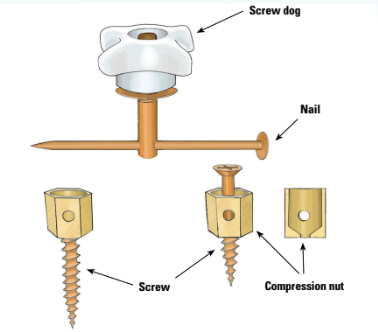
After drilling the compression nuts, I placed a new 1-inch stainless-steel screw in the base of each pillar for
mounting the pillar on the frame. Since my replacement pillars would be spaced farther apart than the old pillars, I inserted a 1⁄8-inch common nail as a longer — and temporary — hinge pin to check the orientation of the drill holes on the compression nuts and the dog. I painted the compression nuts and nails white.
As soon as I can locate some 1⁄8-inch stainless-steel rod, I plan to use it to replace the nails. In the meantime, I removed the six old screws that were countersunk into the bottom of the port frame alongside each of the old dog locations. The stainless-steel flat head Phillips screws with which I replaced them needed to be 1⁄4-inch longer because they would now sit on top of the port frame rather than being countersunk into the frame as the original screws were.
Once the repair was completed, I filled the open ends of the compression nuts with white silicone caulk to give the port a more finished look (and to keep the hinge pin from coming out). Before applying the caulk, I placed
a small piece of paper inside the compression nut on top of the screw but below the hinge pin. This extra step will keep the silicone out of the screw head and allow me to pop the caulk out should I want to remove the pillar at a later time.
Satisfaction on all fronts
This easy repair took about 15 minutes per dog and cost $2.02 per dog ($6.06 for three dogs on one port) not counting the paint and caulk. The repair is aesthetically pleasing and meets all of my criteria: strong, inexpensive, quick, and simple using easily obtained parts and basic hand tools. This method can be used to repair one or several dogs at a time without removing the port and without taking a boat out of service.
Howard Nelson grew up with access to Long Island Sound where his family trailered an MFG-16 runabout. At 19, he purchased a used AMF Sunbird 16 daysailer, but sold it to make way for college, marriage, and children. In 1998, with the blessing of his wife and their four children, he bought an Integra 23, then a 1978 Hunter 27, and he now sails Avalon, a 1983 Hunter 30. His reluctant first mate of 34 years puts up with his passion as long as he’s safe.
Thank you to Sailrite Enterprises, Inc., for providing free access to back issues of Good Old Boat through intellectual property rights. Sailrite.com