Modern technology brings new life to a wooden classic
Issue 19 : Jul/Aug 2001
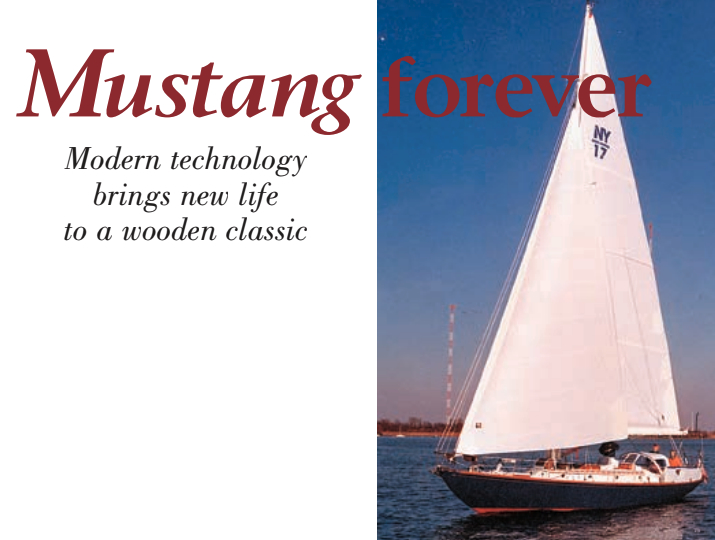
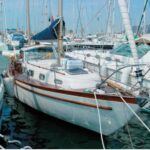
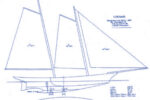
“Well, fiberglass it, then!” These were unexpected words from the late Rod Stephens, Jr. We were discussing Mustang’s deck and cabintop leaks and the risk of rot these created. This apparently casual conversation initiated a renovation project that ultimately lasted for more than a decade. Mustang is a New York 32 designed by Sparkman & Stephens and built by Nevins in 1936. Launched as Revonoc for Harvey Conover, she was one of 20 New York 32s commissioned for members of the New York Yacht Club. Built at a cost of $11,000 each, they replaced the slightly smaller Nathaniel Herreshoff-designed “Thirties” that had been the club’s class boat for many years.
Designed as an all-weather offshore racing cruiser, the New York 32 proved to be one of Sparkman & Stephens most successful designs. They measure 45 feet 4 inches overall with a 32-foot waterline, a beam of 10 feet 7 inches, a draft of 6-feet 6 inches, and a working sail area of 950 square feet. More than 60 years later, there are at least 16 NY32s in commission. This is a fitting tribute to its design and to the quality of materials and workmanship that went into each boat.
Having participated in the design, and sailed 32s in many races and cruises, Rod Stephens was delighted to acquire Revonoc from Harvey Conover in 1946. He renamed the yacht Mustang, ignoring the myth that renaming a boat brings the new owner bad luck. For 23 years he and his family, supported by many now-nostalgic crewmembers, raced and cruised her extensively.
Years of fun
In the spring of 1969, Rod sold Mustang to W. Marlon Dickerson, who was commodore of the New York Yacht Club at the time. Unfortunately, he died aboard Mustang later that summer. Mustang was then sold again, this time to a Philadelphia doctor from whom we purchased her in 1973.
Our early years of ownership were fun times. Mustang was in excellent condition and required little maintenance. With our three young sons, we cruised our home waters of the Chesapeake Bay extensively. As the years passed, we realized that we not only owned a comfortable and safe yacht, but had also incurred the responsibility of caring for a classic piece of American yachting history. While cruising, a day seldom passed without our being asked, “Is that Rod Stephens’ old Mustang?” We also became accustomed to the statement, “She still looks as good as when I raced (or cruised) aboard her with Rod.”
By 1981 our sons and their friends had grown beyond spending weekends and holidays with us aboard Mustang. We agreed that she would eventually become our retirement cruising home. Thus, instead of selling her, we committed to an extensive renovation program of improvements and upgrades to prepare her for extensive cruising.
One of our first concerns was to rectify the annoying leaks in the canvas-covered deck and cabintop. Rod had stated categorically in an article he had written about Mustang: “Water below decks is inexcusable. It dampens everything, including the spirits of all aboard.” So with this in mind, we called him for advice. He replied promptly and definitely: “If you want a permanent cure to the leaking deck and cabintop problem, fiberglass them. Just make sure you do a proper job!”
Astounded
We were astounded that Rod would suggest such a blasphemous thing. After careful consideration though, we realized he was right. With proper materials and careful workmanship, we could permanently resolve this problem. Despite the many expressions of “doom and gloom” by dockside experts, we prepared to fiberglass Mustang’s entire deck, cabintop, and cockpit. Removing all the old canvas and deck fittings, including stanchion bases and toerails, before fiberglassing was not easy but with some help from family and friends we had the job completed within six months. The results, after more than 16 years, are still very gratifying. No deck leaks, wet cushions, or bedding. Rod was right. Not only had we cured the leak problem, but also the spirits of all aboard were “undampened.”
Following completion of the deck-sealing project, we took an extended cruise aboard Mustang. In November 1982, we left the Chesapeake Bay for a leisurely and enjoyable cruise to the Florida Keys, Dry Tortugas, and throughout much of the Bahamas. During these nine months of living and sailing aboard Mustang, our faith and trust in our “cruising home” was fully justified. She felt like an old slipper, perhaps a little worn, but totally friendly and comfortable. Now we could accurately identify the additional improvements and upgrades necessary to fulfill our ultimate ambition of “sailing off into the sunset” in a well-found, safe, and comfortable boat.
Improvement list
The initial list of improvements was extensive. Top priorities were:
- Eliminate the old fastenings and ensure a hull that would safely withstand the most severe weather conditions during extended cruising.
- Repair or replace the original wooden mast and boom. Concurrently, replace all standing rigging and old sails, some of which were more than 30 years old.
- Replace the old Gray Marine gasoline engine with a more powerful and reliable diesel engine.
- Install a cockpit dodger for protection against wind and spray.
- Modify the below-decks accommodations to better suit a liveaboard cruising couple, rather than a crew of seven. Included in this renovation would be the conversion of an old icebox to a refrigerator.
These priorities represented only a few of the hundreds of tasks we set for ourselves. Our equipment requirements list would bring smiles to many marine storeowners. However, none of our renovation and upgrade plans would make any sense unless we could accomplish our main goal of a completely secure and low-maintenance hull.
We were fairly confident that the original 1 1⁄4-inch Philippine mahogany planking on 1 5⁄8-inch white oak frames at 8-inch centers was sound. But the need for frequent attention to garboard strakes and butt block joints indicated that fastenings needed replacing. We also had an undetermined number of cracked frames. These circumstances would not make for long-term, worry-free cruising. A safe and secure hull was our number-one priority. We had several ideas of how this might be accomplished. But whatever we did had to be within our limited financial resources, which meant that we must be able to do the physical work ourselves. Besides, we wanted the satisfaction of doing the job ourselves and knowing that it had been done properly.
Alternatives
We evaluated these alternatives:
1. Renovate the hull in the traditional manner. This would entail a lot of work including dealing with cracked frames, probably by sistering these. Before setting off on our first extended cruise to the Bahamas we had replaced several planks at the waterline. This project required sistering four or five cracked frames. A very experienced ship’s carpenter did most of the work, and we saw just how much skill, as well as the many special tools, this work required. Refastening and any required replanking would be a long, difficult, and expensive process, and we doubted whether it would provide a viable, long-term solution to our objective of providing a maximum-strength, low-maintenance hull for Mustang.
2. Fiberglass over the old hull. An excellent book by Allen Vaites told us that this had been done on many types of hulls with apparently good results. Allen advocated multiple layers of fiberglass cloth embedded in polyester resin, with the resultant sheath being mechanically fastened to the old hull. We concluded that this process, while basically sound, had been outdated by newer techniques and more sophisticated resins.
3. Sheath the hull with an epoxy-embedded cold molding of wood veneer. This cold molding construction method had proven to be immensely strong and comparatively light for new hulls. We knew that good results had been obtained by “do-it-yourself amateurs” and concluded that the same principle, applied to Mustang, would strengthen the hull and provide a durable and practically maintenance-free finish.
Ultimately, we decided to combine all the above alternatives: refasten the old planking, cold mold a sheath over the old hull, mechanically fasten the sheath to the old hull, and fiberglass the entire hull. By our estimation, six months of spare-time labor and $10,000 would accomplish the sheathing project.
The project begins
Heeding Rod’s earlier advice about doing the job “properly,” we committed to the project, which was to involve 11 phases:
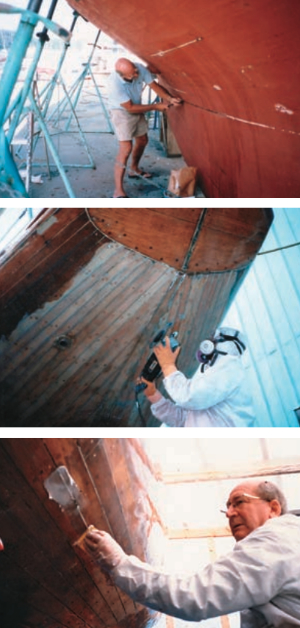
1. Strip off all the old paint and inspect the hull for rot. We were able to deal with the topsides while Mustang was still in the water. As the stripping process advanced and the exposed wood dried, we saturated it with epoxy. After we completed the topsides, we had Mustang hauled and blocked so that we could continue the stripping process on the bottom. Grinding off the old bottom paint was laborious and hazardous. We wore protective clothing including mask, goggles, and gloves for this and many other phases of the renovation process.
2. Allow the old hull to dry. Extensive reading of relevant literature told us that the moisture content of the hull would need to be reduced to 12 to 14 percent before the sheathing process could begin. Drying the hull inside a custom-fabricated shed took three months. The amount of water yielded from the old wood was incredible. We eventually found this to be equal to the total weight of all new materials added to the hull. In drying, the planks shrank and left wide-open seams from which all the old filling compound could be easily removed.
3. Refasten the old planks. To stiffen up the hull and ensure its long-term integrity, we reinforced the old fastenings by driving more than 2,000 21⁄2-inch stainless steel screws through the original planking and into the oak frames. In effect, we used one new stainless steel screw for each two of the old bronze fastenings. Results were impressive. The hull became more rigid and stiffer than it had been since being built more than 50 years earlier.
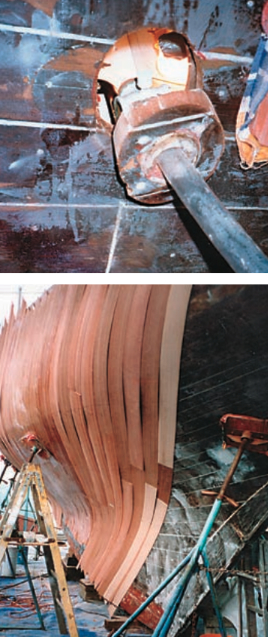
4. Remove all the old through-hull fittings. We removed the through-hull fittings, including the stuffing box and shaft strut. Then we plugged and backed the holes to ensure that hull strength was not compromised. Cleaning, inspecting, and overhauling the old fittings for their reinstallation became a “spare time” job.
5. Seal the old planking and provide a fair surface. We began by filling the seams and screw holes with a thickened mixture of epoxy, followed by careful coarse sanding. This gave the hull a fair surface. Repeated applications of epoxy diluted with acetone ensured that the now dry planking was saturated with a complete exterior moisture barrier. This provided a sound foundation for our cold-molding process.
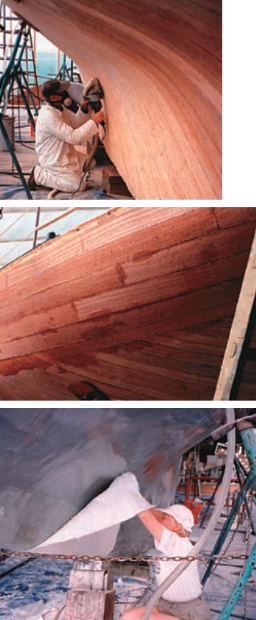
6. Obtain and prepare the veneers for layup. After calculating the amount of veneer required to provide three layers over the entire hull, including a 20-percent allowance for trimming waste and spoilage, we committed to the shipment of 1⁄8-inch mahogany veneer from an Oregon supplier. We learned that this would be delivered in random widths and lengths. With five or six different dimensions to choose from, careful sorting enabled us to utilize the veneers most economically and effectively. Wide, long pieces were allocated to midships sections, with shorter narrower pieces being reserved for the ends of the hull.
All of the veneers required edge trimming to assure at least one straight side. After trimming, individual veneer strips were positioned at 45 degrees to the hull planking and temporarily held in position by staples. To facilitate their removal, we “tacked” these staples, leaving their heads exposed. As successive veneers were positioned, each was marked for required shaping or splining to secure a snug fit to the preceding veneer. Many veneers required multiple markings and splinings before a satisfactory fit could be achieved.
7. Begin the layup of veneers. After splining and clearly identifying each strip’s position, the veneers were removed from their temporary fastenings and coated on both sides with epoxy. Using a serrated trowel of the kind used with tile adhesive, we applied a thickened mixture of epoxy to the hull. This resulted in an adhesive base with the consistency of thick cream, into which the veneer would be embedded. Using 3⁄4-inch galvanized staples fired from a pneumatic gun, we forced the veneers to conform to the complex contours of the hull.
This stapling process guaranteed a close bond of the veneers to the epoxy-coated hull and eliminated any voids or air pockets under the veneers. It was important to take care to shoot the staples perfectly. Too little pressure left the staple heads protruding to be ground off during the fairing process; too much pressure forced the staple through the veneer, eliminating its vital fastening function.
Of equal importance was the consistency and volume of the thickened epoxy applied to the hull. Too thin a consistency or insufficient volume resulted in air pockets and a weak bond; too thick a consistency or volume produced an uneven surface that was difficult to grind fair without cutting through the thin veneers.
The veneers extended from deck level down over the lead keel to which they were again attached with epoxy adhesive and staples. After completing the first layer, we filled the gaps and coarse-sanded the hull. The first layer of veneers was followed by a second, applied at 90 degrees to the preceding layer. The third and final layer followed these, which below the waterline were again positioned at 90 degrees to the preceding layer. Above the waterline veneers were laid up “fore and aft” to ensure that if any eventual “show through” occurred, Mustang would still maintain a traditional “planked” appearance.
8. Mechanically fasten the new sheathing to the old hull. With the combination of epoxy and 3⁄4-inch galvanized staples, we felt confident that the new hull was securely bonded to the old hull. However, we ensured this by driving approximately 5,000 11⁄4-inch stainless steel ring nails through the triple veneer sheath into the original planking. After nailing, we filled and faired the hull in preparation for the next phase.
9. Ensure complete watertight integrity of the cold-molded hull. The long-term integrity of the cold-molded sheath depended on eliminating the risk of moisture penetration. This moisture invasion would not occur under normal circumstances. However, a major grounding or collision could expose the wood veneer, potentially creating a major problem. We decided to eliminate this by fiberglassing the entire hull with 25-ounce biaxial mat/roving fiberglass material, one layer of material above the waterline, two below the waterline, with yet a third at the turn of the bilge. With each layer wrapped completely under the hull and brought up several feet on the opposite side, we had six layers of material under the forefoot and transom. Additional layers applied under and around the keel area provided extra strength and protection in this area. Mustang was now an icebreaker!
10. The finishing process begins. Fairing the hull required endless days of filling and sanding. There seemed to be no end to this, and it was often difficult to maintain a positive attitude toward the task. After many weeks, we finally felt close to having the hull smooth and fair enough to start applying and sanding coat after coat of priming/filling paint.
11. Final details are important. Although the actual sheathing process was now largely complete, there were countless final details requiring our attention. The major ones included sealing the rudder shaft tube, which passed through the wooden rudderpost; repairing the rudder, which had rotted; reinstalling the original, now overhauled, through-hull fittings; repositioning the shaft strut to allow for the thicker hull dimension; installing new through-hull transducers for our upgraded depth and speed instruments; installing a rubrail; tightening the keel-bolt nuts; and sealing the inside of the hull with epoxy.
12. Strive for a proper yacht finish to the new hull. Preparing the topsides of the new hull for a final custom-color coat of Awlgrip paint became another major phase of the project. Every time we thought we had a blemish-free primer base, we would discover minor, but noticeable defects requiring attention. Finally, we were satisfied and enlisted the boatyard experts to apply the Awlgrip topcoat and a final ultraviolet clear coating.
At last we could stand back and admire Mustang’s shape, finish and, above all, the strong, enduring hull that we had created. Worth it? In our minds, an unequivocal “Yes.” However, in our opinion, the cost, time, and efforts of cold molding and sheathing the hull of an older wooden vessel can be justified only on an emotional, rather than an economical, basis. We certainly do not advocate the sheathing of an old wooden hull as being a “quick-fix” solution.
Even though we performed 95 percent of the work ourselves, the costs were high. Our first estimate of cost proved to be 50 percent low, with tools, materials, and related expenses alone totaling approximately $20,000. Our time estimate was even more inaccurate. Six months became 20 months, but this included many additional tasks that had not been included in our initial project planning. During those 20 months we estimate that, between us, we spent some 3,500 hours working on the project. Perhaps a competent boatyard would have done the job in less time. But would it have been done so well? Even if it had, the project cost could have easily exceeded $100,000.
For us it was a long, often tedious, but always deeply satisfying project. We are proud of our “new” Mustang and know that she will bring us safely to any port of our choice.
Brian and Christine moved their family of five to the U.S. from England in 1968. They shipped Spica, a 50-foot Van DeStadt wooden cutter as part of the move. A back injury caused the sale of that boat. As Brian was recovering, the Kings saw and fell in love with Mustang. They spent a year in the Bahamas in 1983, began the restoration explained here, and have since sailed 5,000 miles between Maine and Guatemala.
Thank you to Sailrite Enterprises, Inc., for providing free access to back issues of Good Old Boat through intellectual property rights. Sailrite.com