Rolling and tipping their way to glory
Issue 71 : Mar/Apr 2010
Next time you’re down at the marina, take a close look at the hulls of your neighbors’ boats. You don’t have to look very far to see rub marks, gelcoat faded from years of UV exposure, or the telltale signs of less-than-friendly encounters between their topsides and pilings and docks.
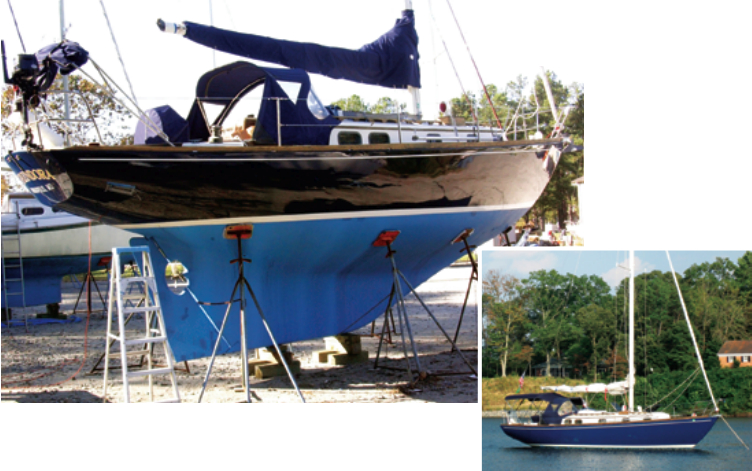
If your boat meets that description, chances are you’ve thought about having it repainted, as we did when we hauled our sailboat, a 34-foot Sea Sprite, for a bottom job. A boat that looks a little tired in the water usually looks a lot worse on the hard, and Splendora was no exception. Her scratched and badly faded flag-blue Awlgrip finish was overdue for cosmetic work.
We were surprised to learn that a professional spray paint job would cost between $3,500 and $6,500, depending on which contractor or yard did the work. Apparently, linear polyurethane (LPU) paints, such as Awlgrip and Imron, are the BMWs of the paint world. They are without equal in gloss, depth, and durability. They are also notoriously expensive, labor intensive, and unforgiving. Even the pros sometimes get inconsistent results; hence the big price tag. Since the price tag was too big for a couple of retired folks, we decided to do it ourselves.
There’s a lot of information on the Internet about LPU paint. It’s an exotic technology involving cross-linked molecules, solvent flash-off, accelerators, and organic-vapor hazards, including a cyanide compound that becomes airborne when the product is sprayed. Spray painting is not an option for the do-it-yourselfer. The roll-and-tip application method is much safer and, theoretically at least, easier to do.
The journey begins
The small-town hardware store near our marina sells marine supplies at competitive prices. The old-timers in the paint department seemed to know a lot more about house paints than boat paint, but we all learned together as we waded though the wholesale catalogs and placed the call to the supplier. Three days and $130 later (including hazmat shipping fees), we had a quart of flag-blue Awlgrip topcoat, a quart of converter, and a quart of brushing reducer.
Our plan was to paint one side at a time. (The transom had been professionally redone when we bought the boat five years earlier.) We started the prep work, which is especially important when using LPU paints. The product goes on very thin, no more than one or two mils for each coat, so any imperfections will show through. Also, the surface must be 100-percent free of wax and alkyd-based paints or other contaminants, as they will affect adhesion and performance of the paint. Removing these can be quite a task. The lesson here is to never wax your boat if you think you might paint it in the future.
We carefully repaired the dings and scratches with polyester filler, touching up with epoxy primer, and did the final sanding with 220-grit paper. After five days’ work, the hull was now a clean, smooth, powdery blue. Our fellow boaters were impressed and asked a lot of how-to and what’s-next questions. The yard manager, well-known for his disdain for do-it-yourselfers, was not impressed. “What the heck are you doing?” he boomed. From atop our ladders, we responded as best we could through our brand-new 3M organic-vapor respirators, but he was already walking away. “That’s one of the prettiest boats in the marina, and you’re ruining it,” he added over his shoulder. Everyone else avoided making any further eye contact.
Theory vs. real world
In theory, application of LPU paint is a fairly straightforward process. It’s a two-part plastic topcoat with a tinted base and a catalyst (converter). A third component, reducer, is used to thin the mixture. After mixing these and letting them react for a few minutes, you pour a small amount into a roller tray.
In the roll-and-tip method, you roll the paint on the hull in a W-pattern in an area of about two roller widths, then roll the same area vertically to ensure uniform coverage. Next, you tip the freshly rolled paint with a high-quality brush to smooth out the stippled surface and bubbles left by the roller. This must be done very quickly and exactly right because the plasticized surface skins over in about 60 seconds — and there’s no going back to fix mistakes.
There’s a nice demonstration of this technique in a streaming video at Yachtpaint.com. It shows a powerboat being painted with Interlux Perfection, a consumer-grade LPU that’s much more forgiving than Awlgrip or Imron. Be sure to notice how easily and smoothly the paint is going on and how one man is doing both the rolling and tipping without even raising a sweat. He looks as if he’s enjoying the task. Note that he’s working on a scaffold inside a large, well-lit, air-conditioned building. Finally, see the completed project in all its shiny and flawless glory, a finish that rivals even the best spray jobs.
It’s an impressive demonstration, but application of commercial-grade LPU paint in the Great Outdoors (the boatyard) involves a complex set of variables that must be controlled. Everything in the equation has to be perfect. The optimum conditions: a warm (68 to 75° F) overcast day with low humidity, zero chance of rain, and no wind. Morning is better than afternoon, so the paint can cure before the evening dew ruins it. The paint has to have the exact viscosity for the heat and humidity prevailing at the moment it’s applied, so the amount of reducer has to be exactly right. Too much reducer and the thin paint will fall off the vertical surface in the form of sags and curtains. Too little reducer and the roller and brush strokes won’t level out.
Also, the temperature of the surface being painted has to be lower than 83 degrees. This is a problem, because a 70-degree hull can zoom to 130 degrees 15 minutes after being exposed to direct sunlight. The reducer flashes off in seconds. If this happens in the middle of a painting session, just throw away the rest of that very expensive paint you’ve mixed and go home. Wind presents a similar obstacle; even a light breeze will suck the reducer out of the painted surface faster than you can tip it.
The Blue People
The finish quality of the first few layers of paint is not that critical because the emphasis is on creating film thickness and depth. Some folks just roll and sand each coat, saving the tipping until the finish coat. But we treated each application as a final coat because we needed all the practice we could get. My wife, Sarah, and I spent the next four weeks rolling, tipping, and sanding. After three coats on each side, we had achieved progressively better, but still less-than-satisfactory, results.
At the marina, we became known as The Blue People, a reflection of the vast amounts of blue paint and dust in our clothing and tools, on our hands and faces, and in our outlook on life in general. Things were not going well. There was a certain degree of weird unpredictability about the whole project.
On a particularly dry and hot day, the static electricity from sanding was so intense that we had to wash the hull three times to remove all the paint dust. A few days later, we had the Attack of the Leafhoppers, when a great swarm of Cicadellidae descended on the freshly-painted hull. These tiny insects are nearly invisible, but they can plow amazingly long and visible furrows in the paint before finally succumbing to the solvents. Very impressive indeed. Imagine Homo sapiens trying to wade through a couple of hundred yards of highly toxic mud.
We discussed the project between ourselves and with anyone else who would listen, to the point of obsession. Our boating pals were sympathetic, but we could see their eyes glaze over when we went into the details. One person who did listen was Ted, the U.S. Paint technical representative, who was very patient and provided a lot of helpful advice.
“It sounds like you’re making progress,” he concluded at the end of a long phone call, “You’re doing everything right; all that’s needed is some decent painting weather.”
A perfect morning
By then, it was mid-October and we were running out of time. On a beautiful cool, dry, and partly cloudy morning, we mixed up the paint and said a short prayer to the Awlgrip god. We thought about offering up a small sacrifice, but it was the yard manager’s day off.
After doing the first few feet on the port side, we knew we were going to make it. The lessons learned from previous sessions were serving us well. We had extra reducer in a restaurant hot-sauce squeeze bottle so we could quickly add small amounts to the mix as the temperature rose. The roller tray was on a stable, easily movable platform (one of the marina dock carts). Sarah had become expert in judging paint viscosity and in rolling the exact amount of paint needed for each strip. To solve the problem of brushes loading up, I had five, 3-inch Purdys ($16 each) at the ready and I’d mastered the art of making the long, very light, top-to-bottom strokes that work best in the tipping process. Most important, we had learned to work as a team, shoulder-to-shoulder, with minimum wasted effort and few mistakes. Fifty-five minutes later, we finished at the stern, stepped back, and looked at our work. We’d nailed it.
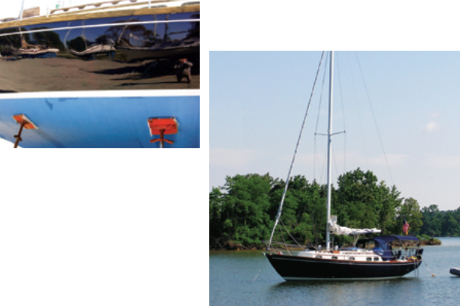
A couple of weeks later, we finished the starboard side and repainted the boot and cove stripes. The whole yard crew (and the marina’s owner) turned out when we splashed Splendora once more in early November.
The balance sheet
Our boating friends ask us if the project was worth doing. We’d wasted a lot of expensive materials in our attempts to get it right and it cost us many sleepless nights, as it was one of the most difficult and frustrating things we’d ever done. We’d also missed the best fall cruising season in recent years on the Chesapeake.
On the positive side, the total cost of the project was under $1,000, including yard storage fees, and we now have a boat that’s a guaranteed head-turner in any marina or anchorage. “Yes,” they ask, “but would you do it all over again?”
Now that, my friends, is a completely different question indeed.
Chuck and Sarah Dougherty live in Virginia and cruise the Rappahannock River and Chesapeake Bay on Splendora, their 1983 Sea Sprite 34.
Thank you to Sailrite Enterprises, Inc., for providing free access to back issues of Good Old Boat through intellectual property rights. Sailrite.com