Air-condition your boat for less than $100
Issue 55 : Jul/Aug 2007
“It must be 104 degrees out here you think to yourself as you walk down the dock toward your boat. It’s been just moments since you parked your car and you are dripping. As you pass the new 47-foot Beneteau, you can hear the faint humming of the air-conditioning system. You know the folks on board are comfortable, while the rest of the marina is baking in the August heat wave.
Farther down the dock, you step aboard your own boat (mine is a 1978 Watkins 27), slide back the companionway hatch, and step down into the main cabin . . . which, happily, is also cool and comfortable. That’s my scenario anyway, and it could be yours.
A 1978 sailboat with dockside air conditioning? It must have cost a ton of money! Our boat’s air-conditioning system cost less than $100, and installation was easier than you might think.
The first step is to go to one of the big-box stores, such as Home Depot or WalMart, and purchase a 5,000-Btu/hr single-room air conditioner. We bought GE Model AGR05L with a 5,150-Btu/hr output for only $79. The important consideration for this portion of the project is to select the smallest size for the optimum output. The smaller the unit, the fewer problems will be encountered during the installation process. The unit I used was 12 inches high, 17 inches wide, and 12 inches deep.
The second step is to determine the best place to install your air-conditioning unit. The two best installation options are the main cabin companionway and the foredeck hatch. If you can make it work there, the companionway is a far better location, as it can cool the main cabin directly.
Spacer block
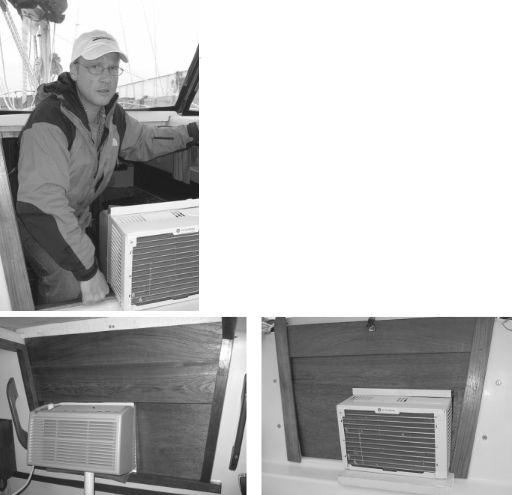
There are two approaches to installing the unit in the companionway. If you have a bridge deck, your installation will proceed much like mine. First, you need a spacer block (we used a piece of closed-cell foam) under the unit to bring it up to the level of the bottom of the companionway. It’s important to have the unit tilt slightly back toward the cockpit to allow for condensation drainage.
Place the spacer block on the bridge deck and locate the unit on the block so the retainer bar on top aligns with your hatchboard slot. (If you do not have a bridge deck, you’ll have to create two legs to support the unit where it extends into the cockpit.) Now measure the space from the bottom of the unit on the inside to the top of the counter directly below the unit. Cut a support leg (we used an old turnbuckle boot) to fit under the unit. At this point you should have the unit in position and relatively stable. To ensure stability, we used foam-rubber pads on either end of the leg.
To complete the installation, make cardboard patterns of the spaces on either side of the unit. Using these patterns, make filler hatchboard pieces for each side of the unit. We used a piece of luan underlayment for this job. It is thin and has hardwood surfaces that can be stained to match your existing hatchboards.
In our case, the height of the air-conditioning unit was exactly equal to the height of two hatchboards. If your situation is otherwise, you will have to make up a filler hatchboard to fit over the top of the unit. This piece will fill the gap between the top of the unit and the next hatchboard or the companionway slide.
After all the parts have been fitted, sanded, stained, and installed, just plug the unit into your shorepower outlet, turn it on, and sit back in cool comfort. Ain’t life grand!
An important consideration when mounting your unit is how you will get into and out of the cabin through the companionway. Do not create a situation that will make exiting the cabin difficult. If your companionway is not wide enough at the bottom to allow you to pass around the unit, consider a forehatch installation.
A note about power consumption: most 5,000-Btu/hr units are rated at 11 to 12 amps. Most marina circuits are set up for 30 amps, while some older marinas are equipped with 20- amp service. So just plug your new unit in and turn it on.
Forehatch installation
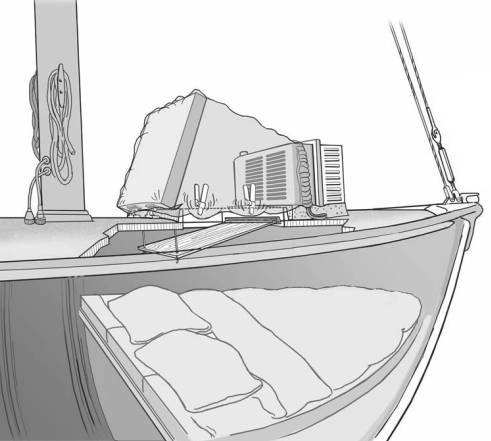
If your companionway is too narrow to accommodate an air-conditioning unit, the installation for a forehatch is a bit more complicated. Position the unit on the deck in front of the hatch. The first step is to create a pad of closed-cell foam equal in thickness to the height of the hatch coaming. The size of the pad should be equal to the size of the unit’s base (in the case of our GE unit, that would be 12 inches by 17 inches). Use a large contractor-style, 4-mil trash bag with a drawstring closure. Place the open end of the bag completely around the front of the unit and use the drawstring to secure the open end of the bag to the unit. (A piece or two of duct tape will ensure a snug attachment.)
Next, make an I-shaped cut in the bottom of the bag. Align the cut so that when the unit is placed on its pad directly in front of the hatch, the bag can be slid over the raised hatch. In this position the bag should fit over the open hatch so the longer cut is directly in line with the hatch opening. You can use medium-sized spring clamps to hold the sides of the bag to the sides of the hatch. When this is all set up, you will have created a wind tunnel that will direct cool air directly through the hatch opening.
More secure
If you are planning to leave the unit set up for an extended period of time, you can use duct tape to make a more secure attachment of the wind tunnel to the hatch coamings.
There is one problem with using the forehatch as your air-conditioning port. A person sleeping in the V-berth will soon complain that the cold air blowing directly on him or her is too chilly. This problem can be avoided by making a deflector from a piece of rigid lightweight material (luan underlayment is excellent for this application).
Place an adhesive Velcro strip along one edge of the deflector and the corresponding piece of Velcro on the inside of the forward side of the hatch opening. Secure two short pieces of 1⁄8-inch line to the two opposite corners of the deflector. Place 1-inch self-adhesive Velcro dots on the free end of these lines and the corresponding Velcro dots on the two aft corners of the hatch opening. When in use, the deflector is attached to the forward side of the hatch opening while the after end is suspended from the two 1⁄8-inch lines. When positioned properly, the deflector will blow cool air into the cabin area but will not freeze out anyone sleeping in the V-berth.
There you have it. The total cost of our installation was $79 for the unit, $5 for the closed-cell foam, and $7 for a half sheet of luan underlayment. The stain and varnish were already on board as part of our ship’s stores. The total cost was $91. Can you beat that for a cool deal?
Thank you to Sailrite Enterprises, Inc., for providing free access to back issues of Good Old Boat through intellectual property rights. Sailrite.com