One sailor’s solution
Issue 60 : May/Jun 2008
I was in the cabin of Mas Tiempo, my Islander 30, when I noticed something different in the symmetry of the shroud chainplates. These chainplates are attached to the main bulkhead with carriage bolts. The shine and robustness of their polished stainless steel sends a comforting message of strength. But I noticed that some of the bolt heads weren’t flush with the chainplate. They were tipped.
This — and my recent experience with setting up the standing rigging — were sending an entirely different message: a red flag. When I set up the rigging, the shroud turnbuckles had needed almost full-length adjustment to take up tension. Yet on a hard reach, the lee shrouds seemed too slack. I had noted this but, as the boat had been out of the water for nine months without the mast, I thought I’d let it “settle in” before re-tightening the shrouds.
Slack shrouds can be an indication that a deck-stepped mast is settling. The mast base won’t properly support the mast if the cabintop is weak or the compression post underneath is deteriorated. I had just replaced the mast base plate and hadn’t noticed any signs of gelcoat cracking or cabintop distortion, and the plate hadn’t leaked into the cabin. Instead, it appeared that the boat’s chainplates were pulling out.
I bought Mas Tiempo out of salvage after owning an Islander 24 for a couple of years. The construction and strength of that smaller boat had impressed me, but it was a little too snug. When the 30-footer came up, I jumped at the chance to upsize. I spent winter and spring getting her ready for launching. I did a total hull repair and added an epoxy barrier coat and anti-fouling paint. I overhauled the engine and installed a new shaft and folding prop. I replaced the wiring systems and re-rigged the running gear.
What happened?
“But,” I pondered, “what had happened to the chainplates?” Forces on the chainplate’s mounting bolts had caused them to crush the wood around them. Then, because the full thickness of the wood was no longer available as a bearing surface, the round bolt hole elongated into an oval, and the bolt tipped. Bolt holes elongate when mast loads are greater than expected, when the wood becomes punky due to rot, or weak through age, or when the nuts aren’t kept tight and the bolts are able to gain leverage on the wood. On a boat that’s 30-something, these things can happen.
The bulkhead wood will rot when the deck seal fails and water seeps into the cabin, soaking the wood around the plates. Marine surveyors are always alert for water stains and rust around the chainplates. The wood can also fail if the system is carrying greater loads than the designer calculated or if something happens to the mast system, as it might in a knockdown. However, those things usually lead to a catastrophic failure, whereas my problem was indicative of age fatigue.
There are many ways to fix loose chainplates. One alternative is to repair the chainplate bolt holes. Another is to add chainplate extenders. A third is to replace the chainplate itself. These solutions require that the bulkhead wood be dry and in good condition. If that is not the case, another, more extreme, alternative is to replace the entire bulkhead.
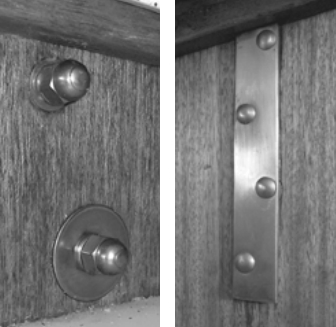
Chainplate extenders bolt over the old plates and extend down the bulkhead to increase the number of bolts in better wood. This has the effect of decreasing the load on the original bolts but doesn’t really repair their weakness. Adding extenders requires adequate room below the old plates. Extenders look a bit “patched up,” but they’re cheap to buy, simple to install, and they do solve the problem.
Different locations
The next rung up the repair ladder is to replace the chainplates with substitutes that use different bolt locations and perhaps extend farther down the bulkhead for additional load area. This is cosmetically more appealing, but more costly and more difficult. My original plates have four 5⁄16-inch carriage bolts and are not quite 2 feet long.
If the wood isn’t sound enough, the only option is to replace the entire bulkhead. This requires cutting away the old bulkhead with implements of destruction, fitting in new wood, which must then be tabbed to the hull, deck, and associated cabinets and joinery. It’s messy, labor-intensive, and expensive. The bulkhead plywood must be marine-grade, the veneer will have to match the original, and there is a temptation to increase the bulkhead thickness as added insurance against future problems. This is a major undertaking requiring carpentry and fiberglass skills. The accessibility of the tabbing is a major consideration and other nearby cabin woodwork may be damaged in the process of removing the bulkhead. Still, if your aim is to have a strong-as-new result, then bulkhead replacement and new chainplates are unavoidable.
When I was buying this boat I looked for water stains on the bulkhead and rust on the plates. I didn’t find any, nor had the loose and tipped bolts appeared since the mast wasn’t stepped and the chainplates weren’t loaded. Whether I would have bought the boat with the failing chainplates is a good question . . . but a moot one.
As I plan on sailing this boat aggressively and far, the problem had to be fixed properly. But I balked. Since I had been involved with so many other needed repairs I was reluctant to jump into bulkhead or chainplate replacement. I hadn’t enjoyed sailing her enough!
Inspected holes
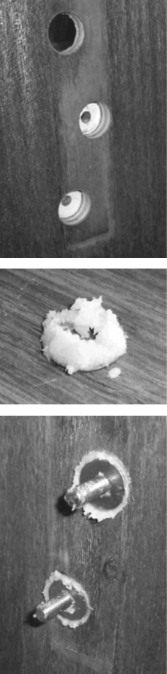
I removed the plates and inspected the holes and wood around them. I noted that the nuts weren’t locknuts and weren’t very tight. In some places the washer had crushed the wood. This might have allowed enough play to let the bolts tip and upset the holes. I noted that the bolts had a carriage bolt-style head that mated to square-punched holes in the chainplates. This gives the round bolt head a smooth look and relieves the installer from having to wrench the head. Using oversized bolts would mean drilling out a square hole and losing that clean appearance.
I inspected the chainplates carefully, looking for corrosion in the deck-joint area, elongated clevis-pin holes, and cracks radiating from any of the holes. Any sign of failure of the chainplates themselves also should be investigated. Machine shops can magnaflux, inspect with dye penetrant, or X-ray metal parts for cracks. In my case, the plates were sound.
Inspection of the bulkhead holes showed no sign of rot. The wood in the bore of the holes was somewhat gray but not black. It had been worked by repetitive forces and had fatigued. What a relief! I wouldn’t have to replace the bulkhead. I only had to repair the holes and reset the plates.
So how do you repair an oval hole in wood? You could drill it out to a larger hole and use a larger bolt. You could fill it with filler and re-drill it. You could drill it out to a larger diameter and install a bushing to get back to the original size. You could move it to another location. Each method works but has its own advantages and disadvantages.
Not best-looking
Using larger bolts would have meant drilling out the plate and having a hex bolt head where the smooth round one was. I decided this was not esthetically pleasing. Drilling out the square hole in my plates would have created its own problems, and I couldn’t punch larger square holes in the plate without special machinery.
The idea of using a filler brought up the question of what material might be suitable for the expected loads and how to get it to adequately transfer these loads to the surrounding wood. Epoxy filler is typically used for reinforcing and filling holes in boats. The usual method is to completely fill an oversized hole and re-bore it to the required diameter, thus creating an epoxy bushing.
Epoxy has its drawbacks, though. The first is how to make the liquid epoxy completely fill the hole while in a liquid state. The stuff has a tendency to ooze, and any void left behind is likely to be at the top of the hole where the load will be. A void could possibly crack the bushing. The use of fillers makes epoxy more like putty that can be pressed into an oversized hole. But it’s hard to drill a hole in epoxy that is stronger than wood. The epoxy bushing could break loose and spin in the hole before the hole is drilled through.
A metal bushing would work. A metal bushing won’t crack or ooze out when pressed into wood. There are standard threaded wood inserts made of steel. These might have met the need but, as they are generally made of steel, they will rust. Stainless-steel bushings would have to be custom-made. A third choice was to use stainless-steel washers stacked to the right thickness. Such a stack would form a decent bushing if the hole could be drilled out to just the right size to accommodate the washers’ outside diameter.
Washers and resin
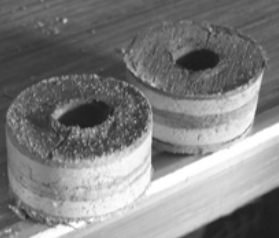
My solution was to use stainless-steel washers and epoxy. The epoxy filled the void between the washers and the wood and bonded the washers and wood together. Once I had the concept, the technique was simple. I drilled out the deformed holes to a size just larger than the washers so they would be a close fit and concentric with the original hole.
I determined how many washers were needed by stacking them to the same thickness as the plugs I had cut out. Holding a bolt in place with a fender washer and some duct tape, I buttered a stainless-steel washer with epoxy and filler and put it into the hole. I continued to add buttered washers to create a washer sandwich. In this state, the sandwich was thicker than the bulkhead. I placed another stainless fender washer over the end and tightened the whole with a nut, compressing the sandwich into the bulkhead. This pressure squished the epoxy out into the void around the washers, filling it. Since hydraulic pressure is equal all around, the epoxy flowed everywhere, including into the porous wood.
If you choose to use the chainplate and the original carriage bolt when making the bushing, they will be epoxied together and leave no way to subsequently remove the bolts, short of hammering them out (possibly destroying the bulkhead). But using a hex bolt and fender washers allowed the bolt to be removed by unthreading it. The epoxy forms perfect threads which can be drilled out for the original carriage bolt or used as a threaded insert. Using the chainplate means one has to load the sandwich from the back side whereas using a second fender washer and hex bolt means one can load it from either side.
Back in position
After the epoxy has cured, the chainplate can be bolted in its original position. It then must be sealed at the deck joint. I used 3M 4200 for this, as it forms a flexible bond to the metal and the gelcoat of the deck. The shrouds can then be installed and tensioned as needed.
Is this system strong enough? The weak link in the chainplate shroud system is the aging wooden bulkhead and its metal-to-wood junction. Since the wood isn’t easily replaced or structurally reinforced, the best thing is to reduce the stress on it. The applied compression loads from the shrouds aren’t changed. Therefore to lower the wood-to-steel interface stress, it’s necessary to increase the bearing area. Increasing the bearing area from the original 5⁄16-inch bolt to a 3⁄4-inch washer means the wood will experience less than half the original stress at the interface. I tested the epoxy-washer sandwich with a piece of plywood to ensure the joint would be solid. The increased fender-washer cap will eliminate the washer compression of the wood.
I believe this system is stronger than the original and will last the remaining life of the bulkhead and the boat.
David Cowell is a retired electrical engineer. He and his wife, Jamie, enjoy sailing in the Sacramento Delta and San Francisco Bay in their Islander 30, Mas Tiempo. As this issue went to press, Dave was indulging his passion with a cruise in Mexico.
Thank you to Sailrite Enterprises, Inc., for providing free access to back issues of Good Old Boat through intellectual property rights. Sailrite.com