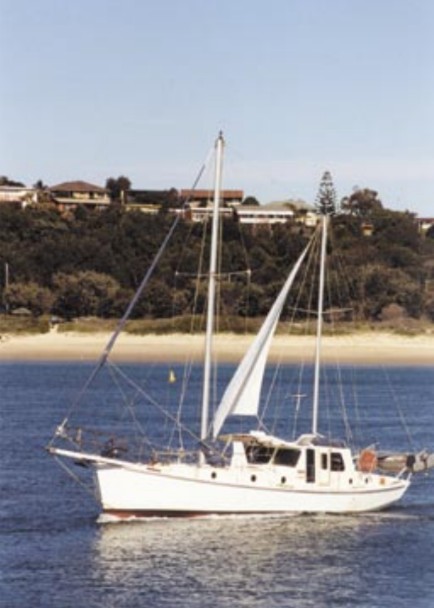
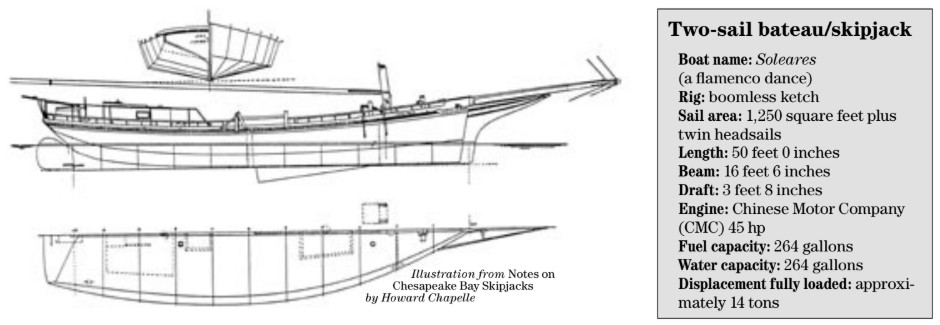
Experienced sailors build a comfortable, shallow-draft 50-footer
Issue 34: Jan/Feb 2004
IN THE 1960S I WAS ANCHORED OFF the Gold Coast of Queensland in Australia aboard my home-built plywood ketch. She had galvanized rigging, no engine, and drew 6 feet on a length of 30. My only neighbor at the time was a Californian who had recently crossed the Pacific Ocean to Australia on a yacht of similar length. The big difference was that his boat drew just 10 inches. She was a skipjack.
Her coffin-like accommodation held no appeal, but I was immensely impressed by her minimal draft and the fact that she could cross oceans. A desire had dawned to own a shallow-draft yacht one day.
Some years later I owned a bilge-keeler whose design was loosely based on the American catboat. It sailed like a haystack and had a draft and keel area more like a displacement motor cruiser than a yacht. After 3 years with her, I returned to deep-keelers.
The 1980s found me sailing around the world with my family in one of those deep-keelers, spending a year in the U.S. en route. In the Chesapeake Bay I haunted the Calvert Marine Museum and ogled every skipjack. I also bought Howard Chapelle’s little book, Notes on Chesapeake Bay Skipjacks, in which he produced the lines of many a vessel plus notes on their history and performance. This would prove pivotal to our future. I had one more deep-keeler to go first.
This was the Angelman-Davies-designed ketch, Renee Tighe, whose restoration was described in Good Old Boat (January 2003). With the family temporarily ashore, she admirably suited my singlehanded ambitions but proved inadequate at the end of that era. Change was inevitable.
Impossible job
The change came in Maryborough, Queensland, January 1998. My wife, Patricia, and I had just returned from a full Great Barrier Reef cruise revising my guide, Cruising the Coral Coast, and were facing its pre-press production. This proved quite impossible aboard Renee Tighe. Building a new and much larger boat seemed like a good idea.
Coincidental with this need came the availability of space in a huge waterfront shed on the Mary River in Maryborough. As the shed was flood-prone, the rent was very reasonable. The region was familiar to us, since we had built a ferrocement schooner there more than 20 years before. And next door, at the boat launch, a shipping container was available as a studio. The decision to stay came easily.
The whimsy of being able to finish a book and build a boat at the same time was quickly recognized, with the former falling by the wayside in favor of the latter within the first few months. But it did produce a sense of urgency and a promise that the studio would be the first cabin to be fitted out. But that was some time off. First, the lines plan had to be drawn.
From Howard Chapelle’s book we chose the skipjack (actually called a two-sail bateau), Lena Rose, and redrew the longitudinals to flatten out a distinct bustle she displayed aft. A box-section full-length keel was added for strength (despite the few inches it added to the draft) and the bulwark cap became the sheerline, an act that almost doubled the topsides height.
Glass beam
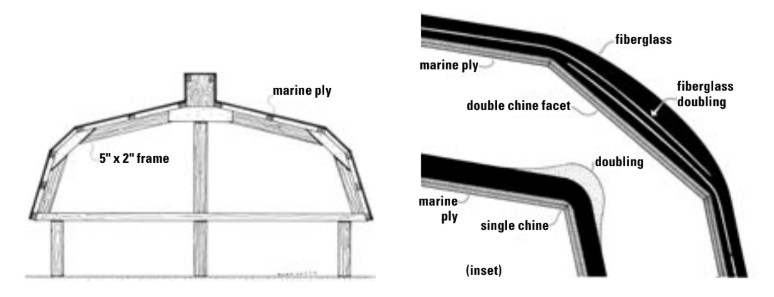
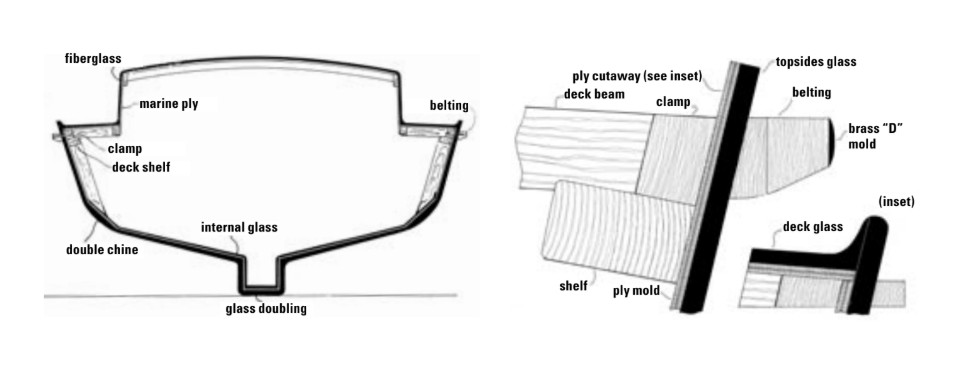
In deference to the chosen building material (fiberglass), the chines were softened with a 14-inch facet along their entire length. This not only rounded the corners a little but, most importantly, it would allow the top-sides and bottom glass to double and thus produce a massive glass beam from stem to stern on both sides (see illustration below).
Finally, we chose a daggerboard over the traditional swinging board to reduce centercase area and improve windward efficiency. That such a system is less tolerant of groundings, I am well aware, but the trade-off seemed worthwhile. This is being written 3 years after launching and with more than 6,000 miles under her keel. So far, we have not forgotten to lift the keel when approaching shallow water.
We chose fiberglass, not so much for all its well-known virtues, but because it is a material that can be worked in small amounts. This eliminated the need to call in outside labor for periodic heavy lifts and allowed just the two of us to build the boat unassisted. As I was already a couple of years into my seventh decade, with Patricia not far behind, saving money and keeping the work as light as possible made good sense.
As attested to by the production-line boatbuilding industry, fiberglass lends itself admirably to being laid up in a female mold. But this is only economical if the mold can be used again as often as possible. It is not economical for a one-off vessel. The male plug is the way to go. But a male plug also presents a dilemma. For a start, it produces a rough exterior and a smooth interior — the opposite of the preferred outcome. And regardless of how cheaply it might be fabricated, it still costs the same in time and is thrown away after the hull is built. There had to be a better way.
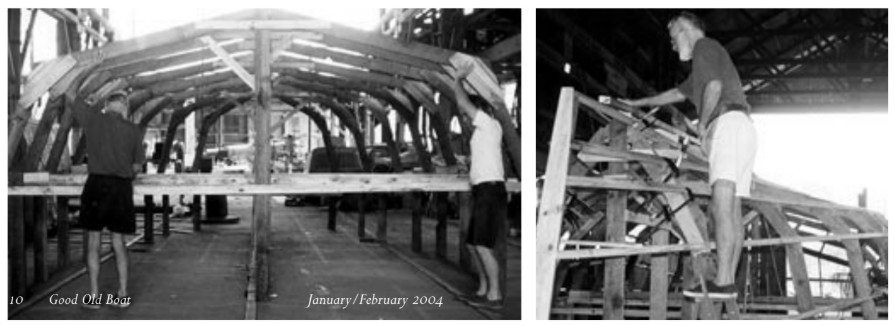
Stripped framing
My response was to use high-quality marine plywood, set up over rough framing. Only the framing is stripped out later; it is then dressed and used in the hull’s fit-out. The plywood is left in place. This eliminates waste, and there are other advantages.
Leaving the ply in the hull means that a timber interior is produced in a fiberglass structure to which all fitments are then easily attached — just like fitting out a traditional wooden boat. And with a few notable exceptions, fastenings throughout the fitments are unnecessary, the strength being in the hull and decks and not in their associated ply backing. This saves an enormous amount of time and money, and the glue consumption is similar to conventional methods.
During the first month of building, Patricia worked on preparing Renee Tighe for sale while I started lofting and setting up the mold. It is an indication of the simplicity and speed of the chosen system that, working alone, I had the hull ready for glassing in less than 4 weeks. Over the next few months our days became a routine of mixing resin by the bucketsful and wetting out glass by the hundreds of feet, taking a break only on those days of high humidity. Boxes of glass stacked as high as we could reach and no fewer than 17 44-gallon drums of resin waited patiently around the worksite for their turn to be morphed into a boat.
Most of the glass was chopped strand mat (CSM) for its bulk and multi-directional strength. But we also used five layers of woven rovings for their uniform thickness, greater strength, and the tension they impart. CSM wets out easily but woven rovings can be almost self-defeating in their resistance to resin. To digress a moment: woven rovings are obligatory in any hull built to survey standards, yet they can become the weak link in a glass structure. Because their weave traps more resin than a cloth or CSM and the actual rovings resist saturation to a greater extent, delamination becomes increasingly possible. The answer is to do multiple wet-outs.
Sandwiched rovings
Where just CSM was involved, we laid up one laminate at a time where circumstances dictated, and two or three at a time otherwise. Where woven rovings were concerned, we laid them up sandwiched between two CSMs in a triple wet-out process. This was the only way of assuring integration of the rovings into the whole. For all that, I remain unconvinced of their necessity and am thankful that they were among the earliest of the laminates that are now buried under a huge majority of CSM laminates.
As an economic measure, nearly all the resin was polyester, the exception being the last two laminates that were wet-out using vinylester resin for its superior imperviousness. There seems little doubt that a carefully hand-laid hull will not suffer from later osmosis regardless of its resin, but an exotic finish is a good feeling.
All resin was wax free to reduce the amount of sanding between wet-outs, but it certainly did not eliminate the need to sand, as is so often thought. Every cured surface must be roughed up to improve its key and to rid the surface of fibers that may produce a bubble under the next laminate. Sanding a 50-foot hull dozens of times in a few months is the least exciting of my building memories.
In the interest of those intending to dabble in glass, an observation: during the glassing process, I lay in bed at night scratching my forearms bloody, presuming the reaction to be from the power sanding despite elbow-reaching gauntlets. It was not until the job was nearly finished that the true cause of my distress was identified. It did not come from the sanding so much as from the almost invisible cloud of dust that came when tearing chopped strand mat to size, a process during which I wore no protection.
Good guessing
While I claim zero score for reading my own body signals, I can claim a high score for quantity assessment regarding the resin. Incredibly, when all glassing was finished — including bulkhead attachment, rudder, and centerboard — there were just 2 liters left from a total of 3,825!
I fared less impressively on glass management — the mountains of CSM needed constant replenishment — but timber assessment was good with virtually no shortage nor excess from the original stacks of recycled, old-growth hoop pine and Australian red cedar. Of the latter, the boat consumed nearly 1 1⁄2 cubic meters (roughly 650 running feet).
The great advantage of having most materials on hand at the beginning of the project was in being able to “guess-timate” weight. To establish displacement and thus waterline, I employed the faithful old Simpson’s rule formula and came up with a weight figure that matched anticipation as well as expected material consumption. It proved precise at 13.5 tons. A friend with a naval architecture program in his computer ran the same figures through and came up with a displacement (dead weight) of 22 tons. Instinct told me it was wrong, but it nevertheless gave us cause for concern until proven so. The dramatic way in which Simpson’s rule would absolutely, but prematurely, be proven the victor was every boatbuilder’s nightmare. A flood was imminent but more on that later.
July 1998 saw the hull glassed and ready for rolling, but we chose to fair it while it was still upside down. This required only that the rippling effect of hand rolling be smoothed out, the lines generally being pretty fair already. Our chosen bog was a resin-rich, pigmented epoxy primer recommended by the manufacturer where heavy build-up was not anticipated. We added micro-balloons to it.
Unfortunate change
It proved easy to work and produced a good finish, but after 2 weeks spent fairing, we ran out of stock at a time when the manufacturer had committed all his stock to a large order. Rather foolishly, we changed products. The new product also came with glowing reports, but mostly from the company’s resident chemist on its information line. He assured me that it would do the job admirably and was quite compatible with the previous product. We forged ahead, troweling on buckets of the stuff.
Trouble came within a few days. The new product was not only peeling but also lifting the previous treatment wherever it was overlaid. It was then discovered that it was extremely solvent-rich, with the solvent striking inward, hitting the fiberglass, and lifting everything off. Two weeks’ work had turned into a shambles.
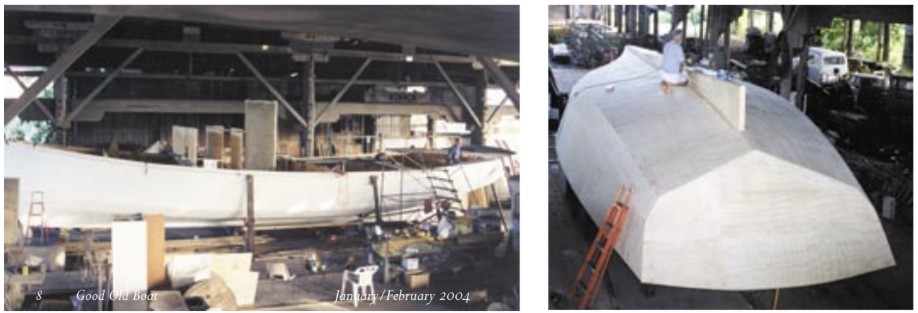
The company denied having misled us, leaving me to relish the idea of litigation, but time and finances were too limited to even knock on a lawyer’s door. This destroyed our resolve to have the smoothest hull in the fleet and we pressed on, rippling and all, to the next stage. This was rolling the hull upright (see illustration below).
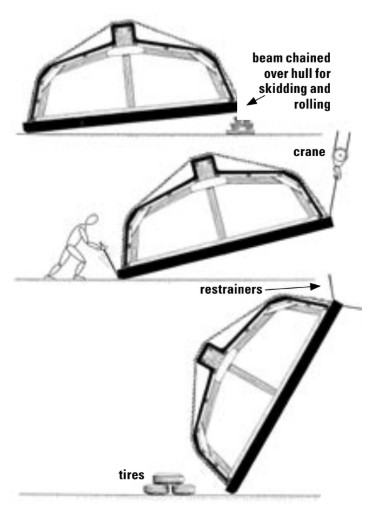
Although our building shed was huge (having once been part of a ship-building yard), our allotted space was limited. The hull could not be rolled like a barrel and instead had to be lifted, skidded sideways, and then landed exactly where it was. To this end, large hardwood beams were bolted and chained across the vessel with a few inches projecting each side. One side of the vessel was then lowered to the floor using an ordinary 2-ton automobile jack. The corners of the bearers were rounded at their point of contact to facilitate their being skidded sideways.
Controlling tackle
We used a crane to lift the opposite side, a team of willing volunteers and I encouraging the skidding motion with steel levers. Before the hull reached its point of balance, restraining lines were secured and then controlled with a tackle. The crane then slued toward the hull. Gravity did the rest, the lower chine coming to rest on a bed of tires.
Now the work really began. After we leveled and cradled the hull with simple shores and keel blocks, we stripped all plug framing and stringers and stacked them ready for dressing and re-use. The centerboard case, fabricated from glass over a sacrificial chipboard mold, was inserted and bogged into its keel slot (cut before rolling). The bilge area was also roughed up with an angle grinder and coarse discs in preparation for interior glassing.
Like the exterior glass, the interior glass was at maximum thickness around the keel and garboards, tapering out toward the chines. Internally, it stopped at the top chine, leaving the topsides ply exposed for aesthetic as well as practical reasons. Between the 1 1⁄4-inch thickness of exterior glass around the keel, the 1⁄4-inch plywood plug, and the interior glass, the total thickness of the hull in this area was almost 2 inches.
Before rolling the hull, a rubbing strip, or belting, was through-bolted to the sheerline. Now with the hull upright, these bolts were removed in controlled sections and replaced after fitting the internal clamp. The principle was essentially the same as in traditional wooden boatbuilding, where long bolts sandwich the hull between belting and clamp and produce a very strong fore-and-aft member at this critical part of the hull. Complementing the clamp was a deck shelf that also played the traditional role of supporting the deck beams at their outer ends. The nearly 200 bolts employed in this service were the only ones used in the entire structure.
Salvaged frames
Next came the topsides frames of dressed 5-inch x 2-inch hoop pine salvaged from the plug. These were glued in at centers of a little over 2 feet. Screwed into the deck shelf at their tops, their bottoms were glassed into the interior bilge glass. Wherever detail glassing of this nature was necessary, only vinylester resin was used due to its greater adhesion to ply and timber.
The topsides frames were almost as much for show as they were for practical purposes. They looked right, as well as being useful for securing most benches and bunks. They very definitely contributed to the prevention of oil-canning, as can happen in slab topsides.
Bulkheads were of 1-inch marine plywood glassed into the bilge glass along their bottoms and the ply topsides along their sides. Their ultimate consolidation came when decks, cabin sides, and cabintops were added.
Bilge webs were glassed in where necessary, but hull strength came from its sheer thickness plus integrated cabin soles and furniture starters. We resined lead ballast around the centerboard and left all further ballasting until after launching.
The only plans used in the entire construction to this stage were the half-frames chalked onto the lofting floor months before. Now we drew a rigging plan to establish load-carrying bulkhead positions and chainplate positions. Otherwise, work continued using only imagined concepts and known facts. Of the latter, a good example was the engine, whose length dictated engineroom bulkhead placement.
Roomy and protected
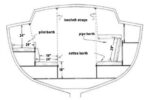
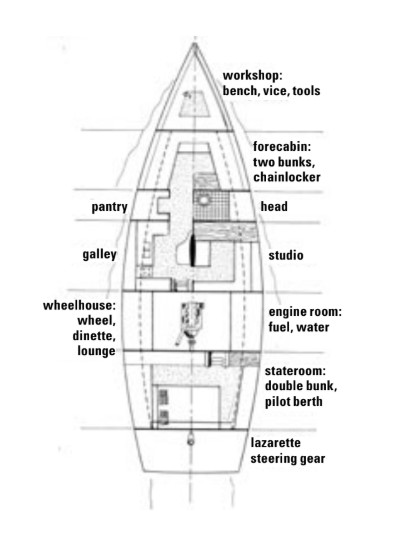
My studio had to be as roomy as possible if the boat were to serve as an office, and Patricia wanted her own space for correspondence and crafts. Furthermore, having spent decades in open or semi-open cockpits, our skin said “no more.” It was time for a fully integrated wheel-house with a lounge where sitting was a pleasure, rather than an exercise in perching. This we achieved with two Peugeot 504 car seats upholstered to complement the dinette, which was also in the wheelhouse.
When it was all said and done, we were trying to fit out an oyster dredge to be roomy and comfortable without threatening the hull’s form stability. It became a constant and often artistically challenging balancing act between maintaining a low profile and having adequate headroom. To this end, we erected and adjusted stick profiles according to measurements inside the boat and aesthetics outside.
Modern glues have eliminated the dependence on good joinery for mechanical strength. Dovetails, mortises, and even simple scarfs have become little more than artistic expressions. In this department, I have to confess, I did not rise to the challenge. Instead I used plain butt joinery with no fastenings worth mentioning and placed absolute dependence on epoxy glue. She was, after all, a fiberglass boat being dressed to look like a timber boat — not the other way around.
Swollen river
1998 had been a wet year. By February 1999, heavy rain in the hinterlands had swollen the river to a terrifying 76 feet, and this volume of water was on its way down to Maryborough. Soleares, as we had named her during the building, was not the only boat in the shed, but she was by far the largest. All others had the luxury of seeking high ground upon trailers or trucks, leaving us to face a most extraordinary future alone. This was a future of uncertainty when nearly a week would be spent alone in a huge flooded shed against whose roof we would be crushed if the height prognosis was correct. In Maryborough, the experts were anticipating a maximum flood of 41 feet.
Grateful that Soleares was the right way up, with all seacocks in, but with no other mechanical or electrical fittings working as yet, we prepared. We put a mattress, food, gas light, and cooker aboard, along with piles of building materials that had to be cleared from the shed floor. The preparation for the flood, the actual flood itself, and the subsequent clean-up cost us 2 precious weeks of building time. But at least we were destined to know her displacement.
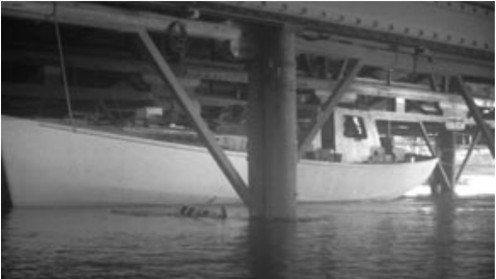
As the muddy Mary River broke its banks, Soleares lifted with her waterline (just a pencil line) more than 9 inches above water in perfect trim. With rig, ballast, fuel, water, and the things of life, we knew she would sit on her marks perfectly. We secured warps to hold her against an impending increase in current and toasted the success of that old technology called Simpson’s rule.
Soon after, an upstream peninsula collapsed and redirected the water through our open-sided shed, turning a calm-water back eddy into a torrent of overfalls and mini-whirlpools that had our warps working overtime. And above was the roof, getting closer by the hour.
Sink or squash?
Contrary to popular myth, boating is not all pleasure. It is sometimes extreme anguish, and this was one of those moments when agonizing decisions had to be made. Is it better to let the cabin be squashed and save the hull, or would sinking the whole lot be more sensible? But what if she were crushed anyway in a waterlogged, semi-submerged state? What if she overloaded the warps and was swept down a river running at around 10 knots? The predictions remained static at 41 feet.
And then sudden relief. With 15 feet of water over the shed floor and about 7 feet of space above us, the flood peaked at 31 feet. The predictions had been proved wrong. Although the headwaters were experiencing their highest peaks in the century, Maryborough, quite inexplicably, had a flood of just average proportions.
When the water receded, an unbelievable mess remained. The shed floor was littered with debris and coated with mud. The local fire brigade, in what is apparently a post-flood ritual, soon arrived and hosed the place out, a free service that reduced our clean-up time enormously.
The flood gave us a sense of delicious smugness for the upcoming launching. We would be able to laugh off those inevitable onlooker quips like, “Do you reckon she’ll float?” or “Have you got some paint ready to raise the waterline?” The enormous question mark that hangs over every launching simply didn’t exist any more.
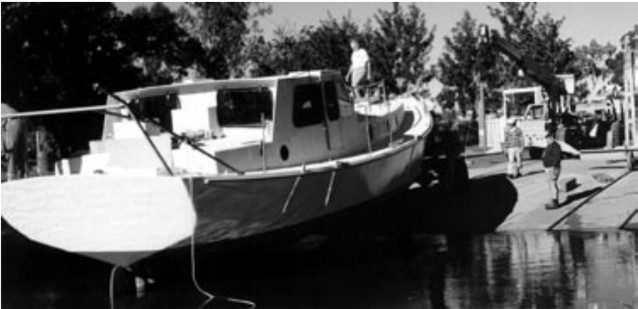
Four months after the flood, on June 12, 1999, we launched her into the Mary River. This was just a little under 17 months since the day I started lofting and was, in fact, minus a month spent delivering Renee Tighe to her new owner, the 2 weeks stolen by the flood, plus a total of 14 weeks spent on the road rounding up boat gear from southern cities. The true hands-on time was thus only one year. This represented about 3,000 hours work from each of us to produce a 50-foot boat. Our chosen construction method has proven undeniably fast.
Three-year overlap
In truth, we launched a trifle prematurely. Diminishing funds and a need to get back to the real work of cruising-guide production pushed us on. It is often difficult to define exactly when the building stops and maintenance begins; in the case of Soleares, there would be an overlap of around 3 years. But at least they would be 3 years of extensive cruising while continuing boatwork whenever circumstances permitted.
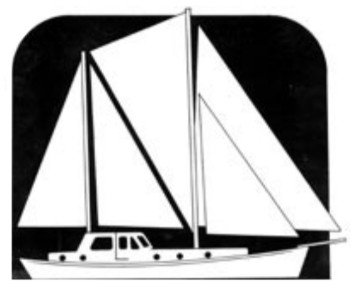
Initially, we remained alongside a Marybarough dock for 2 months testing the engine, checking tanks, and rigging the ship as a fairly low-aspect-ratio ketch. But one with a difference. She had no booms of any description. Not even on the mizzen.
My motives for designing this rather unusual rig were twofold. First, booms can be deadly during an uncontrolled jibe. And jibes themselves, controlled or otherwise, can be very threatening to the ship and gear in bad weather. Second, my secret weapon would be the high-setting fisherman sail. This upside-down mainsail places its largest area up high where the wind is really happening. It compensates for the shortcomings of a low-aspect rig but needs a wishbone boom if it is to keep working off the wind.
I have used wishbones in the past and am a proponent but not when they are set from aloft. They can be mechanically unsound and generally unwieldy, especially in light air and troubled seas. And yet, without booms of any description, all sails must collapse and become useless in following winds.
Sensible old rig
My response to this dilemma was to use a fundamental and very sensible cruising rig from the past. This was the twin-headsail configuration, where poles are hung and saddled to the mainmast when not in use but are hoisted out to spread the two sails when needed. The result is a spread of sail that almost matches the wing-and-wing area of a poled-out jib and boomed mainsail but without their dangers.
Twin headsails set entirely forward of the mast and not attached to the forestay in any way can be very reliable self-steering devices in themselves. Admittedly, they are inconvenient, even difficult, to set for short durations, but for long distances they are supreme.
Now, 3 years since launching and having sailed the east coast of Australia several times, Soleares has fulfilled our every expectation despite — dare I admit it? — having only one-third of the ballast aboard. Her natural stability is nothing short of extraordinary, her ride being rather like that of a catamaran fitted with shock absorbers, and her overall versatility continues to be a thrill after all those years in deep-keelers.
To the purist, it is no doubt disappointing that a classic sailing vessel like the skipjack should be reduced to nothing more than a glorified motorsailer, but for our purposes she is ideal. Unless we discover the fountain of youth, I suspect she will be out last boat. If she really is the sawn song, then we could not end on a higher note.
Thank you to Sailrite Enterprises, Inc., for providing free access to back issues of Good Old Boat through intellectual property rights. Sailrite.com