Ice-cooled air for a cool night’s sleep
Issue 108: May/June 2016
Some nights in mid-summer it’s just too hot to sleep on the boat. Even with the companionway and all the ports and hatches open, very little air is moving. And, if you anchored in the wrong place, there are lots of mosquitoes.
I solved these problems with a way to cool the air for about $40, if all the parts are brand-new. A lot of the stuff you need for this project, however, may already be in your workshop. My air cooler is not elegant, the air is still humid, but it works. It can’t be called an air conditioner because AC dehumidifies the air as part of the conditioning process. I call my alternative a cabin cooler.
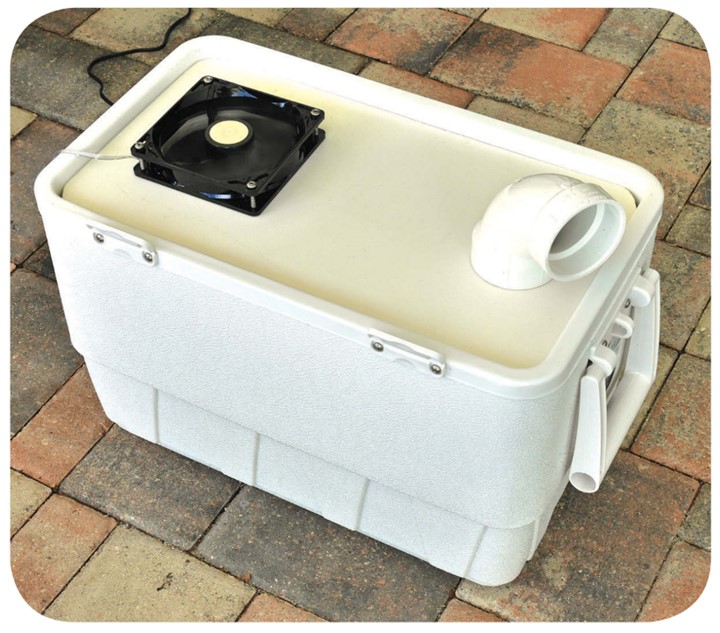
The main component is an ice chest. The larger it is, the more ice it can hold and the longer it will cool the air. I chose a 25-quart Igloo cooler ($23 at Walmart). It’s small enough to be easily portable and conveniently fits several spots in the cabin of my 28-foot Catalina from where it can blow cool air into the forward berth.
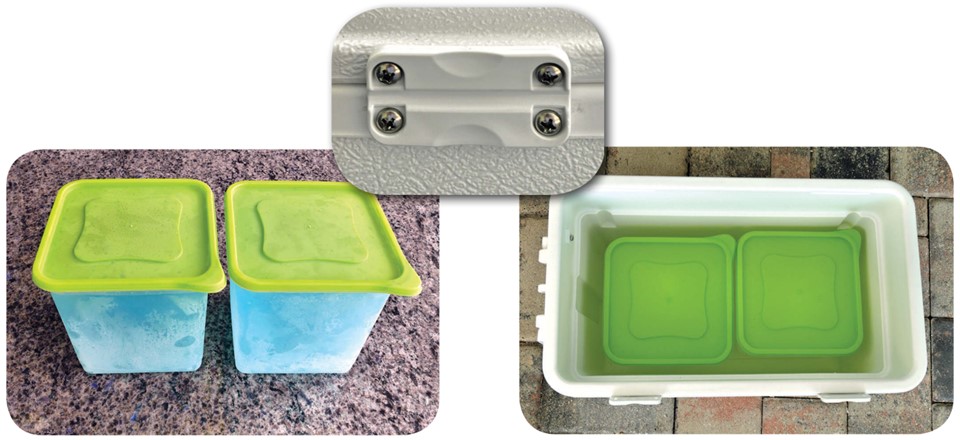
A key reason for choosing this ice chest was that its lid hinges can be easily removed. With the lid in place, there are no holes in the ice chest itself and containers of ice stay frozen solid until I’m ready to use the air cooler. At bedtime I replace the lid with a StarBoard panel that incorporates my modifications.
I took the chest to the store’s housewares section to select containers to fill with water that will be frozen. Two square, 16-cup (1-gallon) food containers fit inside the chest very nicely while leaving room for air to flow all around them. They are an ideal size to place in a home freezer. I also bought smaller 3-inch-high containers that can be placed on top of the larger containers to increase the amount of ice and extend the cooling time.
You could use blocks of ice in the ice chest, but the melted water might slosh around and damage the fan. I use a water and alcohol solution in the plastic food containers. Because it melts at a lower temperature, the melted solution is colder than it would be with plain water ice. This may be an illusion, but air blown over a cold container seems to be less humid than air blown over cold water.
Fan facts
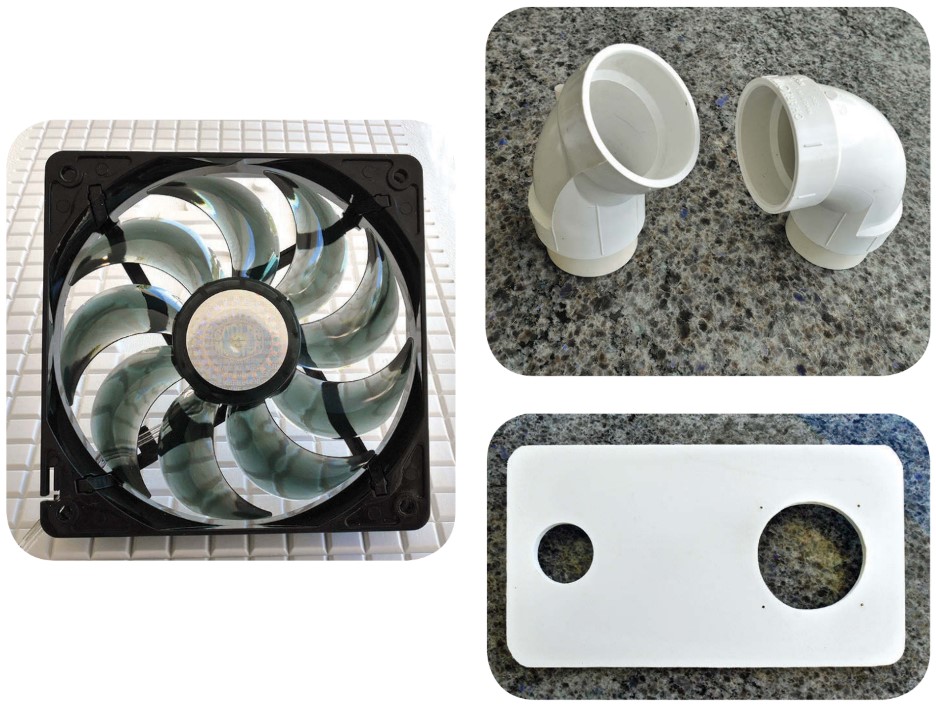
To blow air across the ice, I used a 120mm computer-case fan. The frame of the fan is 120mm square (4.72 inches). The fan blades are 4.5 inches in diameter. Virtually all case fans run on 12 volts and there are thousands to choose from. Pick one that will best balance airflow and battery drain. For computer use, quietness is a prized and pricey feature. For this project, even the noisiest fan will be barely audible.
As a starting point, look for a fan that will move more than 50 cubic feet of air per minute (CFM) and draw about 4 watts. As CFM increases, so will the wattage and the price. Fans with built-in, colored LEDs are very popular with computer gamers. If you wind up with a lighted fan, you can always put black electrical tape over the LEDs to keep the cabin dark.
The fan I chose is made by Cooler Master. It cost $9 (free shipping, no sales tax) at Newegg.com. At the time, Amazon.com sold this same model, claiming it was its best seller. The fan is rated at 4.2 watts and will move 69 CFM. A 120mm Cooler Master fan rated at 4.8 watts that claimed to move 95 CFM cost twice as much.
You’ll have to wire a plug to the fan’s power cord. I used a 12-volt cigarette-lighter plug. I have a socket on the boat for each battery (one battery is for starting the engine, the other is the house battery).
Some case fans can run at variable speeds. That’s because some computer motherboards vary the voltage supplied to the fan as the temperature inside the computer case changes. A few fans have a switch that will let you choose the running speed manually. For this project, you don’t need variable speed. If you connect 12 volts to a variable-speed fan that doesn’t have its own speed switch, it will run continuously at its top speed.
Battery drain
If the online listing shows power drain in amps, wattage can be calculated by multiplying amps by 12 (volts). A 12-volt fan listed at .4 amps will draw 4.8 watts. For perspective on what your boat’s batteries can handle overnight, that’s about half the drain caused by a typical incandescent masthead light with a 10-watt bulb. (Looked at another way, .4 amps for 8 hours is 3.2 amp-hours.) My masthead light has an LED bulb that draws 1 watt, so I’m not concerned about draining the battery if both the masthead light and air-cooler fan run all night.
The air outlet is a 2-inch PVC elbow with a short piece of pipe in one end. I have both a 90-degree and 45-degree elbow to give me a choice for directing the cold air. Use a sanitary-grade elbow. At $1, it’s about half the price of Schedule 40 PVC and a little more compact. With another piece of pipe in the outer end, you can create a slight nozzle effect to shoot the air farther.
The magic of melting
The cooler will work fine if you fill your plastic food containers with water, freeze them, and put them in the ice chest. But when I tested my air cooler with plain water ice, it took 15 hours for it to completely melt. The cooler will work better if you fill the containers with a water and alcohol solution that has a lower melting point. I described my first experiments with this technique in “Ice Magic” in the May 2014 issue of Good Old Boat, where I showed how to improve the cooling efficiency of a boat’s built-in icebox. The same principles apply in this project.
Heating and cooling are measured in BTUs (British thermal units). Before it reaches its melting point, a pound of ice removes only .5 BTU of heat for each degree Fahrenheit that its temperature rises. But something magic happens at the moment ice melts. It takes a lot of heat to create that change from solid to liquid. A pound of ice absorbs 144 BTUs of heat in the process of becoming water.
The magic melting point for ice made with plain water is 32°F. Mixing rubbing alcohol with water lowers the freezing/melting point. The ice will melt sooner and the liquid it becomes will be cooler as the ice continues to melt. The air passing over the melting mixture will be cooled more than it would be with ordinary ice.
Optimum cooling for a good night’s sleep will take place if it takes about eight hours for the ice in the cooler to completely melt. If there is still a chunk of ice there at dawn, you will have missed some of the magic-melt cooling power that could have occurred while you slept.
With three parts water and one part rubbing alcohol, the freezing/melting point is about 0°F, but most home freezers can’t go that low. The magic melt and huge BTU removal will not happen unless the ice is frozen solid.
Using the 25-quart ice chest in the cabin of my boat, I found the best formula for 8 hours of melt is one part rubbing alcohol to 15 parts of water (1 cup of alcohol plus 15 cups of water make a gallon). Because rubbing alcohol is toxic, I add blue coloring to the mix to make sure nobody mistakes the solution for regular water.
Inside the chest freezer I use to make boat ice, the temperature is about 10 degrees below zero. At that temperature, it takes about 12 hours for the 1:15 formula ice to freeze solid. With the fan blowing air across the ice containers, it takes about eight hours for all the 1:15 ice to melt if the outside temperature is about 85 degrees. At the start of the melt, the air coming out of the air cooler outlet is 60 degrees.
Assembling the cooler
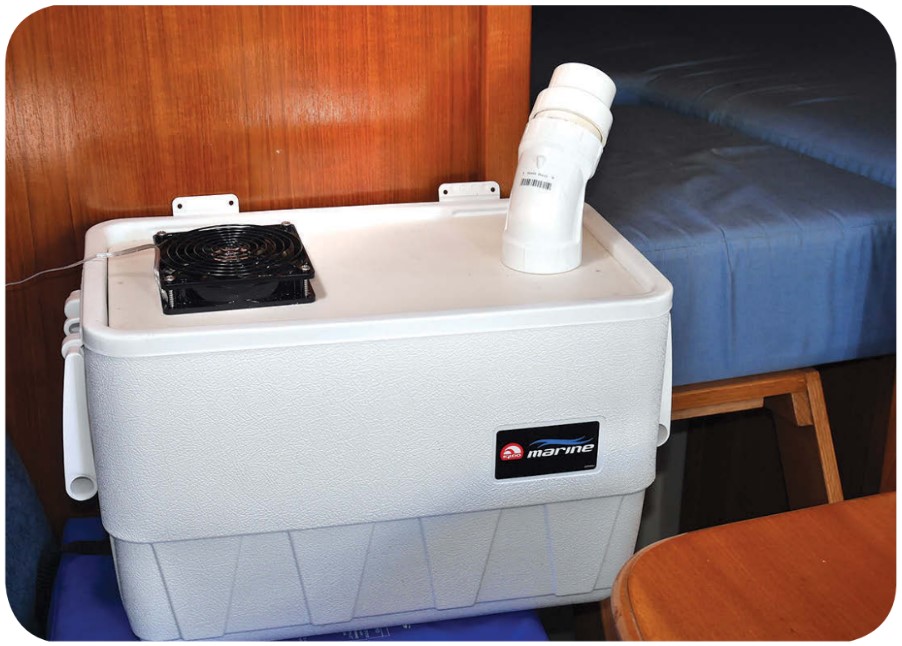
To mount the fan and air outlet, you can simply cut holes in the ice chest or its lid, but you’d have to devise a way to cover them so your ice will stay cold until you’re ready to turn on the cooler. I mounted my fan and outlet on a panel that fits inside the top of the ice chest.
I used 1⁄2-inch StarBoard for my panel. The fan is mounted to draw air into the chest through a 4 1⁄2-inch hole at one end of the panel. A 2 1⁄4-inch hole at the other end takes the 2-inch PVC elbow and directs the outgoing air. A saber saw will cut the holes, but to make them neater, I used a hole saw for the outlet port and a router circle-cutting attachment for the larger fan opening.
Using this panel, I didn’t have to cut holes in the ice chest itself. I leave the lid in place and the containers of ice stay frozen solid until I’m ready to use the air cooler. I then swap out the lid for the panel.
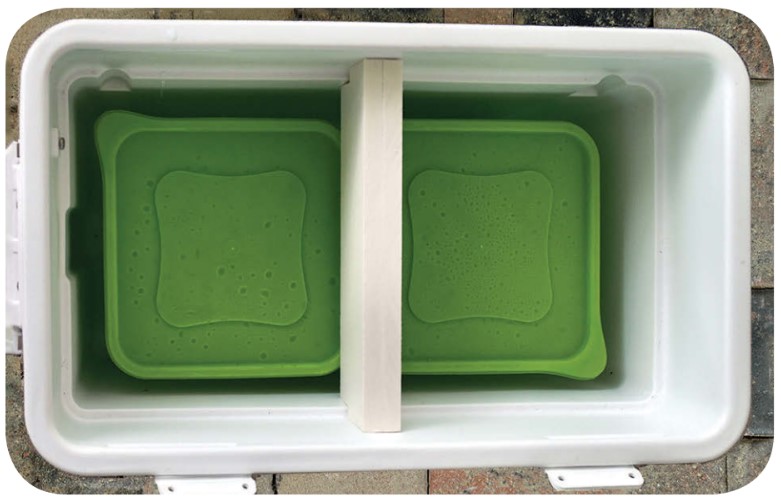
To make the cooler more efficient, I made an air baffle by screwing two pieces of StarBoard together (it could also be made with Styrofoam). It sits on top of the containers, blocking the more direct route across the top of the containers from fan to outlet port. This forces the air to flow down around the sides of the ice containers.
If you use plywood for the panel, I’d recommend painting it to prevent it from absorbing moisture and getting moldy. StarBoard is expensive if you buy a sheet of it. I can usually find an inexpensive scrap at a local marine surplus store. StarBoard doesn’t need paint and is easy to saw and drill.
For hot nights on the boat, I remove the lid from the ice chest, put the panel in its place, then plug the fan into a 12-volt outlet in the cabin. The air temperature quickly drops and I’m assured a better night’s sleep.
Clarence Jones began sailing in a 12-foot dinghy 40 years ago, then sailed through a series of trailerable boats — two MacGregors followed by two Precisions. The big change occurred in 2007 with his 28-foot Catalina, which he moors behind his canal-front home on Anna Maria Island in the mouth of Tampa Bay. Part of the joy of sailing, Clarence says, is inventing modifications for his boats. He has published almost two dozen magazine articles about them, and two books: Sailboat Projects (2012) and More Sailboat Projects (2015).
Thank you to Sailrite Enterprises, Inc., for providing free access to back issues of Good Old Boat through intellectual property rights. Sailrite.com