Where there’s smoke, there’s a serious Sirius cleanup
Issue 69 : Nov/Dec 2009
In early December 2007, while she was alone in her slip, a fire started aboard our J/32 that nearly cost us the boat.
All was well during my routine check on Sunday afternoon. The next morning, my wife and I left to visit family. We returned home on Wednesday, and my first stop was to check on Sirius.
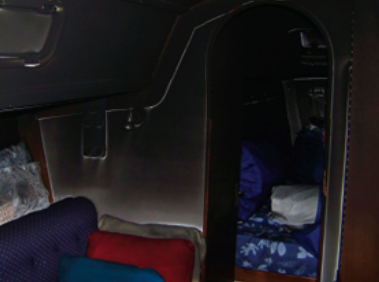
Before boarding, I noticed black, oily stains around the companionway slide and the hatch in the head compartment that had been left slightly ajar to help with ventilation. With a tight knot in my stomach, I removed the dropboards and discovered her black and cold interior. The smoke detector was still beeping forlornly, its battery nearly exhausted. A fire had started and died out without being noticed by anyone and without causing any damage to nearby vessels.
What followed was a long, arduous process to recover our beloved boat. It was a steep learning curve for us. Much of what we learned might be of use to other good old boaters confronted with the damage left by a fire or perhaps the sooty mess left by a leaking engine exhaust system.
Prelude to a fire
A fire aboard a boat is a fearsome thing. Ours started inside a power strip that was feeding a small oil-filled radiator-type space heater. Our using that power strip was the last link in a chain of events.
The winter climate where we live in the Pacific Northwest promotes the growth of mold and mildew. For aesthetic and health reasons, many owners run a small heater during winter months to keep out the damp.
My wife, Mary Jeanne, who has a keen sense of smell, wants her boat to smell fresh and be a healthy place to be, so during the shoulder seasons, I run a small (200-watt) dehumidifier for a couple of days a week. This does a great job of keeping the boat dry. In the coldest period of the winter, the dehumidifier becomes ineffective. During those months, my practice has been to run a thermostatically controlled heater at a 500-watt setting for a couple of days to warm up the interior, then run the dehumidifier for a couple of days. I would power down the boat for a few days before repeating the cycle.
Our J/32 left the factory with a well-engineered shorepower system. Initially, I plugged the dehumidifier or space heater into a convenient receptacle. Over time, though, I noticed that our zincs eroded with undue rapidity — especially the nose zinc for our rather expensive AutoProp. There was a derelict woody moored to starboard, and the fiberglass trawler to port had fallen into disuse, so I concluded that my rapid loss of zincs was due to contaminated shorepower.
My initial response was to install a galvanic isolator. This did modestly lengthen the life of the nose zinc. However, I was still concerned about the rather short life of the zincs and had a nagging concern about other underwater metals. I decided to bypass the onboard shorepower system so Sirius would not share the shorepower ground with adjacent boats.
I led the 30-amp shorepower cord through a portlight into the head compartment. Since plugging a 15-amp appliance directly into a 30-amp source is a very bad idea, I used the power strip to provide overcurrent and GFI protection upstream of the heater. (Note: There is a perception that, before something can get hot enough to cause a fire, a circuit breaker or fuse will blow. That’s not true. A hot plate or a hair dryer can easily light a fire without blowing a fuse. –Eds.) Yes, the cord to the power strip was designed for 15 amps but was being fed by a 30-amp source. However, I expected that any trouble would be on the downstream side and the boat would be protected by the 15-amp current limit in the power strip.
The fire
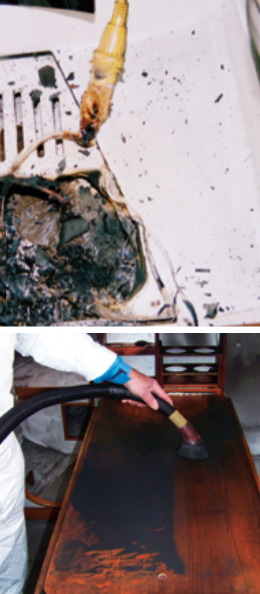
Unfortunately, the over-current protection in the power strip did not stop the arcing. The 30-amp breaker in the shorepower box was the next line of defense. It did trip, but a 30-amp arc can support a substantial fi re. The power strip was entirely consumed. The fire melted and burned through a plastic grate over the fiberglass shower sump molded into the sole of the head compartment. The burning mess settled into the shower sump.
During my initial inspection, I could not tell whether the fire had reached the inner surface of the hull, which is about one inch below the shower sump. Fortunately, it had not; but this was not determined until after the start of the reconstruction work.
The fire spread to the immediately adjacent bulkhead, burning through the laminate skin and charring the plywood core. It spread up this panel until it encountered a back-surfaced plastic mirror. Here it stopped. Evidently, the ignition temperature of this mirror was just high enough to stop the fire. Some traditionalists think that mirrors aboard boats are bad luck, but it seems that a mirror saved ours.
In addition to damage to the burned and heat-affected structures, the entire interior of the vessel was heavily contaminated with soot. As we were to learn, the effort and cost of dealing with the soot contamination would be greater than that associated with the direct fire damage.
Aftermath
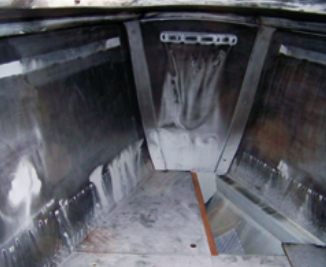
The interior of Sirius was a dark, smelly, dismal cave. Going below required donning a Tyvek painter’s suit (fondly called a bunny suit) and gloves. It was powerfully depressing. Furthermore, we could not begin any recovery work until the surveyor retained by our insurance underwriter had completed his survey.
As the surveyor explained, it is one thing to get the interior looking clean. It is quite another to be able to step below after the boat has been closed up and not detect a whiff of smoke. The hot and very reactive gases generated by a fire will diffuse into painted surfaces and vinyl, into varnished wood, and particularly into the back sides of wooden panels if they are not sealed. Hence the need for chemical cleaning followed by appropriate re-coating to seal in any residual odors.
While waiting for the surveyor’s detailed report, we began clearing out the interior. We bagged up our personal possessions and hauled them home for triage: save and clean, possibly salvage, or toss. The settee and V-berth cushions came out next. Removing the soot and odor from the foam in cushions is so difficult that the surveyor recommended that they all be replaced.
Next, we vacuumed off the heavy coating of soot in the V-berth, saloon, and head compartment. We then set about removing all the brightwork that was not adhesively bonded in place, followed by the overhead panels, which are vinyl-covered plywood skins. We left the vinyl covering along the sides of the V-berth for later. All of this effort addressed just one of the surveyor’s many recommendations.
Recovery begins
As part of our recovery plan, we budgeted extensive use of our own time. In effect, this project became my “day job” for about four months — one advantage of retirement. Working on-site with the team of professionals at the boatyard, Platypus Marine, kept the communications loop short and had another important, but subliminal, benefit. The yard crew seemed to appreciate having an owner there who was willing to put on a bunny suit and crawl into a locker with a paint roller, and they took a greater interest in our project.
We had about six weeks of working time before the scheduled haulout at the boatyard. Mary Jeanne and I used this time to develop techniques for cleaning soft goods such as clothes, bedding, lines, and sails. We set up an assembly line to clean, sand, and varnish our brightwork. Aboard Sirius, we began cleaning cockpit lockers, the lazarette, and head compartment. Our recovery plan included a contract with Servpro, a nationwide chain of fire-cleanup specialists, to do the initial cleaning in the main saloon and V-berth.
As a result of all our efforts, we learned a great deal about products and techniques used in cleaning up after a fire.
Cleaning soft goods
We learned, for example, that your first attempt will be your best chance to save a fabric item, so make it count.
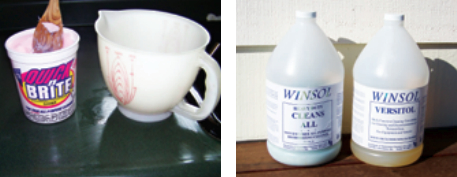
Our first efforts to wash with a cleaning solution that was too weak seemed to set the soot contamination and made it impossible to remove later. Initially, we used a product called QuickNBrite purchased at our local Safeway store. It has similarities with the waterless hand cleaner I use to clean my hands after working on greasy engines. It comes as a gel that can be diluted. We used a dilution that was liquid while hot, but would gel up again when cold. We would heat some of the product in the microwave oven in a plastic tub and then slowly add water, stirring it and reheating as necessary to keep it liquid.
We placed the item to be cleaned in the bathtub and then worked the diluted QuickNBrite solution into it with a sponge or soft-bristle brush. Then we would leave it to soak, periodically agitating it gently by hand. Next, we placed the items in our washing machine. We added normal clothes-washing detergent as the machine was filling. After letting it soak for an hour or so, with occasional agitation by hand, we would run the wash and rinse cycle to completion. This process usually worked quite well.
We also experimented on two of the smaller foam cushions from the settees, even though all the cushions were going to be replaced. We did this to satisfy our curiosity in case we were ever confronted with the need in the future. For this test, we started with a QuickNBrite solution with the cushion in the bathtub. We gradually diluted the solution with more water and worked it through the foam with hand squeezing. We followed this with several rinses. We learned that it was possible to remove most of the odor, but drying the foam thoroughly proved to be harder than the washing. We finally stuffed the foam block into the washing machine and used the high-speed spin cycle to force out most of the water. A couple of days with the cushions baking in the sun finished the process. Overall, this process worked reasonably well but is unfortunately limited to foam pieces small enough to stuff into the washing machine.
Later, Mary Jeanne spent time searching the web for products specific to fire-damage cleanup. She found a company in Seattle, Winsol Laboratories, Inc., that specializes in this area. We purchased two of its products. One, called Versitol, was designed for cleaning the fire-turnout gear used by firefighters. We found this to be a good alternative to diluted QuickNBrite for cleaning soft goods. The other one, called CleansAll, proved to be very good for cleaning the hard surfaces aboard Sirius. It was formulated to clean surfaces in buildings prior to repainting. The product literature notes that CleansAll is alkaline and should therefore react chemically with the acidic fire-contamination deposits. It will also lightly etch painted surfaces to help provide good adhesion for new coatings.
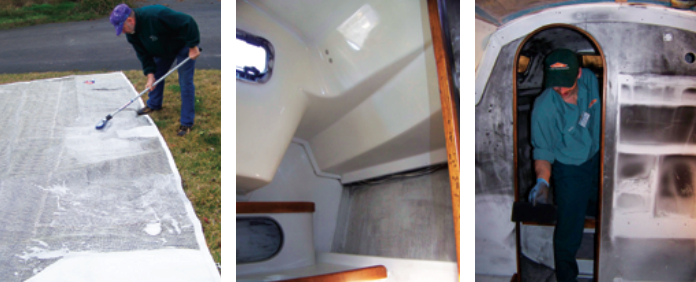
Using either Versitol or QuickNBrite, we were able to successfully clean most of our personal clothing, bedding, lines (sheets, guys, and preventers that had been stored belowdecks), mesh stowage bags, and so on. We also cleaned contaminated spinnakers by soaking and gently agitating them in a Versitol solution, followed by extensive rinsing. We used a 40-gallon plastic garbage can for cleaning the spinnakers. We laid the jibs out on the lawn, scrubbed them with a Versitol solution and a long-handled brush, and followed up with a thorough rinsing.
Cleaning smooth gelcoat
We found that smooth gelcoat surfaces were the easiest surfaces in the boat to restore, but they nonetheless required a multi-step process. First, we vacuumed off loose soot. The more tenacious contamination was removed by spraying on a solution of CleansAll (about a 3:1 dilution) and scrubbing with a sponge, followed by multiple clean-water rinses. The third step was power buffing with an automotive buffer and a 3M cleaning wax. (I admit to a bias toward 3M products — a bias developed during my career in the 3M magnetic recording products labs.) I had three stages of aggression in my arsenal. For lightly oxidized surfaces, I used a mild cleaning wax; for more heavily oxidized surfaces, a more abrasive cleaning wax. The third degree employed a rubbing compound followed by the cleaning wax for lightly oxidized surfaces. This process always resulted in a well-restored surface with correct color and good gloss.
Cleaning textured gelcoat
The textured surfaces were a tougher challenge. We started with either a 3:1 dilution of CleansAll or the Servpro solution (explained further below). I worked it into the surface texture with a soft bristle brush and rinsed it off with sponges and fresh water. It often required multiple applications. I usually finished off by power buffing with a cleaning wax and a lamb’s-wool pad.
The overhead in the head compartment was the most heavily contaminated and also the most affected by heat. This made it the hardest surface to restore. Multiple cycles of spraying, scrubbing, and rinsing removed most of the contamination. The remaining trouble spots responded to vigorous rubbing with a cloth wetted with lacquer thinner. Once I had removed the soot, I power buffed with the more aggressive cleaning wax, using a lamb’s-wool pad.
Cleaning laminates
The Servpro team did the initial cleaning of laminated surfaces in the saloon and V-berth. Their general approach was to start soft and get more aggressive, as needed. This translated into an initial rubdown with large rubber sponges that resembled giant art-gum erasers. (Later on, while attempting to clean hard-to-replace documents, we thought back to this and found that an art-gum eraser worked surprisingly well on smoke-damaged papers.)
The second stage for Servpro was a citrus-oil-based solution, which they sprayed on and vigorously rubbed off with terrycloth towels. Finally, if needed, they switched to a more aggressive cleaning solution. This was a proprietary product consisting of eucalyptus oil and a strong solvent. (As the local Servpro owner put it, this was “definitely not a green product.”) It was best to wear a good respirator when using it in a confined space.
This stage-three cleaning solution was required on all laminate surfaces. Despite all this, some stains invariably remained. I was able to remove them by power buffing with rubbing compound followed by a cleaning wax. (My contract with Servpro was for a “best effort,” since the local firm had little experience with yacht interiors.)
Cleaning painted surfaces
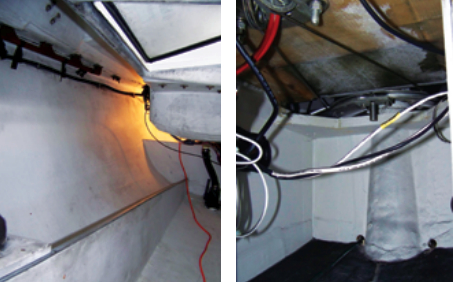
The first painted surfaces we attempted to clean were in the starboard cockpit locker. In our initial efforts, we used a citrus-based cleaner purchased from the local Safeway store. I sprayed this on and then scrubbed vigorously with a 3M Scotch-Brite-backed sponge. I found rinsing quite tedious when I was stretched out in a locker. We used the sort of synthetic sponges used to wash cars. Mary Jeanne handed in clean ones and took the used ones away to rinse out.
The citrus spray cleaner took these painted surfaces from black to gray — not good enough. This was, in part, what motivated Mary Jeanne to track down a specialty fire cleanup product. Once we had the CleansAll in hand, we went back into the locker, this time with much better results — the surfaces were now a light gray. However, the paint-shop crew at Platypus Marine took the cleaning one level higher. They set about the locker surfaces with a more aggressive grade of 3M Scotch-Brite and a strong solvent mix that they called Emerald Green. Their concern was that the residual contamination might bleed through the overcoat of oil-based paint and lead to a need for further recoating later.
I joked with the painter that they called it Emerald Green because using it in a locker without a really good respirator would take a guy off to the Emerald City of the Wizard of Oz. Emerald Green was the product of recycling all the solvents they used with oil-based paints, lacquer, two-part urethane paints, and fiberglass work. I found it to be more effective than lacquer thinner alone. The end result was nearly white painted surfaces that had a good tooth to which new paint would adhere. This rather arduous process was repeated for the port locker, the lazarette, the bilges, the fuel-tank compartment, under the galley and head sinks . . . and so on.
Cleaning vinyl surfaces
The headliners in Sirius are plywood skins covered with vinyl fabric. Vinyl fabric is also used to dress the sides of the V-berth. Our cockpit cushions too, with their vinyl fabric cases, had been stored in the starboard locker at the time of the fire and had obvious soot stains. Since they were going to be replaced, we decided to experiment on them to see if we could find a way to clean vinyl well enough to avoid having to replace other vinyl surfaces.
We started with QuickNBrite and a 3M Scotch-Brite-backed sponge. This removed the heavier deposits but left very visible stains. Vigorous rubbing with towels wetted with lacquer thinner removed most of the stains. The remaining stains could almost be removed by scrubbing with a Scotch-Brite pad wetted with lacquer thinner (using the least aggressive grade of Scotch-Brite). We had concerns about the lacquer thinner leaching plasticizers out of the vinyl and, since some subtle stains remained even after this final step, we concluded that we would have to replace all the vinyl coverings.
Electrics and electronics
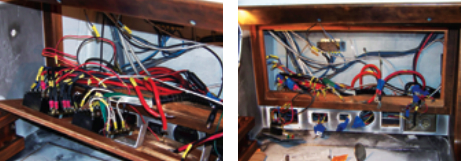
We replaced almost all the electrical and electronic components in the main panel due to concern about corrosion from the hot reactive gases generated by the fire. This was a joint effort with the Platypus Marine electrical technician. The replacement list included the breaker panels, VHF radio, propane control and detector, bilge-pump switch, the 50-amp breakers for the electric winch and windlass, and the switch and high-current solenoid for the electric winch. The GPS chartplotter and radar display, which were stored below at the time of the fire, were also replaced.
We had to disassemble the inverter and its control head to reach the circuit boards and contacts. We cleaned them with alcohol so they could be reused. The Link 10 charge monitor received the same treatment. We wiped down the wiring behind the panel with alcohol and carefully examined the terminals. If there was any visible corrosion, we re-terminated those wires. We used the same process when replacing the AC outlets.
Fire is far-reaching
Fire aboard a vessel is an insidious thing. In most cases, it will require a great deal of effort, money, or both to bring your vessel back to life. Committed owners can often find a way to save their good old boats — especially when they get a few lucky breaks along the way. We are delighted to have Sirius back and in better shape and better equipped than before the fire.
Durkee Richards learned to sail in the Sea Scouts on the Columbia River. His first date with his sail-mate Mary Jeanne, was on a Snipe. They spent nearly 40 years in the Midwest, chartering boats on Lake Superior until they bought their J/32 in 1999. After Durkee retired, they moved to the Olympic Peninsula and the waters of Puget Sound and British Columbia.
Thank you to Sailrite Enterprises, Inc., for providing free access to back issues of Good Old Boat through intellectual property rights. Sailrite.com