Intrepid Great Loopers survive in frigid Duluth
Issue 118: Jan/Feb 2018
Most cruisers complete the Great Loop cruising route — up the ICW from Florida, through the Erie Canal to the Great Lakes, south from the bottom of Lake Michigan to the Gulf of Mexico, and back to Florida — in the span of a single year. They head north from Florida in spring, spend summer on the Great Lakes, head south in fall, and sail the Gulf of Mexico in winter. It’s a great route, but the schedule set by the seasons doesn’t leave time for cruising Lake Superior. Because we wanted to see Lake Superior, and because we wanted to linger with relatives who live around Lake Superior, we chose to make our Great Loop adventure a two-year affair. That forced us to find a place to wait out the long winter. We chose Duluth, Minnesota. And we chose to stay on board our boat.
Duluth is rated in the top three most brutal winter cities. It is farther north than every major Atlantic seaport city, save Quebec. Duluth winters average 81 inches of snow and the waterways freeze 3 feet thick. Temperatures stay below zero for weeks and regularly touch -30°F. With 50-mph winds howling unimpeded across the largest of the Great Lakes, average January temperatures range between a high of 19°F to a low of -2°F, fully 9 degrees colder than those for Anchorage, Alaska.
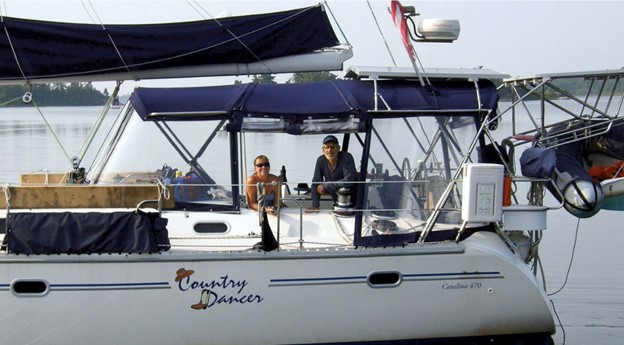
Jodi, my wife, is a three-time World Champion country dancer, and her achievements are reflected in the name of our 2000 Catalina 470, Country Dancer. We love our boat and we love living aboard her. She’s our magic carpet and our floating home. Putting Country Dancer on the hard and getting an apartment for the winter would have been like leaving a loved one alone on an arctic ice-floe. We were determined to winter aboard in the water, and saw doing so as a challenge.
Living on the hard above a 10,000-pound lead keel chilled to -30°F and with no water and no toilets didn’t appeal to us. But if we remained afloat and could keep the surrounding water free of ice, nothing below the waterline would get colder than 32°F. We could keep water in our tanks and our toilets and our sinks would operate normally. We could use our 8-kilowatt water-cooled diesel generator in the event we lost shorepower.

De-icing
To keep the water around our boat from freezing, we used Kasco de-icers, which are like electric trolling motors suspended on lines under the boat. Due to a unique property of water, even in a frozen lake, liquid water at the bottom is warmed by the earth to around 39°F. By circulating that warmer water to the surface, the de-icer keeps ice from forming.
A call to the Kasco factory assured us that, down to about 10°F, a single 3⁄4-horsepower de-icer would keep Country Dancer in liquid water. Below 10°F, two would probably be required. Spirit Lake Marina, where we stayed, had four units available for use. We felt sure we could avoid being crushed by growing ice, even in the coldest polar vortex.
Snow load
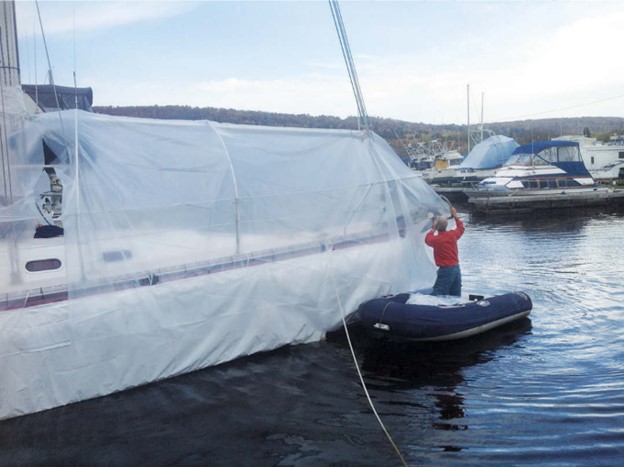
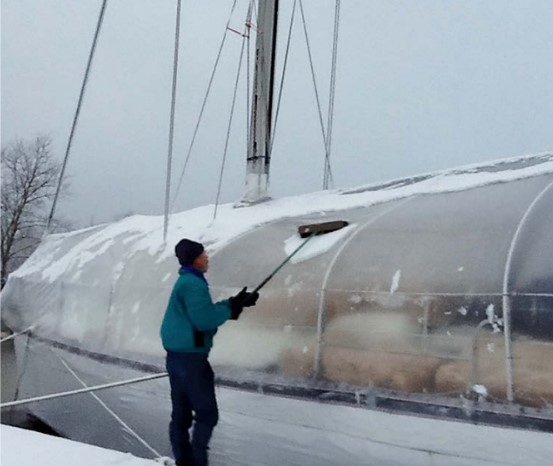
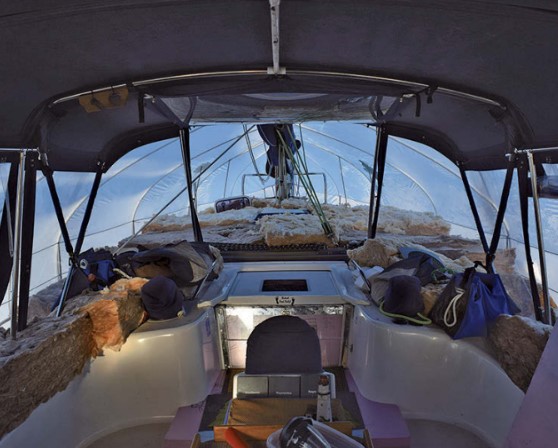
Next we considered the effects of snow. An average snowfall of 81 inches is a lot. We were told that it mostly would be light and fluffy, but that the spring snows were often wet and heavy. Collapsed boat covers are common, but to keep the snow, ice, and wind off the deck, we needed some kind of cover. Because this was a one-season project, shrink-wrap seemed the obvious solution. We chose clear wrap to let in more light and create a greenhouse effect when the sun was out.
I wanted to retain access to the whole deck, so we used the boom and the whisker pole as ridgepoles for our cover, supported by the topping lift and fore halyard. We used 45-degree PVC fittings to join 1⁄2-inch PVC tubing and create toerail-to-toerail arches to support the wrapping and create squatting headroom over the entire deck. I could skooch around beneath the cover to deal with docklines and to fill the water tanks. Unfortunately, this was not an unqualified success.
Heating and insulation
I found an online BTU calculator, but it asked for lots of numbers I didn’t have. I measured the interior at shoulder height (450 square feet) and guessed at the window sizes. Our hull is solid glass below the waterline; the topsides and deck are cored. I input an R-factor of R-3. We were in an environment that could go down to -33°F. The calculator said we’d need to add 50,000 BTU of heat per hour. Our three onboard heat pump/AC units had worked well in the ocean and together provided about 28,000 BTU of heat. Unfortunately, they would be worthless in water very near 32 degrees.
I had access to a diesel fireplace rated at 9,000 BTU and an RV propane unit at 15,000 BTU. They wouldn’t even get us close. We needed a massive propane furnace and equally massive plumbing to get fresh air into the boat to service it. A BTU saved is a BTU earned. It was time to look at insulation.
A friend who spent a couple of winters aboard in DC suggested foil-backed bubble-wrap insulation in all closets and ports. “If you don’t,” he said, “The hull will sweat. It will soak your sweaters. And they’ll freeze to the hull.”
This simple insulation material has an R-factor of about 1.25. R-factor is a complex calculation of resistance to heat flow over time. I looked up the recommended insulation R-factors for Duluth: floor R-25, walls R-40, and ceiling R-50+. R-1.25 bubble wrap was not going to cut it.
We have a 50-amp electrical service, which comes aboard as three 15-amp 110-volt service lines. Almost all electric space heaters are rated at 15 amps, so we could potentially support three. Those heaters are rated at 5,200 BTU, so using the maximum power available, we could create 15,600 BTU per hour. Going back to the online heat-loss calculator, I began plugging in numbers. I found that, if I could control heat loss through the deck with an R-factor greater than 25, an R-factor through the hull greater than 5, and ignored the ports and cabin sole, I should be able to handle -33°F with 14,500 BTU per hour.
That made my choice for insulation extruded polystyrene foam board (pink board or blue board). This stuff is easy to work with, does not absorb water, and has a reasonably good R-factor of R-5 per inch of thickness. I pulled some drawers out in the aft stateroom. One hour later, I had glued and jammed about seven pieces of 1-inch-thick foam in and around all the hoses and conduit to cover about 1.5 square feet of hull. At this rate, I would finish sometime in April and have gained an R-factor of about 4. It was time to think outside of the box, and maybe outside of the hull as well. Why couldn’t we insulate on the outside?
Heat-loss mechanisms
Heat moves to the cold by radiation, conduction, and convection. Radiation is a long-wave energy form we call infrared, which we normally associate with the warmth we feel from the sun or a fire. It can be successfully controlled by reflecting it with shiny foil.
Conduction is heat energy transmitted through collisions between neighboring molecules. The heat you feel when touching a warm rock on a beach is from conduction, as the energy moves to your hand from the rock. When insulating, any break in the insulating layer will allow vast amounts of energy to move from the inside of the insulation to the outside by conduction through these thermal shorts. It’s like the water coming in through a broken seacock. It’s amazing how fast the ocean can come through that tiny hole. The same is true of heat moving through the thermal short of a steel shroud poking through insulation.
Convection is heat energy moving by being carried through a fluid, such as air or water. When the wind blows in your face and carries away the energy in your skin, we call convection windchill. It is so effective at robbing heat energy it’s the leading cause of frostbite.
There were several advantages to moving our insulation outside the hull. First, we created a seamless blanket of insulation without the thermal shorts of shrouds, bulkheads, and exhaust hoses jammed against the hull and all those window and hatch frames. Second, instead of the insulation taking up even more of our valuable interior space, we could put a much thicker layer where it wouldn’t affect how our clothes hung.
A skirt for Country Dancer
We floated 4 x 8 sheets of pink foam on edge alongside the hull and tie-wrapped the top edges to the toerail. Since our boat is fairly large, the big sheets didn’t have to bend too much, and we could use 2-inch-thick R-10 foam. (On smaller boats, it would probably be better to use two layers of more flexible 1-inch foam.) We carefully trimmed the edges and taped them together with thick Gorilla Tape. Once the hull was completely wrapped in foam, we used shrink-wrap straps to pull it firmly against the hull. It was most important to make sure no wind could get under this foam layer. If the insulation was not in contact with the hull, convection would take all the heat from the hull to the water and the insulation would be worthless. As reinforcement, we cut a 6-foot width of white shrink-wrap, strapped it over this belt of foam, and used the heat gun to shrink it tightly to the hull. Although not perfect, our results proved that we were largely successful in this design.
Wrapping the cover
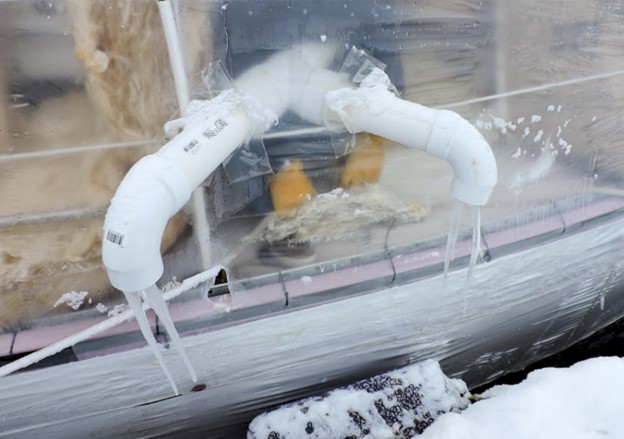
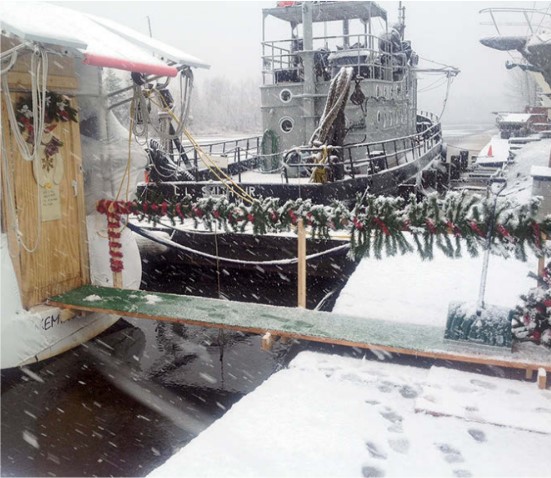
Our eventual winter berth was to be the travel-lift bay, once the travel lift was finished for the season. Because we were going into the bay stern-to, the plan was to build a short gangplank and enter the boat through our walkthrough transom. I made a plywood door with a stainless-steel piano hinge and gave it two quick coats of cheap poly clear coat. I secured the door frame to the solar array and davits with tie-wraps and fastened the shrink-wrap to the frame with screws, staples, and battens before shrinking. This concept worked wonderfully. We even bought a wireless doorbell so the UPS driver could notify us when delivering packages.
After shrink-wrapping the entire aft section, we covered the bow, slotting for the mast and rigging as we had for the aft section. I left the anchor in its roller and wrapped the extra plastic around it. All this was taped and attached except around the mast. Here, we had to stand in the gap between the bow section and the stern section to weld the two pieces of shrink-wrap together.
Videos on shrink-wrapping show how to wave a huge propane torch over the plastic and, while using the back of your hand in a thick leather glove, quickly pound the plastic together around a piece of strapping, thus welding the wrap to itself. The heat of the torch has to soften the plastic to the point of being very sticky but not quite liquid. If you move too fast, the plastic begins to shrink but isn’t joined and will pull apart.
To weld the front piece to the back piece at the mast slit, Jodi’s hand in an oven mitt served as the inside anvil. I was wrapped around the mast and stretched over her with a huge flaming torch in one hand while hammering my leather glove into her oven mitt with the other. All the while, I was trying to keep two huge sheets of plastic from blowing in the wind. This activity will draw a crowd. We were careful to use our inside voices and Sunday-morning vocabulary. (This shrink-wrap joint became one of our failures, as we were not able to adequately weld the two pieces together and the tape eventually let go.)
Once the shrink-wrap was in place and welded at the edges, it was time to shrink it. This stuff is amazing, as it will shrink, and shrink, and shrink some more. I learned not to quit once I had a good torch process going, because the second pass will leave wrinkles. If the framing is too thin for the cover, the shrinking is so powerful it can break the frame as it tightens. For us, the shrinking process was a multi-step affair. Imagine standing in your dinghy while holding a monster torch in one hand and banging the back of your other hand against the hull to weld two pieces of plastic together while the dink obeys the laws of conservation of motion and scoots backward across the slip.
The shrink-wrap was integral to our design. Once the deck was sealed from the rain, I was able to stack pieces of 10-inch-thick fiberglass insulation to cover the whole deck. This was R-30+, and we could move it out of the way when we needed to fill the water tanks. When the weather was not too cold, we stacked the pieces so sunlight could get below through the ports and hatches.
The ports and hatches both got their own pink-foam treatment. We made covers to press into the openings from the inside so the foam touched the glass and prevented sweating. These were easy to remove when we wanted to vent excess humidity or let in sunshine. We’ll use them in the Tropics too.
Inside air
Humidity was a huge concern as we faced the coming season. We also needed a way to bring replacement air into our sealed plastic bubble. We could keep the humidity down by taking showers ashore and using a dehumidifier, but our real concern was the risk of asphyxiation. Many activities on board use oxygen and leave carbon dioxide behind. Cooking and heating with propane are the biggest factors, but our breathing also contributes to the problem. On a cold weekend in a sealed boat, it can get pretty dicey, even with electric heat. The first weekend under the bubble, we noticed that we had headaches in the morning, the first sign of carbon monoxide poisoning. I was oblivious to this issue until a friend asked how we were handling the problem. My blood ran cold; I was poisoning us and didn’t even recognize the symptoms.
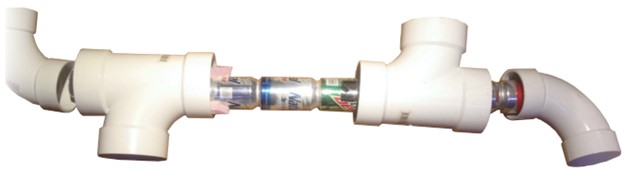
I designed an air-to-air heat exchanger using two computer fans and a 10-inch length of 4-inch-diameter PVC tube that enclosed an inner aluminum tube made of soft-drink cans. The idea was to draw air into the outer tube from outside and warm it with the air being exhausted through the aluminum tube inside it. The entering air first contacted exhaust air that had already lost most of its heat and progressed to the end of the tube, where the exhaust air had just entered and was very warm. Fresh very dry air replaced the exiting warm moist air. We had solved our humidity and oxygen issues with a single device. It was so effective we were able to run our heat exchanger at very low temperatures and not notice a difference in cabin temperature. We always ran it while cooking, which created some wonderful smoky gray icicles on the outside.
Cool cruising
The winter of 2015/16 was an El Niño year, and the weather gods smiled on our stay in the northlands. The coldest temperature we saw during our season in the snow was -18°F with a windchill of -48°F. We suffered only a single 7-day stretch when the high temperature never rose above zero. Most of the locals pooh-poohed our great adventure aboard by saying, “You can’t claim you stayed in a real Duluth winter.” But we did.
Not only did we survive, we thrived. We walked and biked hundreds of miles, shot hundreds and hundreds of pictures, and played again in the snow like children. It was a fabulous season and an adventure worthy of the label cruising.
And then came the spring
If you survive the winter, you must then survive the spring. Duluth is on the side of an 800-foot escarpment, and the spring thaw can sometimes wash small forests down that hill. The onslaught comes from the other side, too, as mile-long sheets of ice blown by the wind move ashore, crushing cars and even houses.
As for spring, the marina is 6 miles up the St. Louis River from Lake Superior. It was originally a shipyard that built Victory and Liberty ships during the two world wars. The marina has solid earthen piers and slips averaging 16 feet deep. This is an excellent well of warm deep water and a safe haven from the marauding logs and mini icebergs that flow downriver in a frightening display during May. Staying in the travel-lift bay further enhanced our security. Both sides of the bay are strong steel structures capable of supporting the 40-ton crane. Another advantage of this location is that we were right in front of the laundry and bath facilities, although our hair still froze as we walked to the boat after showering.
Winter aboard turned out to be quite pleasant, but spring was a different story. In May, we removed the shrink-wrap, gave away the insulation, and headed forth from the travel-lift bay to a temporary slip. It was a new world, but still a very cold one. Without our insulation and shorepower, the first few weeks were the most miserable of the season.
All in all, the adventure was well worth the effort, but we were more than ready to trade our Sorel boots for Panama Jack flip-flops on our way back to the South.
Gary Bratton, his wife, Jodi, and their schipperke, Rio, have been cruising full-time on their Catalina 470 since April 2013. Gary attended the University of Washington, and his multiple careers included professional Motocross racer, home builder, several positions in the sailing industry, and 20 years in his own IT consultancy. Now semi-retired, he writes website code for a book of international clients (including Good Old Boat) and an occasional story about his and Jodi’s projects and adventures aboard Country Dancer.
Thank you to Sailrite Enterprises, Inc., for providing free access to back issues of Good Old Boat through intellectual property rights. Sailrite.com