Issue 5 : Mar/Apr 1999
At the end of his Mediterranean odyssey, Ulysses was given divine instructions to put his oars on his shoulder and walk inland until people no longer recognized what he was carrying. When he arrived at this place, he buried the oars and returned home to a loving family and lasting peace with his lifelong nemesis, the sea god Poseidon. Life should be so simple.
Oars today are not quite as magical as in old Greek myths. But today’s misunderstandings of what makes a good oar, or even how to choose the right oar for your needs, are almost as staggering as Ulysses finding someone who didn’t know what an oar was. Moreover, the amount of substandard rowing hardware and misinformation out there is far more frightening than Poseidon ever was during one of his periodic rampages.
Fortunately, owners of good old boats needn’t concern themselves with a lot of rowing baloney. Oars for mid-sized sailboats are generally confined to the boat’s tender. I say “generally” because I once lost my mind and decided to row my five-ton, 31-foot sloop back to Maine from Florida, using just one 12-foot sweep. More on that a little later. For now, suffice it to say that before you buy or make any sort of rowing device, you must thoroughly understand its makeup.
Anatomy of an oar
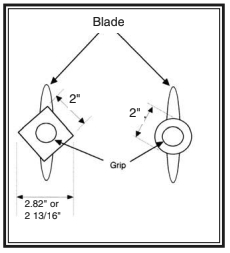
An ordinary oar consists of the blade, the shaft, and the grip. Although that sounds simple enough, the variations on this theme are endless. Should the blade be short and thick, long and thin, cupped, reinforced, or tapered? Then there’s the shaft’s shape and thickness, another source of constant discussion for some. Most prefer round but there is an ardent group of square advocates, and an even smaller tribe of hexagon fanatics, too. The anti-round radicals contend the oar’s durability is improved because you can orient the stronger peaks of the angles perpendicular to the blade (See sketch at right), making the oar more durable while in use.
In a sailboat’s tender, I find most of these discussions somewhat beside the point. No one’s trying to win races in a tender. Even in a boat that’s rowed for pleasure, the small advantages these innovations offer are of little consequence when you’re moseying up some back creek or heading across the harbor to check out a handsome new arrival. So as far as I’m concerned, blades and shafts can be just about anything you like and still be quite serviceable.
An oar’s grip, however, is important and should be tailored to the individual most likely to spend the lion’s share of time pulling for shore. From the outset, the grip should feel comfortable in your hand. Many grips are cut way too thick, making it feel as though you’re trying to grasp a cantaloupe rather than a proper handle. This is particularly true for women. Very few oar manufacturers take into account a woman’s hand size, which is generally smaller than a man’s. The trick then is to take matters into your own hands, figuratively and literally.
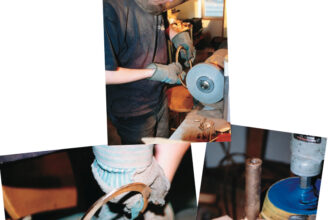
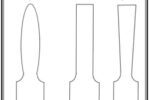
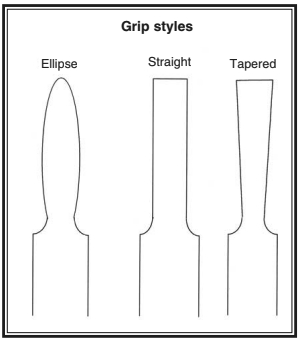
Over the years, I have refitted dozens of oar grips for people. To do this, a round-face spokeshave (about $25) does the job quickly and efficiently. Lacking a spokeshave, an electric drill fitted with a grinding wheel and some 35-grit sandpaper can also do the job reasonably well. The point is to make the grip comfortable for you. Most sailors find the elliptical grip more comfortable than the straight grip or the inverted taper (See grip sketch on Page 30). Don’t be afraid to experiment a little, though. Taking off some now and maybe a little more later in the season is normal. And don’t worry about the finish on the grip. There shouldn’t be any finish on a grip in the first place. Painted or varnished oar grips will blister your hands while naked grips will barely leave your palms warm. If you feel you must put something on the grip to protect it until the oils from your hands seal the wood, use a small amount of linseed oil.
Which wood would work?
Of course, taking some wood off the oar’s grip begs the question of which wood is best for an oar. Again, there are many opinions on this, but there are also some undeniable facts.
Ash is the traditional wood used in oars. Its use can be traced back to 5,000-year-old northern European cultures in which ash was believed to have the power to protect sailors from drowning. Not so coincidentally, ash is also strong, flexible, moderately light, and easily worked — more so than its hardwood brethren like oak, elm, and maple. I prefer ash because I have been known to use an oar as a pry bar or shovel, and a hardwood oar survives this kind of treatment much better than today’s softwoods.
For today’s recreational boatowners, though, spruce is the preferred wood for oars. But exactly which variety of this softwood you will get varies depending on your geographical location and the task ahead. As the name indicates, eastern spruce grows east of the Mississippi and is used by most oar manufacturers in that region. Sitka spruce is the principal alternative and grows in the northwestern United States and Canada. It tends to be more expensive than eastern spruce but it does have more flexibility and strength. Thus Sitka spruce is favored for long oars (more than 8 feet) and eastern spruce is perfectly acceptable for short oars. And, as always, the closer you live to the source of manufacturing, the cheaper the cost.
Ash and spruce are not the only woods used in oars. Good arguments have been made for sassafras, maple, basswood, or Douglas fir. And the truth is that there are a dozen or more domestic wood species that will make perfectly serviceable oars. Include imported woods in the list of possibilities, and you’ve got nearly 30 species that will do the job. But if the sales clerk at your local chandlery can’t tell you what kind of wood the oar is made out of, or is vague and indecisive on the subject, buy someplace else. Ditto for mail-order oars of an undefined or vaguely-defined species. Even though the wood species is not nearly as important as the manufacturing process and the attention paid to detail, it is useful to know the basic ingredients in your oars. It indicates the limits of their uses and life expectancy. Species selection and proper manufacturing are what separates a truly good oar from the significant amount of junk out there today.
Sizing up a pair of oars
Laminated oars are often at the top of the heap of substandard oars today. This is too bad because properly laminated oars have many advantages over solid wood. In fact, many professional rowers prefer laminated oars and with good reasons: they often last longer, perform more efficiently, and even look better than solid oars. Even to environmentalists and oar manufacturers, the laminated oar is preferable because it makes good use of lumber that would otherwise be rejected in the oar-making industry.
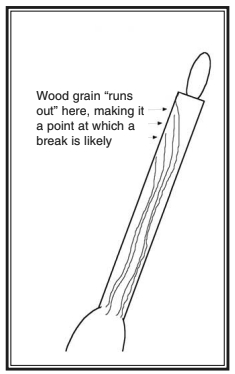
Unfortunately, many mail-order distributors of ordinary oars only offer the least expensive laminated variety, quality be damned. Delamination of these oars usually occurs after a season or two, particularly in oars with laminated blades. Often these laminations are put together with substandard glue or pieces of wood in which the grain “runs out” of the oar’s centerline. In both laminated and natural oars, the grain should not run out of the shaft or blade. That’s asking for a break where it runs out. (See sketch on Page 31.) Indeed, aligning the grain amid the laminations is a science in itself. Suffice it to say, you can’t just slap a few pieces of wood together and cut a good, long-lasting oar out of it.
Once you find decent oars, laminated or otherwise, you must then decide what size oar you want. Ordinary oars range in size from 4 to 8 feet, increasing in size at 6-inch increments. So, given some nine sizes to choose from, manufacturers have come up with a formula for getting the correct length. It goes something like this: take one-half the beam of your boat (in inches) and multiply it times 25/7. Round off the answer to the nearest 6-inch increment, and you’ve got your oar length. For instance, a skiff with a 48-inch beam would work out like this: 48 ÷ 2 = 24 x 25/7 = 85.7 inches or 7.1 feet. So buy the 7-foot oars, right?
Well, not quite. To begin with, this formula doesn’t take into consideration idiosyncrasies of both the boat and the rower. Some people like to row cross-handed while others prefer to keep their hands well apart. I prefer to keep my hands well separated and that shortens the length of oar I need. Cross-handed folks might need a longer oar. Moreover, my skiff and many tenders available on the market today have fairly low freeboard. The lower the freeboard, the more likely you are to “crab” or catch the blade on a wave on the return stroke. This is particularly true when rowing beam-to the wind. With a low freeboard boat, an even shorter oar is desirable. So while my skiff has a beam of 48 inches, I found a 6-foot, 3-inch oar is the ideal for me. Yes, I did take some off the blade tip and some off the grip too. And if my woodworking skills had forced me to settle for a stock oar, I would have opted for the 6-foot, 6-inch version. Oars a little longer than necessary are more comfortable to use than oars too short. I’ve found raising the blade up a little higher on the return stroke of a too-long oar is easier than trying to get some muscle into the pulling stroke of a short oar that forces you to raise your arms up to shoulder height.
Hardware and accessories
Proper oars are not the only consideration when attempting to make your rowing life easier. Oarlocks, chafing gear and grip accessories all must be considered too. Oarlocks (known in England as rowlocks) are notorious for becoming lost. Their suicidal tendency to jump overboard at inopportune moments is legendary and has been counteracted in several ingenuous ways. My personal favorite is the Davis style oarlock. When not in use, you simply lift it up, tilt it slightly inboard and let it drop down in the slot. This holds the oarlock upside down in the oar socket and absolutely keeps it from going overboard. You can’t get a Davis oarlock out of the socket unless you unscrew the whole piece of hardware.
The four other oarlock styles each have at least one distinct drawback. The horned oarlock can only be held inboard by the use of a lightweight chain attached to the eye molded in its stem. The chain is invariably too light, eventually breaks, and overboard she goes. The round oarlock prevents you from removing the oar quickly and easily from the rowing station. This can lead to banged and marked up hulls, oars chipped on piers and so forth. The North River oarlock has this same problem and compounds the situation by preventing you from sliding the oar to a more suitable location on the shaft. The pin through the oar shaft also makes rowing uncomfortable for those of us who like to look around or move around in the course of a rowing trip. And finally, the patent swivels allow you to attach a heavier chain to the eye on the horn. But why do that if you can avoid a chain altogether with the Davis?
As for oarlock materials, I wouldn’t consider anything other than bronze, preferably the manganese variety. I can’t tell you how many zinc, aluminum, and cast brass oarlocks my friends and I have broken. Moreover, galvanized iron oarlocks invariably turn into rusting hunks of frustration and stainless steel often raises more questions than it answers. There are literally dozens of stainless steel formulae that can be used in boating hardware, some of which are fine and through an oar-deal like that. many of which won’t last very long at all. Unless you’re a metallurgist, stick with bronze.
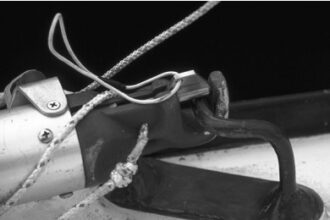
Oarlock chafe against the oar shaft is inevitable in all but the North River design. To prevent deterioration, the traditional chafing gear is a piece of thick leather sewn and/or nailed to the oar in the general vicinity of the point at which the oarlock and the oar shaft meet. This works well but can be expensive, regardless of whether you buy the chafing gear directly from a catalog or buy some leather scraps from a cobbler, upholsterer, saddler, or leathersmith. So some alternatives have developed over the years.
One of the best alternatives I’ve used recently is a short length of 1 1/2- inch flexible marine sanitation hose. Slit lengthwise, it wraps easily around the shaft of oars under eight feet in length. Tacked in place, they wear like iron, far outlasting the leathers I’ve used in the past. Although not exactly “finely fitted yacht quality,” this approach costs about one-tenth of the traditional rig.
Grip options were discussed earlier. In general, I advise taking off more material in the grip area, rather than adding material on. But for comfort’s sake, you can add some padding. Rowing gloves and round grip pads are the two possibilities. I find gloves useful in winter conditions, but otherwise they’re clumsy and hot. Grip pads increase the diameter of the grip area and make it feel awkward. Unless you plan to row miles at a time, grip and gloves seem unlikely to preserve all but the most delicate of hands.
Paddles, sculls, and sweeps
Owners of good old boats sometimes step out of the simple oar universe and enter more esoteric, muscle-powered dimensions. This can be dangerous territory when, say, a few Ivy League crew enthusiasts sit down to hash out the advantages of various types of sculling sweeps. At great risk to my personal safety, I can report even these types of oars can be reduced to basics and work quite satisfactorily. I once whittled a 12-foot sweep out of Douglas fir and used it to help me take a five-ton, engineless sailboat from Florida to Maine. It was crude to say the least. But in calms it gave me steerageway, and that was sufficient until the wind came up. Yale and Harvard crew teams should be so lucky.
Canoe and kayak paddles also have advocates for various materials and forms. Again, the basics outlined above will get you there, no ifs, ands, or buts. However, for anyone who wants more than basic speed, comfort, and a source of conversation, please feel free to jump into the fray with the paddle “experts.” In the opinion department, paddle experts can hold their own with sculling enthusiasts. I can only add here that any inexpensive hard plastic or aluminum tube paddles are a fool’s investment. You might as well open up the nearest porthole and throw your money out.
Ultimately, rowing with a decent pair of oars is like owning, and cruising in, a good old boat: a small pleasure in which the difference between quiet pride and boisterous arrogance is fairly easily attained. Ulysses may have appeased the gods by burying his oars and giving up life at sea. But with rowing today, you need not put yourself through an oar-deal like that.
Thank you to Sailrite Enterprises, Inc., for providing free access to back issues of Good Old Boat through intellectual property rights. Sailrite.com