Step-by-step instructions for making your own hard dodger
Issue 27: Nov/Dec 2002
IN MY DREAMS I OWN A SLEEK high-performance sloop that goes to weather like a rocket. This dreamboat has a sexy little canvas dodger that quickly folds down to reduce the windage by just enough to allow me to sail higher and faster than any other sailboat in the area.
However while cruising, I awoke each day to the reality of living on a not-so-sleek cruising boat that was fully loaded with everything we owned in the world. Reducing windage by folding down a dodger took a back seat to protection and seaworthiness. I didn’t want a dodger flapping or tearing in extreme conditions when I needed it most, and I didn’t want my foot to go through it if I stepped on it. When we sailed through the night, I wanted a clear view through the windows. I’ll always love fast boats, but this article deals with the reality of building a seaworthy hard dodger for a serious cruising boat.
We didn’t install a hard dodger on our boat in the beginning, due to the expense and the fact that we didn’t yet know exactly what we needed. Many of the major rigging modifications planned for our boat would eventually affect the shape and form of the dodger. I relocated the traveler from the cockpit to the cabintop, added an inner forestay to allow the use of a small staysail in high winds, and installed a variety of winches, rope clutches, and camcleats to the cabintop.
Our first dodger was an old canvas “swap-meet special” that was adapted by cutting and bending the stainless bows. The sorry-looking canvas with worn plastic windows was temporarily sewn into place when we went on a rainy cruise one winter in the Northwest. The “temporary” dodger remained in place for more than a year, and three good things came of it. First, it kept rain out of the cabin and off our faces. Second, we had many good laughs when friends teased us about the wrinkled makeshift installation. Third, it gave us time to experiment and determine what would best suit our needs when the time came to replace it with something that was the perfect size and strong enough to stand up to the serious use it would get on a cruising boat. The eventual construction of a permanent hard dodger was one of the most functional and enjoyable modifications I made to our Cal Cruising 35 over the years, and it added to the already capable look of the boat.
Critical shape and size
Like the readers of this magazine, I love looking at boats, and I don’t think there is anything that can add to, or detract from, the graceful lines of a boat more than the appearance of a dodger. The overall look and size should blend with the lines of the boat from all angles. The shape and size of the windows are critical issues, and an otherwise great dodger can end up looking like something on a military tank if the windows are too small. It’s worth every hour of your time to sketch and even build cardboard mock-ups of the dodger you intend to create. Check clearances for all winch handles (maybe an 8-inch handle will clear when a 10-inch won’t). Check clearances for rope clutch levers in the open position with a cardboard mock-up or with the “foam only” dodger (described below) in place. Make sure there is clearance for your hand and not just the handle or lever.
We considered several factors in determining the height of the dodger. It had to be tall enough to allow easy access to the cabin and to clear winch handles. Yet it had to be low enough to clear the boom when the main was sheeted in tight; aesthetically, I didn’t want to end up with the two-story look that some boats develop. Visibility is an important factor, so I wanted to be able to see over the dodger or through the windows — I didn’t want the top of the dodger to obstruct forward vision at eye level as we stood in the cockpit. My wife and I are about the same height, but some cruising couples make sure that the taller one can see over the dodger while the shorter person looks through the windows.

Limited visibility
Wider dodgers offer more protection, but can dangerously limit your ability to get around them to go forward and can also limit visibility. Our boat was designed with a raised-deck saloon that already reduced our forward view from the cockpit. I had designed cockpit seats and a helm seat to allow us to see over the cabin and through the dodger windows, but I also wanted an unobstructed forward view down the side of the dodger. In final form, our dodger did not extend to the edge of the cabin. I left space for the staysail winches to be mounted outside the dodger (half cranking worked fine), and there was unobstructed forward visibility from the starboard and port cockpit seats.
Curved surfaces are stronger than flat surfaces, as any of us can appreciate by looking at the design of our own boats, and the clear acrylic plastic recommended for windows in this article easily conforms to graceful curves. A square corner has the potential to become a crack, and radiused window corners matched the shape of our boat’s original windows. Finally, I made sure there were no sharp corners or edges on the completed dodger.
I’ve seen beautiful hard dodgers made from aluminum, wood, fiberglass, and many other combinations of materials, but when another boater showed me a piece of Divinicell foam, my decision was made. Our dodger would be a 3⁄4-inch foam sandwich between layers of fiberglass. The strength-to-weight ratio of the final dodger would be excellent. Many modern raceboats are made in a similar fashion. I had also worked with acrylic plastic in the past and knew it would be a simple matter to make and install my own inexpensive custom windows.
Cheaper dodger
Commercially available custom hard dodgers can cost thousands. However, if you are capable of doing the work yourself, a hard dodger like the one we made can be built for $500 to $700. The time involved in the design and construction of my first hard dodger was more than 80 hours, another labor- intensive boat project (what’s new?).
My hand-held jigsaw got some use, but most of my time was spent using a random orbital sander. The initial construction of the dodger needs to occur on the boat, and working with the foam is not particularly messy. The foam can be trimmed with a knife, and a shop vac easily sucks up the lightweight sawdust. Once the dodger has taken shape in foam, it needs to be carried to a shop area for fiberglassing and sanding. The use of a dust mask and a strong shop vac are required for the next week or two. This is definitely not a dock project.

Construction steps
1. Creating the shape in foam
Divinicell foam is an advanced polymer designed for use in cored laminates. This wonderful stuff is manufactured in 4-foot by 8-foot sheets. I used the 3⁄4-inch thickness. This foam is far easier to cut, carve, and sand than wood. It saves weight, and is not subject to rot. Unfortunately, it costs about $150 a sheet.
Lightweight marine Bondo serves as the ideal adhesive and reduces waiting time to a few minutes. Edge gluing requires no fancy joints or clamps. Simply spread on a little Bondo and hold two pieces together or run a piece of masking tape across the joint for a few minutes. Drywall screws also work well, as do toothpicks, for holding joints until the Bondo kicks. (Check your Bondo and foam for compatibility before starting the project. If they are not compatible, the foam may be attacked by the Bondo. –Ed.)
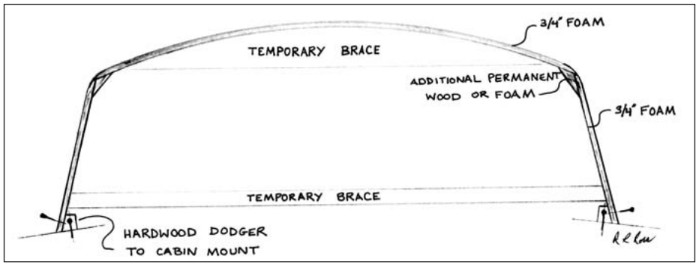
The foam-only dodger created at first (see illustration below) is not yet strong and will need inside braces to hold its shape before the outside is fiberglassed. The roof foam can be screwed to an arch cut from wood (or foam) and in our case I made good use of the stainless bows that had supported the old canvas dodger. The idea here is to cut, carve, Bondo, and brace until you have the basic shape of the dodger. I enjoyed the foam shaping process. Mistakes were easily patched with Bondo and more foam. It may be best not to cut out the window openings until the initial layers of fiberglass have been applied to the outside and the inside of the unit later in the shop. This creates more waste, but helps maintain the exact shape you have worked hard to create.
2. Get it right before you glass
Live with the foam for a few hours, if possible, to make sure the design is right. Raise and reef the mainsail and check all winch handle clearances. Estimate the line of sight around, over, and through the completed dodger and use a soft pencil to sketch and experiment with window shapes. Add more temporary braces if needed to hold the exact shape of the foam dodger before it is removed from the boat and transported to the shop or garage. Changes are easy at this stage but may require hours of grinding after the unit is fiberglassed. Note: be aware that intense sun can distort the foam shape at this stage.
3a. Fiberglassing at the dock
I don’t recommend fiberglassing at the dock, but it is possible to add the initial layer of outside fiberglass to the dodger while it is still on the boat. The shape is then fixed before the dodger is transported to the shop, but the risks of making a serious mess with buckets of resin on your boat need to be considered, and weather conditions need to be perfect. If this is your choice, you definitely do not want any window cutouts yet. I did all my fiberglassing in the shop.
3b. Fiberglassing in the shop
I draped a double-thick piece of double layer (some call it fatmat) over the outside of the dodger and brushed on inexpensive polyester resin (you should overlap into the areas that will soon be cut out for windows, but there is no need to cover the entire window area). When the cloth was saturated, I rolled out air bubbles and excess resin with a grooved steel roller. I did the same to the inside of the dodger the next day. The layers of fiberglass needed will depend on the size of the dodger.
Aesthetically, a final outside layer of fine cloth can be added after most of the initial fairing and sanding have been completed. Vinylester or epoxy could certainly be used, but we were working above the waterline here and I’d rather save the money. Also, if you use any fiberglass mat in the process, there may be problems trying to saturate it with epoxy. The process is forgiving as long as you sand between coats. At this point, the dodger was already surprisingly strong.
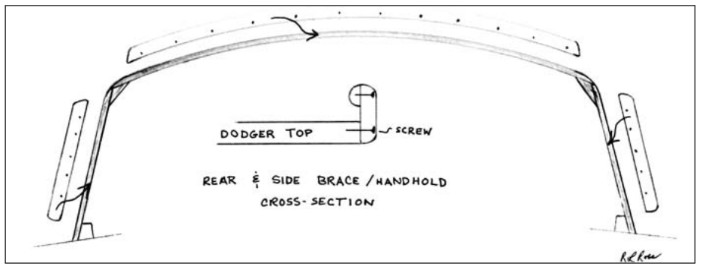
I cut the rear edge of the roof to the final curve and, using drywall screws and Bondo, added a strip of foam that would serve as a roof brace and a place to hold onto the dodger (see illustration below). I also added handhold strips to the sides of the dodger and fiberglassed them into place after rounding all edges (don’t try to bend fiberglass over a sharp corner — it won’t stay). A final layer of cloth will smooth and strengthen the outside of the dodger but is not needed on the interior. The number of fiberglass layers needed for strength will depend on the size and shape of your dodger. I ended up with nothing more than the original fatmat for most of the dodger. Significant strength was gained from the rear and side handhold strips, wrapped in additional fiberglass, that also served as braces.
4. Window cutouts
Nothing will affect the look of a dodger more than the window shapes. A jigsaw with a relatively fine blade is ideal for cutting out the window openings, and a drum sander on a drill can smooth inside corners. I added fiberglass cloth to the inside of the window openings, but probably could have saved time and effort by simply applying more resin to the exposed foam edge of the openings.
5. Sanding and filing
After a few hours of this you’ll appreciate the molds used by professional fiberglass boatbuilders, but hang in there because your efforts here will show for years to come. Like fairing out a fiberglass boat hull, even fairing a small dodger is a time-consuming and dusty process. The use of long sanding boards is helpful, and a variety of sanding blocks will keep you from sanding away your filler.
I also rolled on a high-build, two-part epoxy coating to help achieve a smooth finish toward the end of the process. The roving texture that shows on the inside of the dodger has a textured “cloth-like” look that can serve well as a final surface, especially after the epoxy coating is added. The finish on the outside of your dodger is a reflection of the hours you are willing to spend. This will be easier if your former career had something to do with auto-body repairs.
6. Paint or gelcoat
I was anxious to go cruising and simply painted our dodger with primer and a couple coats of marine paint that looked great and lasted for years. Two-part paints are expensive but would be ideal. A perfectionist might transport the dodger to a professional shop for spray painting or even gelcoating.
7. Making and installing windows
I used 1⁄4-inch acrylic plastic for the windows (see illustration below). It holds up well in the sun without crazing and can be bent slightly to conform to the dodger. For the sake of night vision, clear is a better choice than tinted plastic for a cruising boat.
I made paper patterns for the windows and cut the plastic with a jigsaw. Always test your blade or drill bit on a piece of scrap plastic to avoid surprises. Experiment with tool speeds — too much speed and heat will melt, rather than cut, the plastic. Drill holes using a wooden block as a backing. There are special drill bits (less aggressive cutting tip) available for plastics if you have a problem. (Or dull the cutting edge of the drill bit with a whetstone. –Ed.)
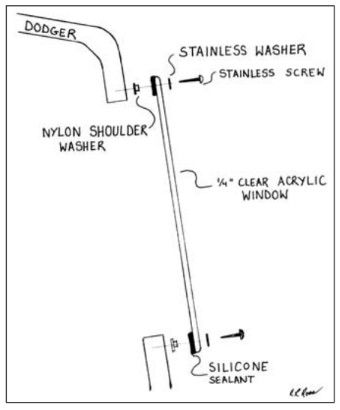
Leave the protective paper on the plastic until you are completely done cutting, drilling, and sanding window edges. A belt sander can help, but whatever you use make sure the outer edge of the plastic is rounded off and smooth now. You won’t be able to deal with it easily after the windows are installed.
Windows add weight to the dodger, and if this causes a transportation problem they can be installed (with more difficulty) after the dodger is mounted to the boat. There are many ideas for installing windows, but what I’ll present here was used on our boat successfully for many years (the main boat windows are thicker and are through-bolted, but the technique is the same).
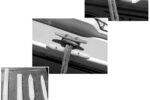
Nylon shoulder washers (see illustration above) are fit into slightly oversized holes in the window about every four to six inches and at least 1⁄2-inch from the edge. The shoulder washer (inserted from the inside) will prevent the sharp stainless-steel screw threads from ever touching the windows, and the shoulder washers also maintain a small space that prevents you from squeezing out all of the silicone sealer when the screws are tightened.
Spreading the load
I used carefully hand-tightened stainless sheet-metal screws with prominent threads and added a stainless washer to spread the load. Pre-drill small pilot holes in the fiberglass and temporarily dry-mount each window to the dodger before adding silicone sealant for the final installation. Next, place protective tape around the outside of the window on the dodger. Before you remove the window be sure to place protective tape on the inside of the window next to the dodger. After the window is removed is a good time to place a final strip of protective tape around the inside of the window opening. This tape will make your silicone cleanup much easier.
Use black silicone sealant for the final window installation — it will not be paintable. I have had success with Dow Corning and GE products. Have a good supply of paper towels and either alcohol or paint thinner available for cleanup. It’s also a good idea to have a box or bucket to throw the cleanup towels into — many of us know what a mess can develop when caulking on a boat.
Gaps or air pockets in the sealant will be visible through the edge of the window when viewed from the outside and will detract slightly from the appearance. In extreme cases, they could cause a leak. It is far better to have too much than not enough sealant during the installation process. I’ve found it easier to apply the silicone sealant to the plastic window than to the dodger. A putty knife helps to spread a uniform layer of sealant on the window perimeter before it is mated to the dodger. The window can be supported in one hand or placed, with the outside surface down, on a piece of protective paper while the shoulder washers are inserted and the silicone is applied.
8. Final installation
Gently press the caulked window with shoulder washers into place against the dodger and use a couple of screws (with the outside stainless washers) to align the plastic with the pre-drilled holes. Another set of hands is helpful. The protective tape shows you the exact location of the window.
There are a couple reasons not to over-tighten the screws. First, they can strip out of the fiberglass, and second, it is a good idea to give them another half turn after the silicone has partially set to achieve optimal seal. A small, commercially available plastic scoop or a wedge of wood or foam can be used to remove most of the excess silicone. Leave the protective tape in place until you have cleaned and wiped the surrounding area with solvent and paper towels.
Remove the tape and do a final cleaning. Use only the alcohol or mineral spirits/kerosene mentioned above for your cleanup. Acetone or lacquer thinner will destroy your paint and the windows. I used a lot of paper towels in the process. Each window took most of an hour to install and clean up. In 24 hours the silicone would probably hold the windows in place without the screws, but I never wanted to test this theory. I’ve never had a cracked window or a water leak using this process.
9. Attaching dodger to the boat
I wanted the attachment to be strong and the process to be simple. At this point I was tired of sanding and filling and didn’t want to fiberglass the dodger to the boat, but I also didn’t want a storm to remove all my hard work during a passage. As shown in the sketches, I shaped pieces of hardwood to conform to the cabintop and the dodger. They were caulked and screwed into the cabintop with the dodger removed.
The dodger was then set in paintable urethane sealant (Sikaflex 242) and screwed into the wood from the outside, using beauty washers (countersunk finishing washers) to spread the load and prevent sharp exposed edges. The front of our dodger was also screwed to the rear of the turtle cover for the hatch. The nonskid was protected with tape, and I added extra caulk to blend in the transition. With a little touch-up paint, the installation looked professional.
10. Useful additions
I mounted a cockpit light, an external VHF radio speaker, and a remote GPS antenna under our dodger. I also through-bolted some teak handles to the top of the dodger.
We enjoyed the protection and the undistorted view through the clear acrylic windows. Being able to put a foot or knee on the dodger made working with the sailcover and cockpit awnings much easier. We enjoyed many compliments, but sometimes I missed the good-natured teasing I used to get with the wrinkled old
Thank you to Sailrite Enterprises, Inc., for providing free access to back issues of Good Old Boat through intellectual property rights. Sailrite.com