How to repair corrosion damage on painted aluminum
Issue 40 : Jan/Feb 2005
How does the paint look on the painted aluminum of your boat? Is it bubbling up and breaking through the surface? This is the first visible evidence that the metal beneath the paint is corroded. It is a problem that needs to be dealt with immediately; if left unchecked, the corrosion will eat right through the metal, leading to expensive and time-consuming repairs.
I’ve repaired this sort of damage several times over many years, experimenting with different materials and procedures on all sorts of aluminum pieces, from masts and steering pedestals to window, hatch, and door frames. What follows is what works for me when it’s time to strip, prep, and paint corroded aluminum.
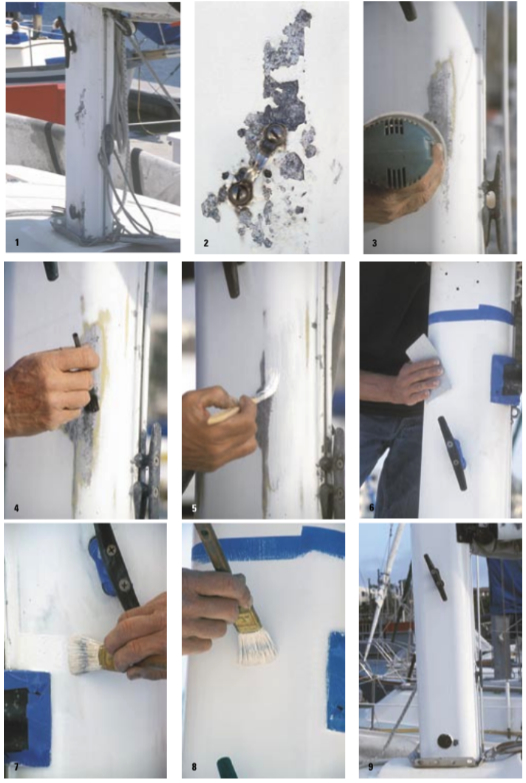
The first step is to remove the corrosion — all of it. Any corrosion left behind will come bubbling up to the surface later. Use a paint scraper and a wire brush to remove the loose, bubbling paint from the aluminum. Then sand the damaged areas down to shiny bare metal, using an orbital sander fitted with an 80-grit disk. Fin- ish up by hand-sanding with 120-grit paper, feathering the edges of the surrounding paint into the sanded area. Then wash everything thoroughly with running water. If you are working on a thin piece of aluminum — like a window frame — skip the power sander and do the job by hand in order to keep from breaking through the metal.
The next step is to etch the metal surface with an acid solution. Paint doesn’t stick well to smooth metal surfaces. Etching roughens up the surface just enough to give the paint something to grab onto. Use a phosphoric acid-etching solution, which is readily available at marine, auto supply, and hardware stores. Follow the dilution directions on the container, applying it to the bare aluminum with an acid brush. The etching process is almost immediate; you can wash it off with running water within minutes of application.
Running off in sheets
When you rinse the aluminum, see that the water runs off in even sheets rather than beads of water. Sheeting water is a good indication that the metal surface has been properly etched. If the water beads, repeat the etching process.
The key to stopping corrosion from recurring is sealing the metal surface with a proper paint job. And the key to a proper aluminum paint job is the priming. My favorite aluminum primer is Awl Grip 545, which was developed for use with the manufacturer’s linear polyurethane (LP) paint. Although this two-part epoxy primer is expensive, the leftover material doesn’t go to waste since it also makes an excellent all-around primer for fiberglass and wood surfaces.
Work with small amounts of the primer, since you’ll throw away whatever you don’t use. Mix equal parts of base and converter, pass the mixed primer through a paint filter, and apply it over the bare aluminum with a disposable brush, overlapping the feathered edge of the surrounding paint by about 1⁄4 of an inch. Since this primer is thin, keep an acetone-damp rag handy to immediately wipe away drips. The primer will dry hard to the touch within an hour. You can then give it a light sanding with 220-grit paper, rinse it clean, and apply a second coat once it has dried thoroughly. Allow this second coat of primer to dry overnight before repeating the sand/rinse/dry routine.
You can paint over 545 primer with enamels or twin-pack linear polyurethanes; however, I prefer using a marine-grade one-part polyurethane paint as an excellent compromise between these two. One-part polyurethane is more durable than enamel and a lot easier to use than LP. In addition to the paint, you will need a natural-bristle brush, brushing thinner, paint pots, stirring sticks, and filters.
Spot-paint first
Mix a small amount of paint with 10 percent brushing thinner, pass it through a strainer, and spot-paint over just the primed areas. This will help bring the repaired areas up to the level of the surrounding paint. Let this spot-coat dry overnight before sanding.
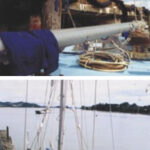
The next day you can lay down a top coat of paint. Tape off an area larger than the repair to be repainted. For example, the photos for this article show a mast being repaired and repainted. Although the damaged areas were relatively small, the mast was taped off from the deck to the boom for repainting. When finished, the paint over the repaired areas blended into the paint job over the lower portion of the mast, leaving only a thin line around the mast to indicate that it had been repainted.
Hand-sand this entire area with 220-grit paper and wash well with running water. Dry the area with clean cotton rags. Then mix your paint with 10 percent brushing liquid, pass it through a filter, and apply a thin coat of paint with a natural-bristle brush. The paint can be applied in any direction; however, the final brush strokes should be vertical to keep the paint from sagging and creating the dreaded “curtains effect.” Let this coat dry overnight and then repaint the entire area one more time the following day.
How well does this type of repair hold up? Well, two years later, the mast shown in these photos looks just fine, thank you. It may take another two years before it needs a new coat of paint.
Thank you to Sailrite Enterprises, Inc., for providing free access to back issues of Good Old Boat through intellectual property rights. Sailrite.com