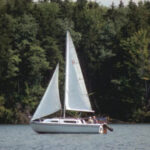
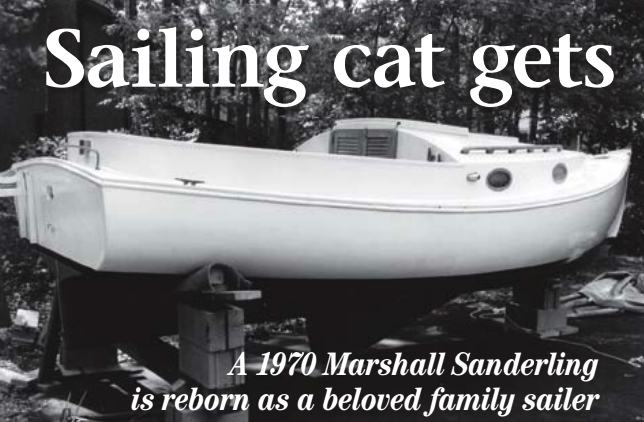
A 1970 Marshall Sanderling is reborn as a beloved family sailer
Issue 41 : Mar/Apr 2005
We had sailed for about 20 years before putting a halt to our nautical adventures. The necessity of repowering our Pearson Triton and the prospective costs of sending two children to college had made it financially impractical. We moved on to other less costly endeavors.
Our admiration for classic boats had never abated, however, and by happenstance we were brought back to our love for boats. In the summer of 2002 we attended the Green Head Fly Festival, an annual event held at the Tuckerton Seaport Museum, south of our home in Toms River, New Jersey. That afternoon, six Marshall Sanderling catboats made their appearance and tied up at the docks.
As we stood by admiring their classic good looks, I casually asked my wife, “So what do you think, should we buy one?” To my surprise, she responded positively, and we both recalled how we had investigated the purchase of one many years before but found Sanderlings to be out of our price range at the time. Although, with children settled, we could now afford to spend money on a boat in our retirement years, my wife reminded me that I was as enamored of working on boats as I was of sailing them. Our decision was to find a fixer-upper I could play with.
As we looked at Sanderlings in the local boatyards, online, and in the newspapers, it seemed that a decent boat would run about $12,000 to $15,000, depending upon age and condition. Since the frames, deck, and seats were made of wood, I was reluctant to spend the maximum, figuring there would have to be bad wood somewhere in the boat that would require serious work. A piece of bad wood was like the tip of an iceberg, I figured. Where some is visible, there is much more below. I decided the only important thing was a sound glass hull, including the glassed-in plywood transom.
In need of repair
The ideal boat for my purposes appeared in the newspapers. It was a 1970 model, and the owner was asking only $7,000. When I saw her laid up in the yard, it was obvious why the price was so low. The elderly gentleman who owned her had not sailed her in a few years, and she was sadly in need of repair. While the glass was sound, the wood was another matter.
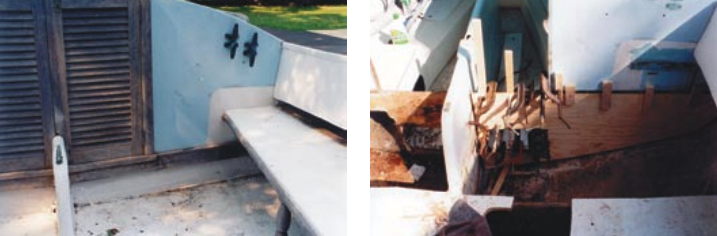
Sanderling cabins have an opening in the aft end near the sole, which allows the placement of ballast under the cockpit sole. I reached under the cockpit and came up with wet, disintegrated wood. In spite of having been on land for a couple of years, the frames under the sole seemed damp. The aft end of the cabin is a plywood bulkhead glassed to the gelcoated and finished exterior. All around the door the wood was soft and rotted. The entire bottom half of the cabin bulkhead was equally soft, indicating that it would need replacement. The hatchway was framed with ancient and split teak, and the louvered teak doors were cracked. Black mildew covered the interior of the cabin. This boat needed a complete redo.
The Sanderling’s construction is similar to many glass boats of her size. Most have longitudinal stringers and transverse bulkheads used for stiffening the hull. Water eventually finds its way to the wood and rots it, requiring replacement. The procedures described in this article can be adapted to other boats of similar construction.
An exterior survey indicated that most of the gelcoat was sound. There was some crazing in the gelcoat and pits on the toerail where air bubbles had broken through. My plan was to fill in the crazing and any nicks or dings in the hull and deck and repaint it. The hull was white, but the decks, cabintop, and other parts were a faded blue. Buff-colored paint would cover the blue, and the hull and other areas would be painted white. The aluminum mast, boom, and gaff were sound but covered with scrapes and scratches. The coaming caps and rubrail on the older Sanderlings were of vinyl. These would be replaced with teak. Affixed to the transom was an outboard bracket of vintage design and in poor condition. It would be replaced. Wires peeked out from under coamings and floorboards. The running lights were on their last legs. These would all need replacement. I had what I wanted: a sound hull in need of some serious restoration work.
Sloppy work
Discussions with the boatowner revealed that the cockpit sole had been replaced, allegedly with marine plywood, glassed in. The work was sloppy; I could only guess that the owner had wanted to repair the obvious defects to make the boat more saleable. Negotiations were difficult, as the old man had his price, but I managed to get it for $6,000, and within two weeks the Sanderling was sitting in my driveway ready for work.
The first stage involved determining what needed to be replaced and how to proceed. I stripped everything off the boat that was in the way — vinyl rubrails and coaming cap, portlights, chocks, cleats, and miscellaneous hardware. After 30 years, the windows were heavily crazed and cloudy.
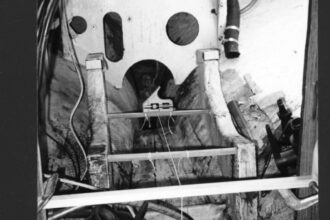
I was concerned that the hull not lose its shape, so I determined that I would have to take the frames out and replace them one by one. I cut an 18-inch square opening in the cockpit sole, aft of the cabin and investigated the first frame (see photo below). The entire frame was wet, as was the one behind it. I decided to replace all of the frames and any other wood I could get my hands on.
This undertaking was not as reckless or bold as you might think since working on boats has been an avocation of mine for many years. Our first boat was a Hartley Trailer-Sailer 21, which I built in our garage from a set of plans. It took about two years to complete, and I enjoyed building it. We had that boat for 11 years, and our two kids grew up on it. We cruised with them, and I spent the off-season maintaining it. We outgrew it and purchased a 1964 Pearson Triton sorely in need of work. The only shortcoming was the aged Atomic 4, which eventually led us to sell her after five years.
Years of grime
The work on the Sanderling began with a good cleaning. My wife, Lucille, went after the interior mildew with a vengeance and many bottles of Spray 9 cleaner. She removed years of grime.
To get at the sole and bulkheads it was necessary to remove the seats. With them out of the way (and saved for patterns), I was ready to tackle the sole and frames. Work began on the cabin wall and first frame. The gelcoated glass cabin wall ended about deck level. Beneath it was a 3⁄4-inch plywood bulkhead with a compartment on either side of the centerboard case to hold the ballast. Much of the wood was rotted. I set the depth of the cut on my circular saw to a hair less than one-half inch in order to cut through the half-inch plywood but not score the fiberglass. I removed the rotted wood with a chisel and mallet and pulled the rotted bulkheads free. Next I went over the area with a rotary sander, preparing it for the new glass and plywood.
Fortunately the old bulkheads had come out in one piece. I purchased 3⁄4-inch fir marine plywood and cut bulkheads from it. After careful fitting, it was ready for the next step. To prevent water saturation in the new wood, I rolled two coats of epoxy resin over the surface of the frame, paying particular attention to the edges of the plywood. It was not my plan to have water in my bilges, but as an experienced boatowner I felt it better to cover all my bases.
No great difference
A note about materials is important. I use only marine-grade plywood. Some builders use exterior-grade plywood, but the difference in cost between a few sheets of marine-grade and exterior plywood is not that great. The major expense in this type of restoration is in man-hours. I would much prefer to finish the job and have confidence that I have used materials that will last as long as possible.
I fastened the two new half frames in place using epoxy resin. Clamps held each in place as it cured. The outboard parts of the frame were clamped using blocks of wood, screwed together, on each side of the wall. In each side, I cut a rectangular hole to allow the placement of ballast under the cabin sole.
I fastened the bulkhead below the cabin wall and the next bulkhead in place using #10 silicon bronze screws and epoxy. Three layers of 6-inch fiberglass tape and epoxy secured all joints. Each of the bulkheads had a notch cut out in the top to take a wide plywood stringer to stiffen the boat and provide a place to secure the two halves of the plywood sole.
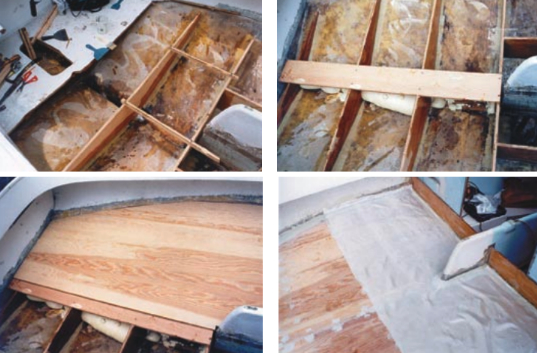
I worked from fore to aft in the cockpit area, carefully cutting away the old deck, chiseling out the old glass tape, and sanding it with 60-grit paper on a rotary sander. I then cleaned each area with Interlux Fiberglass Solvent Wash to degrease it. Each bulkhead was secured to the next with temporary battens to keep them aligned. Once the entire sole was removed and each frame securely in place, I ran battens fore and aft in the cabin to make sure there were no high or low spots. Since I had taken care to line things up properly, the tops of the bulkheads needed only some minor planing. After giving each bulkhead two coats of epoxy resin, I glued and screwed the 3⁄4-inch plywood stringer fore and aft to tie them together. At this point most of the nasty work was done. I could begin construction of the cabin sole.
Two epoxy coats
The sole was cut from 3⁄4-inch marine plywood and glued and screwed into place. Prior to laying each half down, I rolled two coats of epoxy on the bottom to protect it. Once the sole was in place, there would be no way to check it, so I wanted it to be impervious to water. Because each of the screws had been countersunk, it was necessary to cover the holes and center seam with polyester putty. In order to make a smooth transition from the sole into the hull sides, I filled the space between the edge of the plywood and the hull with fiberglass-reinforced polyester putty. Two layers of 6-inch glass cloth finished all seams and bonded the sole to the sides. This was then sanded smooth so I could cover the sole with glass cloth.
I laid several sections of glass cloth, overlapping by about 6 inches at each joint. Then I rolled on two coats of epoxy resin to fill in the weave. I sanded the edges smooth once it had cured.
Using the old seats as a pattern, I cut new ones from 1⁄2-inch marine plywood. For stiffening, I screwed and glued battens made from 5⁄4-inch Philippine mahogany to the underside, one running along the seat edge and two running perpendicular to it. I gave the entire undersurface of the seats two coats of epoxy resin as a sealer.
I made support battens from 5⁄4-inch mahogany and glued and screwed them to the transom and aft end of the cabin at the appropriate height to support the seats. I planned to make face frames and doors under each seat to enclose the storage spaces. I secured the outer edges of the seat to the hull using two layers of 6-inch cloth and resin, top and bottom. I then covered the entire seat with a single layer of cloth and two coats of epoxy resin. Two coats of paint on the seats and cabin sole finished the job.
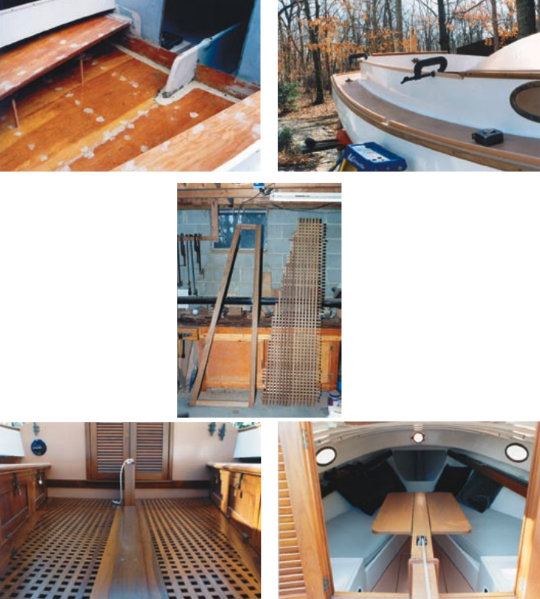
Trimmed to size
One of the factory options on the Sanderling is a pretty teak centerboard cap that extends into the cockpit. I purchased one from Marshall Marine and trimmed it to size. Final installation would have to wait until some more basic construction was completed.
A pair of cabin shelves was another option. Since extra storage is always useful, I cut some patterns out of scrap plywood and fashioned the final shelves out of 1⁄2-inch marine plywood and glassed them in place. I covered the surface of each shelf with cloth to make everything consistent. Now painting was necessary before I could install any more teak trim.
Preparation of the surface to be painted is important. A layer of paint is extremely thin and will show up any imperfections beneath it. The hull had numerous dings where 32 years of sailing had taken its toll. It also had many tiny holes in the toerail area, where air bubbles in the layup had worked through. I filled these with polyester putty and sanded them smooth. The non-skid pattern on the deck had worn over the years. One spot was crazed and cracked. Since it was my plan to use non-skid paint there, I scraped out the cracks and loose plastic and filled them with polyester putty. After it hardened, I sanded it smooth. It would provide a good surface for the paint.
I used Interlux paint on the boat hull and deck, painting with two coats of Brightside Polyurethane White. This went nicely with the Sundown Buff color for the deck, cabintop, and other areas. Since the original non-skid surface was quite worn, and two coats of paint would not improve traction, I mixed Interlux No-Skid Compound in the deck paint. This proved to be extremely good, particularly when the deck was wet. I also mixed in the Interlux Flattening Agent so the deck and cabintop would not be too shiny.
Some of the Sanderlings I had seen carried the buff color up the cabin sides. Instead, I masked the walkways carefully and painted just the areas that had originally been blue.
Helpful suggestions
One of the benefits of restoring a boat that is still in production is that many materials are available from the manufacturer. Marshall Marine was helpful in making suggestions and shipping parts that were impractical for me to make. I purchased two teak rubrails, handrails, coaming caps, eyebrow trim, and a pair of teak louvered doors. They were shipped promptly. I could not have purchased the teak for the doors or rubrails for the price I paid for the finished products. Since there was much work to be done on the boat, and I wanted it in the water by spring, this saved time.
The next step was screwing the rubrails into place using 1 1⁄2-inch #10 stainless screws. Each hole in the teak had to be drilled and countersunk to take teak bungs. Screws were set on 10-inch centers with a couple of extra screws at the forward end of the rail. I gave each hole in the hull a good glob of BoatLIFE caulking. Then I plugged each hole in the teak rail. Since teak is expensive, I always save any scrap. The drill press and a plug cutter provided all the bungs I needed.
Once the rubrails and handrails were on, it was time to do the coaming caps and cabin trim. I ran the trim around the cabin edge first, since producing a fair curve between it and the coaming caps might require some planing. The trim was fastened with 1-inch #10 stainless screws on 10-inch centers. Once the trim reached the edge of the coaming I clamped a long flexible batten in place and marked how much had to be planed off the top part of the coaming so the line would be fair. With this material removed, it was now possible to screw the coaming cap in place. I used bedding compound in the groove under the coaming cap to seal the top edge of the plywood coaming. I then removed the hatch and trimmed it all around with teak.
Built-up ring
Sanderlings have a hole in the deck through which the mast is stepped on the stem. On early models, such as mine, it’s flush with the deck; on later models there is a nicely built-up ring around the hole to prevent water from entering. I decided to update to a newer type. I cut two rings from 3⁄4-inch teak and glued them together at cross grain using resorcinol glue. After the ring was dry, I gave it a final shaping and sanding and then gave the bottom three coats of Cetol. Once it had dried, I applied a liberal amount of mahogany-colored Sikaflex bedding compound under it and screwed it to the deck. The screw holes were plugged and finish sanded. Then I gave the ring four coats of Cetol. Next I installed exterior hardware, running lights, and ports. The new Plexiglas was a decided improvement.
The next stage would involve some serious customizing of the cockpit. I decided the seat lockers should have three lids. I cut a teak frame about 2 1⁄2 inches wide on top, bottom, and between the locker lids. The aft end needed to be wider to conform to the rake of the transom. Once the frames were screwed and glued together I screwed them to the underside of the seat and the cockpit sole. Liberal amounts of bedding covered the screw holes in the sole to prevent water from creeping in. I made three lids for each side and fitted these in place using brass hinges and hasps.
New teak trim
The companionway was next. New teak trim strips and entrance framing had to be fashioned from 3⁄4-inch wood. Once the frame had been fitted, I fastened it — along with the centerboard cap — securely in place using screws and bedding material. I installed an Aquameter compass through the port cabin wall.
I decided a teak grate would finish the job nicely. I made this in two sections with a strip of teak running down the center of the cockpit sole to keep it in place.
The interior needed some additional work. After carefully painting the overhead, sides, berths, and sole, it was time to install teak trim. I trimmed the shelves with teak and made holders for my VHF, binoculars, and general storage. I placed a teak cap over the centerboard case inside the cabin and installed drop leaves on each side using brass piano hinges.
I gave all teak, inside and out, four coats of Cetol. Teak has oil in the wood that must be prepared before finishing, or the varnish will not hold well. This is countered by sanding and wiping with acetone prior to application of the Cetol.
The original berth cushions were showing signs of deterioration. We had new cushions made to match the paint scheme, threw in some pillows, and we were finished. We had cockpit cushions custom made for us.
I installed a new outboard bracket on the transom. The engine that came with the boat was a 10-year-old Johnson 9.9 long shaft. Although it was in good condition, I purchased a Honda 9.9 four-cycle. The feature that interested me most was the generator, which meant that I would not have to continually remove my battery for recharging every week or two.
Obvious choice
The choice of a name was easy, as our first grandchild, Meghan, had just been born. I took a look at various nameboards at a nearby boatyard and came up with a design. I cut it from 3⁄4-inch teak and carved the letters. Then I gave it four coats of Cetol with gold paint on selected areas between the third and fourth coats. Its curve matched that of the transom, and the Meg was officially named.
The rig was the last thing to be tackled. I took the fittings off the original aluminum mast and cleaned it with Interlux Solvent Wash. Then I gave it a coat of Interlux Viny-Lux Primewash Base, followed by Brightside Primer and three coats of Sundown Buff. I painted the top of the mast and the ends of the boom and gaff white. I purchased new mast hoops. The gaff saddle had no cushioning on the inside and was sure to scratch the new paint. I cemented a piece of naugahyde inside the saddle.
The old sail had several tears in it. I purchased a new sail with two rows of reef points. Marshall Marine had brown sail and tiller covers made for me to match the paint scheme.
Ready to go
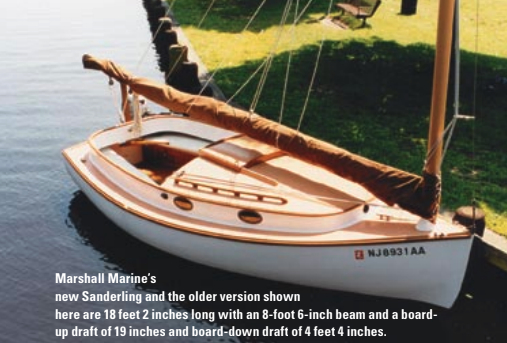
After some final attention to the boot stripe and bottom paint, Meg was ready to go. Our local boat hauler took her out of our driveway and deposited her in Forked River at the Tall Oaks Marina May 8, 2003. People ask me if she is a new boat and are surprised to hear that she is 33 years old. She has been a pleasure to sail. We have adjusted to the catboat rig.
This rebuild took nine months and wasn’t necessarily cheap. I have about $16,000 invested in the boat, including the purchase price, along with the new sail and motor. I could have found a boat in good condition for that price, but it is likely that I would have had to replace the sole or some other wooden parts. In addition, it would not have come with the cockpit grate, cabinets, and other things I added. The time and money invested have given us a boat that is truly ours and a bit unique as far as the class is concerned. With more grandchildren on the way, we have many good days of family boating pleasure ahead of us.
Thank you to Sailrite Enterprises, Inc., for providing free access to back issues of Good Old Boat through intellectual property rights. Sailrite.com