Elegant solution avoids mast replacement
Issue 42 : May/Jun 2005
“Well now, this doesn’t look good.” The marine surveyor was kneeling on the deck looking at the base of the mast where it was stepped on the deck of the venerable Spencer 35 I was in contract to buy. His words brought an unwelcome change to the survey. For more than an hour he had been inspecting, poking, and prodding all over Onrust (the name is Dutch, meaning “unrest” or “restless”). While he had pointed out a few minor irritants (slightly corroded nuts on the underside of a stanchion backing plate, and a GFI outlet that was needed on the 120-volt circuit in the forepeak), Onrust was showing up as solid and well-maintained. But now he had found two vertical cracks on either side of the base of the aluminum mast, each running about an inch and a half up from the cast-aluminum step plate.
“We’ll have to get a rigger to look at this” he said. Soon, Mark Rinsler from Western Yacht Commissioning was aboard. After checking the cracks and surrounding metal, he said we’d have to look closer after the mast was pulled. But he thought the damage was local enough that it wasn’t a serious problem. When the mast was out he would simply cut two or three inches off the bottom to get to solid undamaged metal and all would be well.
Shortening the mast by two or three inches worried me. I could foresee a lot of trouble: shortening the standing rigging, repositioning the gooseneck, and other possible adjustments necessary for a mast that would be several inches shorter. More importantly, why was the base of the mast sporting these cracks anyway? Was there some structural problem in this lovely, sweet-sailing, 35-year-old boat?
Cause identified
Cracks and corrosion in the base of aluminum deck-stepped masts are not rare. In fact, Don Casey discusses the problem in This Old Boat. He concludes that, because of the issues cascading from shortening the mast, “replacing the mast is always a better alternative.” I’ve concluded that this isn’t necessarily so.
With the mast off, we identified the cause of the problem. As originally built, the base of the mast was held in position on the base plate by a tightly fitting oval collar rising about an inch up from the plate inside the mast. This seems to be a very typical and logical arrangement for deck-stepped masts. Over time, though, the collar had suffered from corrosion. In aluminum, corrosion means expansion. The thickness of the collar was greater than that of the mast wall, and the expansion pressure of the collar against the inch or so of mast contacting it was too much for the mast section to restrain. Hence cracks to relieve the pressure.
Mark and I came up with a simple, elegant, and affordable solution to shortening the mast that did not involve replacing it. He designed and built a new mast step that would maintain the mast’s original height and eliminate the threat of repeating the problem.
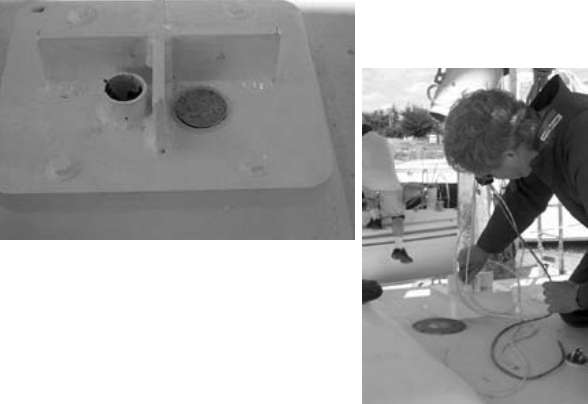
First he fabricated a solid phenolic base block with a thickness exactly equal to the amount cut off the base end of the mast. Then he built a new aluminum step plate to go atop the phenolic block with both bolted through the deck. The new plate, however, did not utilize a collar to hold the mast in place. Instead, it features two vertical plates intersecting at 90 degrees to form a stubby cross on top of the plate. Only the ends of the cross contact the mast section. Continuous contact around the whole inner circumference of the mast, as with the old collar design, isn’t necessary. The load is all downward.
Minimal contact
Forces that could cause lateral movement of the base on the step are infinitesimal compared to the compression load holding the mast in place. Thus only minimal contact area is needed to keep the mast where it belongs on its step plate. For this, the ends of the crossing vertical plates are quite enough.
To finish off the installation, four small weep holes were cut into the very bottom of the mast, each placed to drain one of the quadrants on the step plate created by the vertical crossing plates. A 1-inch-diameter hole was cut in the phenolic base and the new plate so wires could pass through the deck for connection inside.
While we were at it, all the old wiring inside the mast was replaced and run inside a new PVC conduit riveted within the mast. A braided messenger line was also put in to pull through any future wiring I might need for new mast-top installations.
On re-stepping the mast, the stays set up perfectly. The new base and plate look great on the cabintop with two coats of white epoxy paint. Onrust’s lucky coin (a 1922 silver dollar we found when we pulled the old step plate off the mast) was cleaned, polished, and bedded in clear sealing compound on the new plate inside the mast where we trust it will continue to bring Onrust fair winds and following seas for years to come.
Thank you to Sailrite Enterprises, Inc., for providing free access to back issues of Good Old Boat through intellectual property rights. Sailrite.com