Refining the boat’s most important plumbing system
Issue 47 : Mar/Apr 2006
We have all had that experience: you complete a project, feel justifiably proud, but as you live with the results you realize that some changes would make it better. Or, maybe you discover that things didn’t work out exactly as planned. This is the story of such an adventure.
The November 1999 issue of Good Old Boat carried an article on a one-off holding tank that I designed and built. The tank, as detailed in the article, is indeed bulletproof and I have no concerns or regrets about its construction. The plumbing, however, has been quite an adventure. I would like to relate my trials, tribulations, and eventual solutions for others who might be planning to re-plumb a head . . . whether or not you are building a holding tank as detailed in the original article.
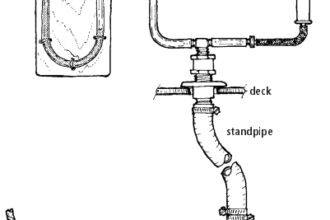
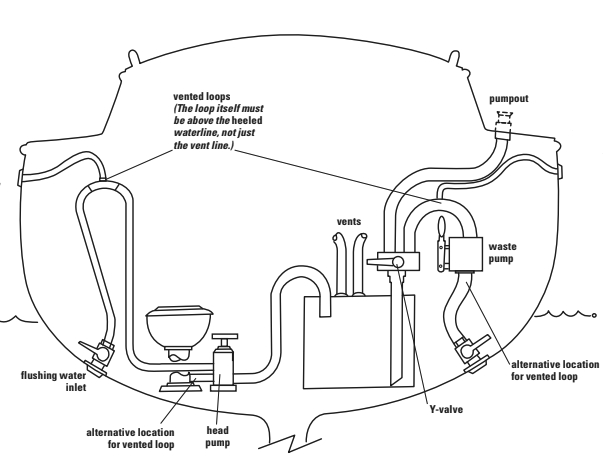
The basic plumbing diagram for my head is shown in the illustration on this page. I must admit at the outset that I never included the vented loop on the intake. My reasoning was that I only open the intake valve when flushing, so why go to the bother? A vented loop is designed to prevent unintentional siphoning, which could flood your boat if the head is below water level. Without a vented loop, water could flow from the intake, through the pump, into the bowl and overflow into the bilge, creating disaster . . . but only if you leave the intake valve open, which I never do. This has not been a problem.
The output of the head is directed only into the holding tank; there is no Y-valve to allow overboard discharge. This arrangement is much preferred by authorities in no-discharge zones, such as Narragansett Bay where I sail. (But I must say, no one has ever boarded All Ways to inspect the plumbing.) The output from the holding tank had a Y-valve to select either a deck-mounted pumpout or an overboard discharge via a Whale Gusher hand pump and a vented loop. (This vented loop I did include, and that is part of the problem.) The head and tank functioned flawlessly. The pumpout worked. No problem. The overboard discharge, however, was a problem from the word “go.”
Halfway up
The total distance from the bottom of the holding tank to the top of the vented loop is about 5 feet, with the Y-valve located about halfway up. The pump was located on the downside of the loop as shown in the original diagram. It didn’t work. A vented loop allows air to enter when there is a vacuum to prevent siphoning. The pump works by creating a vacuum. It doesn’t work on the downhill side of a vented loop – especially when you are asking it to pull a 5-foot head.
OK, so I moved it to the upside. This means it had a pull of about 2 1⁄2 feet and a push of about the same. It worked, but performance was marginal. Next, I bought a Jabsco macerating pump and installed it in place of the manual Whale. The Jabsco literature said it was good for at least a 5-foot head, so I figured I was all set. Wrong. The pump can push 5 feet, but it does not like the 2 1⁄2-foot lift when it’s dry. It worked fine at first, but the pump burned out in less than six months. Fortunately, West Marine was very gracious about replacing it under warranty, handing me a new one in exchange for the dead one. They were less pleased when I returned in another three months, but still swapped it out for a new one. I decided to rethink the whole situation.
Clearly, the 5-foot lift was a problem, but how could I avoid it? Only by eliminating the vented loop. Should I do that? Yes. The only time I open the 1 1⁄2-inch discharge through-hull is when I am pumping out overboard so, just like the input, there was no real need for the vented loop. You can’t get reverse flow when you have a pump discharging. So the loop goes. What about the Y-valve? Is it necessary? No. With the through-hull closed, the only place the pumpout can draw from is the holding tank. Ditto for the Jabsco when the pumpout is closed.
Simple T-fitting
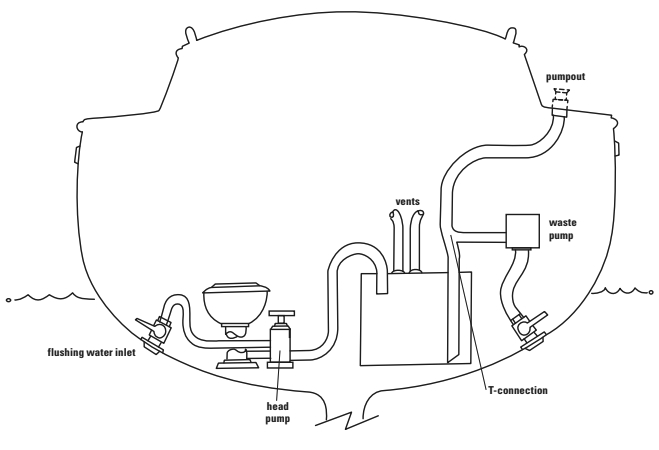
So I threw out everything from the tank discharge fitting and replaced it with a simple T-fitting, with one limb going up to the deck-mounted pumpout fitting and the other down to the Jabsco which is now mounted on the floor behind the head (at about the same level as the bottom of the holding tank).
Now I have a very simple system (strange how that KISS really works!). When we use the head we open the intake valve, pump away, and close the intake valve. To empty the holding tank, we pull up to the pumpout, hook it up, and away it all goes. Alternatively, when offshore we open the discharge through-hull, push the button on the Jabsco, and away it all goes. We close the valve when we are done. No Y-valves, no vented loops, no problems.
This system does depend on operator intelligence to remain safe. If the intake valve is left open, siphoning could occur. This would flood the head and potentially the boat but would be fairly obvious in the process. I have shown each guest on All Ways the proper procedure for using the head and have had no problems. The lack of a vented loop on the output could have more serious problems, as reverse siphoning into the tank could go undetected until a lot of water had come aboard. However, my wife and I are the only ones who operate the overboard discharge, and we are very compulsive about the through-hull valve.
Those who are worried by such a system could install a vented loop between the Jabsco and the through-hull. It would still be much simpler than originally presented and since the pump will be pushing, there should be no problem. Theoretically, without a Y-valve, the vented loop might decrease the suction of the pumpout slightly by allowing some air in. I suspect the pumpouts we have used have more than enough suction to handle that small loss.
Since we have made the above changes we have been very happy with our head. I didn’t get it quite right the first time (or the second), but now I am very comfortable that we have a reliable system that works well for us. I am also comfortable with the safety issues associated with eliminating the vented loops. If you are contemplating a similar system, you’ll need to think through your own situation carefully.
Thank you to Sailrite Enterprises, Inc., for providing free access to back issues of Good Old Boat through intellectual property rights. Sailrite.com