Be cautious about adding new components
Issue 60 : May/Jun 2008
A boat’s electrical system gets attention pretty early in a restoration or refit. Most of us who are fixing up older sailboats figure we’ll make some changes in the system, particularly since today’s technology offers us choices that weren’t available when our boats were built. Therein lies the potential problem: there’s so much equipment out there and so many ways to set things up it can be overwhelming.
I haven’t forgotten thumbing through the catalogs and books trying to figure out what to do and what not to do. In the end, I settled on a combination of old and new. I was able to make choices I could live with later because I got a clear picture of my wants and needs before buying a bunch of expensive boat stuff and installing it all.
No two systems will be exactly alike because the condition of each boat’s equipment and the needs and desires of each owner will never be the same. But perhaps I can help you ground this stuff in reality by sorting through your options on paper.
First, get your priorities straight. Electricity is potentially dangerous. Even 12-volt DC current is capable of starting a very respectable fire or giving you a good shock. More insidiously, when improperly directed and contained, it’s good at setting up stray-current corrosion that can do quick and catastrophic damage to metal components in contact with the water — most crucially, the metal through-hulls that keep the water out of your boat.
This isn’t meant to scare you, but rather to discourage you from taking a casual attitude toward any boat’s DC system; even the most basic system on the smallest trailersailer isn’t a toy.
Do your homework
Before you can evaluate, repair, or upgrade your boat’s electrical system, do your homework. Read a good book on the subject (there are plenty written for the novice), check out the relevant chapters in a recent edition of Chapman’s, and talk to experienced owners. A working knowledge of household wiring is helpful in understanding the basic concepts, but what’s acceptable for house- hold wiring doesn’t cut it on a boat.
That’s not marine marketing talk. That’s basic safety. Boats move, vibrate, flex, and expose their equipment to a perpetually damp and corrosive environment. Also, DC equipment must be inherently different from its AC counterparts. For example, DC wiring is heavier than AC wiring. Understanding marine batteries and their amp-hours, guidelines for wire size, type, connector types and how to install them, distribution panels, and the rest of the equipment is a necessary prerequisite to making the decisions I’m talking about. Once you have that basic knowledge and are ready to start translating it into the reality of your boat, you’ll find some real-world clarification helpful.
If, like me, you want to keep things simple, while nonetheless making your boat more comfortable than a tent, then what you read in the books and catalogs is likely to set off your Complicated Alarm. Different batteries for engine starting and house loads, different charging regimens, multi-stage chargers, regulators, big alternators, combiners, isolators, transformers, multiple switches — it all adds up to a lot of gear, a lot of wiring, and a lot of money. At the end of your stack of reading material, you may be left asking, “But what do I really need?”
Here’s where the basic knowledge you’ve acquired and a clear-headed evaluation of your needs will see you through. Let’s step through the process. My wife and I outfitted our 1977 Pearson 28 with the intention of keeping her permanently. (How long you intend to keep a boat is a major factor in deciding how much work and money to put into her.)
Batteries
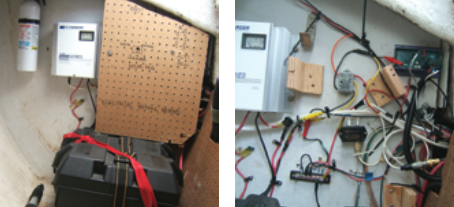
Our boat came with no batteries. She had a built-in plywood battery box with room for two large batteries. There were slots for running hold-down straps. I consider this setup to be a necessity. Two batteries for a cruising boat is a practical minimum, and a secure berth for the heavy, acid-filled things is imperative when the weather gets rough. If you don’t find a sturdy battery box with a hold-down clamp or strap in good condition, make one. But first, consider where it should go. Batteries are heavy enough to affect trim noticeably. If you get flooded-cell batteries, put them in those black plastic boxes with lids and strap those down. Boxes are not necessary with AGM or gel-cell batteries.
Speaking of battery types, I went with flooded-cell batteries because they were the cheapest and have a long service life when properly charged. With any battery, quality matters more than the type of battery. They are not created equal. I bought West Marine brand because I had read good reports of their quality and service life and they were reasonably priced. You should expect about five years’ service from quality flooded-cell batteries if you charge them properly. In fact, they should still be working fine when you trade them in. They require periodic checking for water level, but if they’re being properly charged, they should lose little, if any, water. (If they’re being “cooked,” though, you’ll know because you have to add lots of water to them often.
What about deep-cycle, starting, and dual-purpose? This gets confusing when you start reading that these types of batteries need different charging regimens. You find yourself reading about systems with two alternators with two regulators. If you’re not interested in setting up an engineer’s playground, this can get discouraging.
Modest draw
If you have a small engine — especially a small gasoline engine like my Atomic 4 — your engine needs only modest cold cranking amps to start. Your boat engine is likely to be 10- to 30-hp, unlike the one in your car, which is probably 100- to 250-hp. A good deep-cycle battery is certainly more than adequate to start small boat engines. Since you can combine more than one battery by moving a switch, you’re covered. My two deep-cycle batteries are exactly the same and I bought them at the same time. So they’re getting the same charging regimen — tailored to their needs — from one alternator and regulator. And I’m getting all the advantages of true deep-cycle batteries. Most important are their reserves of amp-hours, which are the largest for a given size and weight of battery.
I first had to decide how many deep-cycle batteries to get and of what size. Both questions are answered, not by the amount of power you’d like to have, but by the amount of charging power you can reasonably expect to provide the batteries. You could tow a barge with 50 105-amp-hour batteries on it behind a 27-foot boat, but you’d be hard-pressed to charge them once they’d finally gone down.
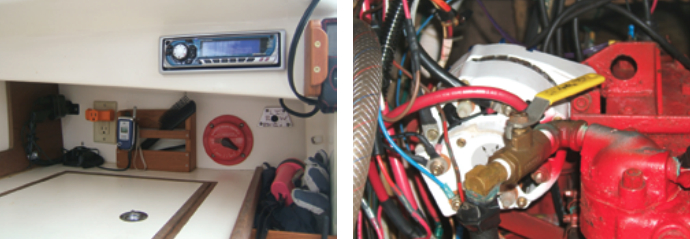
You can replace a stock automotive-type alternator with a bigger marine one, put on a smart regulator, and charge those big boys with a vengeance. That’s fine, so long as your engine can handle the load of that honkin’ alternator. However, I’m leery of asking my engine to do things way beyond what it was designed to do. After talking to Atomic 4 experts, I replaced my stock alternator with the biggest one I was comfortable with and a smart, programmable regulator matched to that alternator by the manufacturer. Other Atomic 4 owners confirmed that this equipment made a big difference in how fast and how completely the batteries would get charged with no discernible negative effect on the engine.
Practical limit
The size of that alternator — meaning its maximum rated output — is going to set a practical limit on the amount of battery power you should carry. The books you’re reading will give you a rule of thumb on those numbers. It doesn’t make much sense to burn half a tank of fuel to charge your batteries.
With my new 65-amp alternator bolted on, I was comfortable selecting two 105-amp-hour deep-cycle batteries. Abiding by the conventional wisdom for maximizing battery life by not draining them beyond 50 percent, that gave me enough reserve power to relax and run my lights, fans, stereo, and instruments.
In general, boats running only these accessories will be just fine with two adequately-sized batteries. This is especially true if you replace high-draw cabin lights, anchor lights, nav lights, and fans with the new lower-draw versions, which can cut the power demand by a factor of 10. That’s worth the money in my book. (Remember, this is a “keeper boat” for us.) Early in this process, I adopted a general policy of “wherever possible, reduce demand rather than increase supply,” because adding to the electrical supply is expensive, fairly complex, and bulky no matter how you opt to do it.
As a general rule, two batteries are fine unless you add refrigeration. Then you will almost certainly need an additional house battery and the means to recharge it.
Switches, combiners, etc.
Let’s talk about battery switches, combiners, isolators, and alternator protection devices. If your older boat has a basic electrical system, it probably has a traditional round, red, battery-selector safety switch. These things are heavy-duty and easy to understand and use. They allow you to rearrange your DC electrical supply without interrupting service, and they make it easy to charge your batteries at the same time. Making all your reserve power available for cold-cranking the engine requires a turn of the switch.
They are not idiot-proof, however, which is why they’ve come under criticism from the boating press. If you turn them to OFF while the engine is running, you can fry the diodes in your alternator. If you leave the switch in the BOTH or ALL position too long, you can drain both your batteries and be unable to crank your engine. You can read about solutions to these potential problems that involve multiple switches, combiners, isolators, and devices to prevent diode-frying if the switch is turned to OFF with the engine running.
There’s nothing wrong with any of that. The drawbacks are complexity — more cabling and connections and devices — which means more money, more labor for installation, and more parts to potentially fail and disable your electrical system.
Know yourself and your crew. I don’t have small children. I am conscientious and careful by nature, and I trained myself to move the battery switch from the ALL position as soon as the engine is cut off. I kept my original battery switch after determining that it was still good by moving through the different positions slowly while watching a cabin light. If it doesn’t blink as you move the switch, the contacts are still good.
Lucky escape
By mistake, my wife once turned the battery switch to OFF while the engine was running (she meant to put it on BOTH). I had a cow, but the alternator was fine. (Fortunately, it was the old alternator.) She definitely now knows not to do that, and she and I are the only ones who will ever touch the thing.
With this setup, a backup means of starting the engine is in order. One option with small engines is a hand-crank — if there’s room to use it in your engine room or cabin. Talk to experienced owners of your boat and engine. For me, given the clearances around the flywheel, that wasn’t an option. So I waited until one went on sale and bought a jump-pack — a self-contained starting battery in a hard case with a pair of permanently attached jumper cables and an on-off switch. These cost $100 or less, and are compact, portable, and rechargeable (mine is supposed to be topped off quarterly). They have indicator lights to instantly tell you the state of charge. They have plenty of power for smaller engines.
Household current
Shorepower is another term for an AC system. In the U.S., that’s 110-volt household current. A basic shorepower setup includes an inlet (use the more expensive all-metal ones since the lids on the plastic ones break with normal abuse), a small breaker panel, a dual receptacle just like the ones in your house, and an AC-powered battery charger (this is useful, but not necessary). I like mine for two reasons. It’s another fast means of charging my batteries if I need it and it gives me an easy way to run power tools at the dock for work projects.
But all is not so simple here either. Read the books and magazines and you start reading about stray-current corrosion, galvanic isolators, and isolation transformers — issues and devices that have to do with faulty shorepower systems in marinas and on other boats and their potential effects on your boat. These issues are real. I used to stay plugged in to shorepower. I started noticing my zincs disappearing quickly and my bronze underwater metal parts turning pinkish — evidence of corrosion caused by electricity.
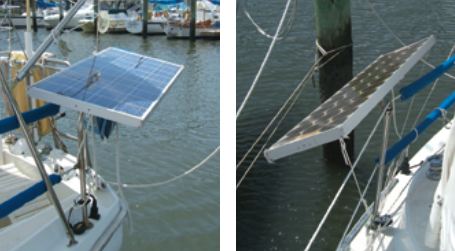
I started looking into possible remedies. Galvanic isolators weren’t all that expensive, but there seemed to be no consensus among experts as to their effectiveness. Isolation transformers were universally applauded, but they were close to $1,000 and heavy. For that kind of money and labor investment, I could abandon my reliance on shorepower and go solar, which is what I ultimately wanted anyway. I bought two used big monocrystalline solar panels on eBay, some wiring, connectors, diodes, and a regulator from the helpful folks at Jack Rabbit Marine, some cool stainless-steel rail/ stanchion mounts from DRB Innovators, and hooked up 106 watts of solar power for a little under a grand.
Not used much
It was a straightforward installation that works anywhere without my having to do anything. I’m glad I have shorepower for the options it gives me, but I don’t use it much now. Solar is great, but solar panels are big and bulky and hard to mount. So on smaller boats, at least, you’ll be strictly limited as to output. But my solar panels keep our batteries topped off, and during the day they can certainly keep up with our stereo and fans.
What’s a basic shorepower setup? A 30-amp cord, 30-amp 3-breaker panel with main breaker and reverse polarity indicator, and a 3-stage battery charger with adequate wiring will do fine for smaller vessels. (More and more marinas are going to 50-amp hookups, so it might be wise to carry an adapter if you’re going to visit a lot of marinas.) Our Charles 15-amp 3-stage charger has worked fine for seven years. A quality shorepower system like ours will cost less than a grand. If you’re not going to spend time in marinas, it’s not worth it. What’s also not worth it is a sub-par 110-volt AC system; household current is lethal. Do it right.
What about 4-stage chargers and equalizing flooded-cell batteries? Just trade your batteries in every five years for new ones of equal or better quality.
Wiring principles
When it comes to wiring, I’ve operated on three principles: if it ain’t broke, don’t fix it; if it is broke, do fix it; and never skimp on wiring and wiring hardware. First, make a thorough evaluation of the boat’s existing wiring. Obtain original schematics and compare them to what you find. (Get some advice if you have trouble understanding the schematic.) How good a job did the builder do? Is it neat? Good quality? Protected from chafe? If it’s good, leave it and count your blessings.
Corroded terminals and wire ends should be replaced; they cause drastic voltage drop and resistance, which is a fire hazard. Heat-shrink connectors make good sense. Learn to install them properly. (You can also put heat-shrink tubing over conventional terminals.) Even a keep-it-simple sailor should have a top-quality pair of crimpers and strippers and know how to use them.
In an older boat with multiple previous owners, you may find second-rate wiring add-ons. Make sure every circuit is on an adequate breaker. If the boat needs a second panel, install one. Fortunately, boats built by reputable builders in the 1970s or later are likely to have good original wiring. You may end up ripping out amateurish addons, but that is easier than rewiring the entire boat.
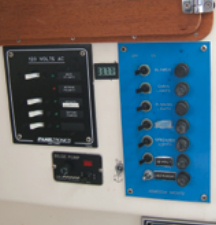
Fine wiring job
Pearson did a fine job wiring our boat. I’ve inspected it all and replaced corroded terminals — mostly grounding and bonding wire terminals in wet areas like the bilge — and I replaced the battery cabling when I found corrosion running up under the jacketing.
Other than that, I’ve left it alone. They didn’t use heat-shrink or tinned copper wire then, so there’s going to be some age-related corrosion at the terminals. Be especially alert when inspecting the wiring on and around the engine — look for heat and vibration damage such as cracks in the jacketing and loose connections.
The main negative ground — probably a black battery cable bolted to the engine block — must have a clean, tight connection or you will lose all electrical power someday, probably when you try to start the engine. This connection is especially prone to loosening by vibration, so pay special attention to it. I used thread locker on the bolt and haven’t had any problems since.
Distribution panels
As long as your distribution panel is free of corrosion and bad switches and it has an adequate number of circuits for the equipment you have or intend to install, keep it (along with spare fuses for all the circuits). I’ve replaced a couple of switches on our original panel and cleaned the connections on the back, but that’s it.
One option I noticed recently is small add-on panels that control the nav lights, thus getting those circuits off the main panel and freeing them up for other things. That seems like a low-cost, common-sense option to me, and one I’ll look into if I decide to add any more circuits to the boat.
Meters
The consensus seems to be that full-function battery monitors like the Link 10 and 20 are the things to have for battery monitoring. For serious cruising, I will probably acquire one, but they are expensive. Right now, I get by with a small hardwired Datel digital voltmeter, accurate to within 1/100th of a volt. That level of accuracy is necessary for a voltmeter to be very useful. The meter was $30 and easy to install.
Voltmeters and ammeters are only useful if you know how to read them, but it’s worth acquiring that knowledge. (Your engine probably came with an ammeter.) With my simple system and modest demands, I’m perfectly happy with what my voltmeter tells me. I disconnected the ammeter when I got the bigger alternator, as the alternator’s max output is higher than the ammeter’s rating. Voltmeters are more informative than ammeters and, in one sense, obviate ammeters since they also tell you whether your alternator is putting out what it should.
Inverters
If you don’t have shorepower and don’t intend to add it, you might consider putting in an inverter to run power tools and your laptop. Another option is the inverter/charger which doubles as an AC charger and inverter. That might be a good way to go if you want shorepower and also want to be able to use power tools away from the dock. Since I already have an AC charger and shorepower, I just keep a pocket inverter on board for the laptop. It plugs into the DC receptacle in the galley. There’s also a weatherproof receptacle in the cockpit for the spotlight and cockpit light.
Routine use
Our routine is to leave the battery switch on 2, so one battery is on duty to power the automatic bilge pump, keep the cell phone charged, and provide power for the emergency high-water alarm. When we get to the boat, we put the battery switch on ALL as we prepare to cold-start the engine. The switch stays on ALL as long as the engine is on, so the charging current is flowing to both batteries. If we have anything running — usually the stereo — when we cut the engine, we put the switch on 2. That way, only one battery is open to draw. When we’re ready to start the engine again, the switch goes back to ALL. We have to go below to sniff the bilge anyway, so it’s no trouble.
When overnighting, we never need both batteries for house use. I haven’t ever done this, but if I ever got uncomfortable with how much we were drawing Battery 2 down, I could switch to Battery 1 for a short time, knowing it had ample reserve. In the worst-case scenario — a battery failure — I have the jump-pack. If that fails, I have sails and anchors.
The old components — two batteries, a traditional battery safety switch, and original wiring and panels in good condition — still serve many sailors well. They’re nicely augmented by some new technology, without getting too complicated — beefier alternators for faster charging, smart regulators to make the most out of your engine running time, solar panels and the regulators that keep them from cooking your batteries, and straightforward shorepower setups for utilizing shorepower when available.
Together, it adds up to a durable and reliable approach, and the investment, while not insignificant for the would-be cruiser on a budget, should have a long-term payoff.
Phillip Reid , his wife, Andie, and certain other miscreants sail a 1977 Pearson 28, Miss Bohicket, out of Wilmington, North Carolina. They finished a five-year refit in the fall of 2005.
Thank you to Sailrite Enterprises, Inc., for providing free access to back issues of Good Old Boat through intellectual property rights. Sailrite.com