Captive bolts mean freedom from worry
Issue 69 : Nov/Dec 2009
Like many boats from the early 1970s, my Hallberg-Rassy Mistral 33 was originally fitted with bronze gate valves. They were mounted directly on the ends of the through-hull extensions, and even though a small piece of 3⁄8-inch marine plywood was placed between the hull and each through-hull nut, I was concerned that the plumbing attached to the gate valve still relied on the through-hull’s sealant for its structural support.
In a couple of locations, a previous owner had reinstalled some ball valves but had left out the plywood, so the through-hull nut was in direct contact with the hull. When making my pre-restoration inspection, I found that all of the remaining gate valves were permanently stuck in the open position and none of the existing connections felt firm or secure.

Since I was stripping the entire inner surface of the hull, I thought I would bring the through-hulls and their connections up to modern seacock standards. However, every article I read regarding the installation of the Perko flanged seacocks I had purchased called for the flange mounting bolts to pass through the hull and be sealed with polysulfide sealant. This was going to mean a lot more holes in the hull, all of which would be potential points for leaks to occur. As the whole point of changing these through-hull connections was to give me more peace of mind, this seemed counterproductive.
The articles I read also called for a contoured wooden spacer between the hull and the seacock to ensure a square and flat surface for the flange to mount against, and that gave me an idea. I’ve become somewhat proficient with epoxy … so, what if I countersunk the bolts into the underside of a plywood mounting plate and buried the heads in epoxy to keep the bolts from turning? I could install the plate against the hull with thickened epoxy to fill in the hull contour, fillet the edges, and fiberglass it permanently in place. It would then provide a solid and secure location for the seacock flange to mount against with the bolts sticking straight out of the hull.
With this solution in mind, I dove right into the project.
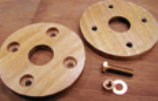
First, I laid out each through-hull mounting plate by tracing the seacock mounting flange’s features onto the plywood. Then, to ensure I would drill them accurately, I center-punched the centers of the holes for the mounting bolt and for the through-hull itself.

I used a 3/4-inch Forstner bit for the countersink and cut into the plywood a little deeper than the thickness of the bolt head. Then I drilled through the rest of the plywood at those locations with a drill sized a little larger than the thread diameter of the mounting bolt. I cut the hole in the center about 1⁄8 inch larger in diameter than the threads on the through-hull to provide a little leeway during installation on the hull. I dry fitted the seacock with the mounting bolts to make sure everything was going to work and traced around the flange so I could cut the plywood a little oversize. Once I’d cut the plywood, I applied a sealing coat of epoxy. If you attempt this project, be sure to use only high-grade marine plywood and seal it very thoroughly.
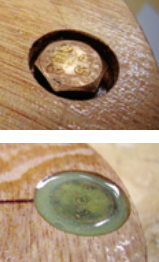
Using the mounting bolts, I mounted the seacock to the plywood mounting plate, placing a plastic grocery bag between them to ensure that I didn’t bond the seacock to the plywood should any thickened epoxy seep though the oversize bolt holes. With the mounting bolts tightened (and therefore aligned and in the correct position) I turned the seacock upside down and filled the countersunk bolt-head areas with thickened epoxy.

Once the epoxy had hardened, I disassembled the pieces. When I was done, each new Perko seacock or Groco flange mount now had its own customized plywood mounting plate.
Before installing the mounting plate, I prepared the inside of the hull by sanding it down to the bare fiberglass, wiped the area with acetone, and wetted it out with unthickened epoxy. I plastered the underside of the mounting plate heavily with epoxy thickened to peanut-butter consistency to fill in the contour arc of the hull. Then, with the through-hull holes lined up, I pressed the mounting plate onto the hull while the excess epoxy paste extruded out around the outside of the plate or into the through-hull hole.

I filleted the thickened epoxy that squeezed outward to the edge of the mounting plate and removed what entered into the center hole with a rag over my finger. I was initially concerned about holding the mounting plate in a fixed location over the hole while the epoxy hardened, but it turned out that this was not necessary.
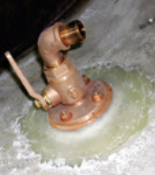
After the fillet had hardened, I fiberglassed the hull and fillet surface around the outside of the mounting plate. I still have plenty of work to do on the interior of the boat, but when I do get around to painting the inside of the hull, I believe these mounts will look very professional.
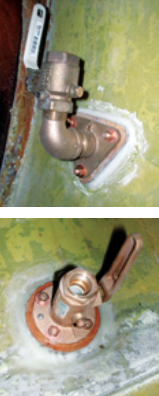
The Perko seacocks, or triangular Groco mounting flanges, can now be installed with sealant under their flanges to permanently mounting plates, while the through-hulls can be installed from the outside according to usual practice.
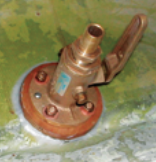
What once were rather doubtful installations are now solid, and I’m confident the structural loads are no longer being carried by the through-hull sealant.
The result? Peace of mind and a story to tell.
Stephen Thompson is a professional mechanical engineer. Having sailed on inland lakes as a boy, he caught the bug once again at 50 years of age and built a small sailing vessel from scratch. He is now engaged in the complete restoration of a 1970 Hallberg-Rassy Mistral 33 in Houston, Texas.
Thank you to Sailrite Enterprises, Inc., for providing free access to back issues of Good Old Boat through intellectual property rights. Sailrite.com