Hand-sewn cargo boosters that stow flat
Issue 101 : Mar/Apr 2015
A pair of saddlebags, or panniers as they are often called in the biking world, add capacity and convenience when we make shopping trips on our bicycles. We designed and made our own bags. Our goals were to make them soft, quickly removable, and collapsible so they could be stowed easily.
These saddlebags can be sewn together by hand without the need for a sewing machine, and making them requires no special sewing skills. They don’t have to look pretty; they just have to be functional. The techniques used to sew them can be found in Emiliano Marino’s The Sailmaker’s Apprentice.
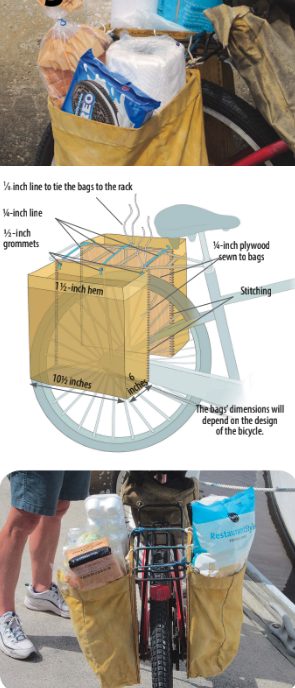
We used 7-ounce cotton duck, although any medium- to heavyweight material could be substituted. We cut the material to size allowing for a 1⁄2-inch seam allowance and a 1 1⁄2- or 2-inch double-folded hem at the top. Although the choices of materials and dimensions are flexible, the one non-flexible aspect of these saddlebags is that they must be sized so that, when they are installed on the bike, they don’t interfere with the pedals or the rider.
We sewed our pieces of material together with a hefty needle (#16 sail needle or heavy sewing needle) and 7-ply sail twine. Just about any other thread could be used. If it’s too light, the thread can be doubled or tripled in the needle. Avoid thread, such as cotton, that rots easily when exposed to UV.
We installed three 1⁄2-inch grommets, or sewn eyelets, evenly spaced in the hem of each pannier along the edge that abuts the bicycle.
Then we cut two pieces of 1⁄4-inch plywood, sized to match the back side of the pannier. We drilled 1⁄8-inch holes around the perimeter of the plywood, spaced approximately every half inch and approximately 3⁄8 inch in from the edges. Using a hefty needle, we then sewed each pannier to its plywood backing. We used 7-ply sail twine, although the #9 nylon twine often found in hardware stores or home-improvement centers is a good substitute. A sewing palm and needle-nose pliers are useful tools for this job.
Finally, using 1⁄4-inch rope, we tied the two panniers together with the line lying over the bike’s luggage rack. The plywood backs lie against the bike and protect the canvas against chafe. Smaller line, perhaps 1⁄8-inch, can be used in addition to tie the panniers to the luggage rack.
Our final step was to coat the entire ensemble with a water repellent. Some fabrics might not need this, but since our panniers were made from 7-ounce cotton duck, we used a locally available brush-on repellent.
Rudy and Jill Sechez have lived aboard and cruised for 17 years on boats they built themselves. Currently on Briney Bug, a 34-foot sail-assisted wooden trawler they designed, they like to keep things simple and enjoy sharing their experiences with others. Reach them at rudyandjill@yahoo.com.
Thank you to Sailrite Enterprises, Inc., for providing free access to back issues of Good Old Boat through intellectual property rights. Sailrite.com