A mast gets a new foot to stand on
Issue 101 : Mar/Apr 2015
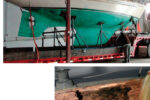
I’ve always been in the habit of pulling my mast when I lay my boat up each fall. It adds to the annual cost, but it’s better in the long run. For one thing, it makes it easier to cover the boat, a 1981 Paceship PY 26, and there’s less risk of the boat being damaged by winter storms.
Pulling the mast also allows me to inspect the masthead and rigging up close without worrying about falling out of a bosun’s chair. Occasionally, I find something at the masthead in need of repair, such as frayed rigging wire or a bad anchor light, and addressing it is easier on the hard. But a few years ago, the trouble lay at the base of the mast.
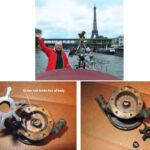
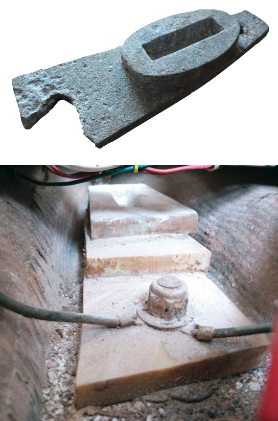
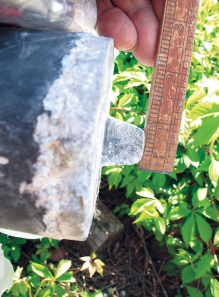
As I was cleaning out the boat, I found a crack running from side to side at the after end of the all-aluminum step . . . right under one of the big nuts that held it in place on the keel. I wiggled it with my fingers and it came apart in my hand. The step had been secured to the keel with the stainless-steel keel bolts that fasten the cast-iron keel to the boat. It was a textbook recipe for electrolysis and that, I knew, is never good.
A not very close inspection showed that the mast foot, another aluminum casting, also showed signs of severe corrosion, as did the lower edge of the mast itself, where it fit around the foot. Fortunately, I had all winter to find out how to fix it.
A link on a website devoted to Paceship owners led me to a source — Rig-Rite — for a replacement mast shoe. If memory serves me correctly, it was somewhere north of $100, but not by much. I was happy they had one at any price for a 30-year-old boat.
A non-corroding substitute
The remaining problem was how to deal with the corroded mast step. One of the boating magazines had an article about G-10 and how it could be used for backing plates under cleats and other deck hardware. It could even be used, in larger sizes, for engine mounts. Although it sounds like the name of a group of economists, G-10 is a composite of fiberglass and epoxy, and it’s available in a wide variety of dimensions and shapes.
I’m an empirical armchair engineer with no formal training, but it seemed to me that a material with a compression strength of 60,000 psi, a modulus of elasticity of 2,700,000 psi, a Rockwell hardness of 110, and a specific gravity of 1.82 should be plenty tough, plenty hard, and plenty heavy. Also, it had the qualities of being impervious to water, essentially non-absorbent, and non-conductive to electricity, thus would shield the mast from further corrosion due to contact with stainless steel in bilge water. It sounded ideal.
A little research indicated that G-10 could be milled, drilled, cut, and shaped like a hard piece of metal, but that any tools used with it should be carbide-tipped. I found it available online in flat sheets of various thicknesses, as well as in different shapes, such as tubes, bars, rods, and angled pieces. In fact, not too far from my home in New Jersey, McMaster-Carr had a warehouse with an amazing variety of thicknesses and sizes. It’s also available from Jamestown Distributors, one of my favorite suppliers for stainless-steel and bronze hardware.
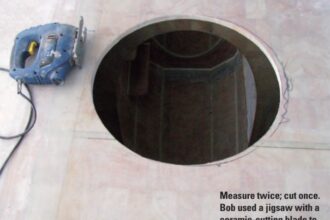
I found carbide jigsaw blades at my local hardware store and used only two of them for the entire job, plus a couple of carbide drill bits and an ordinary tap for a 5⁄16-inch bolt. However, the G-10 was so hard, and its position in the bilge is of “out of sight, out of mind,” that I left it pretty rough, except for softening the edges with a sander. There was no way I was going to make this pretty, with nicely rounded edges, as I might have if I had used wood. I advise wearing protective gear when cutting, drilling, or sanding this stuff, as it will produce a lot of fiberglass dust. Don’t breathe it.
Plan and execution
My plan was to remove the old mast shoe and cut away enough of the mast (about 3⁄4 inch) with a hacksaw to remove the corroded part. I did that, then built a new mast step from G-10. The old step was 2 inches tall. The new one would have to be taller to offset the slightly shorter mast.
Referring to the old mast step as a model for its replacement, I ordered a 24 x 24-inch piece of 3⁄4-inch-thick G-10 from McMaster-Carr for $311.
Using an ordinary jigsaw with a carbide blade, I cut a piece of G-10 the length of the original step (about 18 inches) and roughly the width of the bilge (6 inches), leaving space for any water in the bilge to wash along its sides. This was to be the base and, at 3⁄4-inch thick, it allowed the tops of the keel bolts to be exposed.
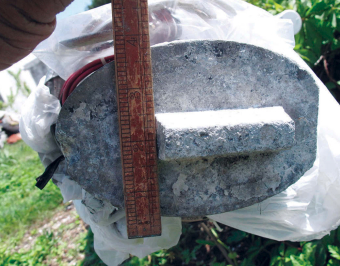
I cut a second piece as a spacer to make up for the shortened mast. Then, using the new mast shoe as a guide, I cut a third piece big enough to fit directly under the mast and cut a beveled slot in it to hold the tenon at the bottom of the mast shoe.
Once I had the upper section of G-10 cut out and properly shaped, I drilled and tapped holes to hold four 5⁄16-inch bolts. I then glued the three pieces of G-10 with epoxy and tightened the stainless-steel bolts to secure them together. The bolts were isolated so they would not touch either the keel bolts or the mast. It seemed like belts and suspenders, but this way, I felt the pieces wouldn’t be likely to slip or slide under the tremendous sideways pressure the mast would exert when the boat was under sail.
Once I felt confident about the location of the upper portion of the new step, I used the original step, what was left of it, as a guide to cut holes for the two keel bolts holding it in place.
I tightened the keel-bolt nuts with a torque wrench to the builder’s specifications (about 90 foot pounds), and used 3M 5200 sealant around the bolt holes. When the mast went in, the rigging wire fit well enough. Even though the step was, in effect, about 1⁄4 inch lower than it had been before, enough threads were showing on the turnbuckles that I could easily take up any slack in the shrouds.
My boat had been struck by lightning in the recent past, so I used a commercial electrician’s connector, a small rectangle of aluminum with a short foot (about $8), to connect a heavy copper ground strap from the keel bolt to the mast without corroding the mast. The connector has a hole drilled to take the wire, which is secured with a bolt. All I had to do was drill a small hole into the mast several inches above the cabin sole, for a #6 stainless-steel sheet metal screw, to fasten the connector with, and lightly sand bare the aluminum surface to ensure a good electrical connection.
Over the past three years the mast step has held up very well and shows no sign of loosening or slipping. With luck, it should last another 30 or so years.
Cliff Moore’s first boat was a Kool Cigarettes foam dinghy with no rudder or sail. Many years and many boats later, he’s sailing a 26-foot AMF Paceship 26 he acquired and rebuilt after Hurricane Bob trashed it in 1991. He is the editor of a community newspaper.
Thank you to Sailrite Enterprises, Inc., for providing free access to back issues of Good Old Boat through intellectual property rights. Sailrite.com