Basic steps for making reliable connections
Issue 102 : May/Jun 2015
If you own an older boat, an important skill to master is the proper technique for soldering electrical connections. At some point, you’ll undoubtedly want to repair, replace, or update an electrical circuit. You may want to replace a bilge pump or windlass or add an electrical switch. While many connections can be made using crimp terminals, a good solder connection is often preferable.
Before contemplating any soldering work, you’ll need to assemble a few tools and supplies (see “Soldering Tools and Supplies” on page 36). None of this is particularly expensive.
Soldering is messy, so you need a suitable work area. Excess solder will drip and hot components, soldering irons, and heat guns will often burn the work surface. I do most of my soldering at the nav station using an old cutting board as my workbench.
As with any boat project, success depends to a large degree on preparation and understanding the tools.
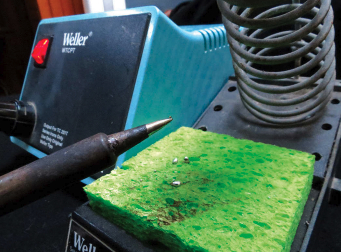
Tinning a soldering tip
Before the soldering iron can be used, the tip must be tinned. I plug in the soldering iron and let it heat up to temperature. If it’s a new tip, I let it continue heating for about 10 minutes to allow any coating to burn off. I apply solder to the entire tip. A lot of solder will drip off the tip during this process. After the entire tip has been coated, I wipe it off using a damp sponge or a damp rag. If the tip is now uniformly shiny, the prep work is done. If it is a new tip, especially a ceramic tip, I may have to repeat these steps three or four times. It is quite important that the entire tip is shiny and bright, otherwise the surface of the tip will oxidize and it will have difficulty making good solder connections. It may need to be re-tinned periodically, when you’re working with the soldering iron, especially when the iron is not temperature-controlled.
The soldering iron tip should never be sanded or filed. The surface plating is quite thin, and the tip will be ruined if it is filed through to the copper.
Preparing the connections
First, I strip the insulation off the wires, being careful not to nick the conductors in the process. The amount of insulation to be stripped depends on the wire size and the type of connection. If joining two wires, 1 inch is usually enough for wire sizes AWG 18 or smaller, while 1 1⁄2 inches of insulation should be stripped from the ends of wire sizes AWG 12 to AWG 16. If a wire is to be soldered to a terminal, stripping half this amount of insulation will usually be adequate.
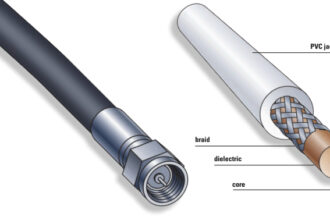
All the components that are to be soldered together should be clean and shiny. If the wires and/or terminals are all marine-grade tinned copper and in good shape, it will be easy to make a good solder connection. If the wires are not tinned and appear dull due to oxidation but are otherwise in good condition, it might be possible to clean them using a mild acid followed by a neutralizer (see “Corrosion Cleanup” on page 37). Wires showing signs of deterioration are green or have a powdery residue and should be replaced. It is difficult, if not impossible, to make a good solder joint with badly oxidized wire. The result will be a bad connection that may overheat and/or will surely fail at an inopportune time.
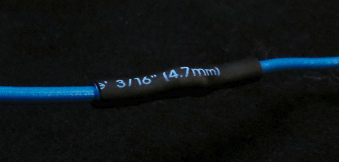
Before making the connection, I slide a suitable length of heat-shrink tubing onto one of the wires. It should be long enough to cover the entire solder joint and have enough extra length to overlap the wire insulation by a minimum of 1⁄4 inch. The diameter of the tubing should be large enough to slide over the completed solder joint but small enough to fit tightly over the wire insulation after it’s heated. Most good heat-shrink tubing has at least a 3:1 shrink ratio.
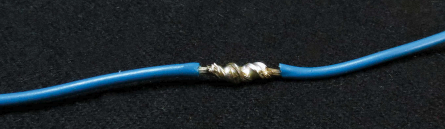
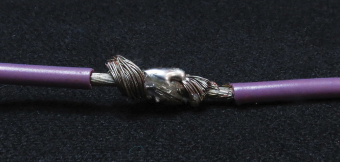
A good solder connection begins with a good mechanical connection. If soldering two wires together, they should be twisted together in line. The wires should not be wrapped together side-by-side; the resulting connection will be larger and weaker than if done properly.
When attaching a wire to a terminal, I wrap the wire tightly around the terminal. I make sure the wrap is tight enough to hold the wire in place before I apply the solder.

Making a good solder joint
First, I slide the heat-shrink tubing as far from the solder joint as I can. I don’t want the heat of the soldering iron to shrink the tubing before it’s time.
Next, I turn on the soldering iron and allow it to heat up. I unroll a foot or two of solder, tin the tip, and place the iron against the connection. After a few seconds, the connection will get hot enough to melt the solder. I touch the end of the solder against the wire connection, not against the soldering iron tip. When the connection reaches the right temperature, solder will begin to flow into the joint. I keep the connection hot and continue feeding solder until the joint is evenly filled with solder. The photos show a good solder joint as well as joints with too much and too little solder and a “cold” joint. If the solder joint has too much solder, I heat it up again and give it a good rap against the table. The excess solder will usually fall off.
Sealing the joint
The last step in the process is to seal the unprotected wires. I allow the connection to cool, then slide the heat-shrink tubing over the solder joint. I use a heat gun to evenly heat the tubing until it shrinks tightly around the connection and wires. A small amount of adhesive will usually ooze out the end of the tubing. The heat gun requires a lot of power. If we are on the hook, I sometimes use a lighter, a stove burner, or a gas-heated iron to heat the shrink tubing. If using an open flame, of course, take care to ensure the flame does not come into direct contact with the tubing or insulation.
David Lynn is a Good Old Boat contributing editor. He was an electronics technician in the U.S. Navy for six years before getting his BS and MS in electrical engineering. He and his wife, Marcie, have lived aboard Nine of Cups, their 1986 Liberty 458 cutter, since purchasing her in Kemah, Texas, in 2000. They have sailed her more than 80,000 nautical miles in their ever-so-slow world circumnavigation. Recently, they crossed the Indian Ocean and spent some time in Durban, South Africa. Find them on their website at www.nineofcups.com or read their daily blog at www.justalittlefurther.com.
Thank you to Sailrite Enterprises, Inc., for providing free access to back issues of Good Old Boat through intellectual property rights. Sailrite.com