A traditional seaman’s artifact is a step up
Issue 114: May/June 2017
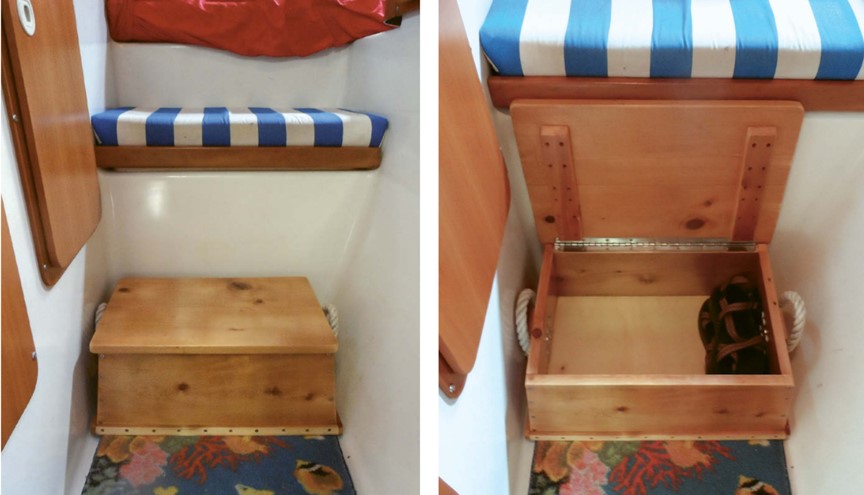
Getting into our bunk aboard our PDQ 32 is a rather athletic endeavor: I have to crawl in face-first over a seat that is too high to use as a step and too high to sit on when putting on shoes. With her bad knee, getting into bed was an even bigger struggle for my wife, Laura. It’s not a problem peculiar to Shoal Survivor. Berths on boats, V-berths in particular, are often at an inconvenient height that’s dictated more by the shape of the hull than by human dimensions.
When high beds were in fashion in homes, they came with a stool. We tried a stool, but it was too small, too tippy, and too single-purpose for life on a boat. We needed something stable that could be used as more than a step up.
Throughout the age of sail, every seaman had a chest in which to keep a few personal possessions orderly and secure. A scaled-down chest would fit perfectly in front of our V-berth, could be used as a handy step, and would solve an additional problem. Although our boat has some cavernous lockers under the bunks and saloon seating, handy small lockers are in short supply in the staterooms. Laura and I had never settled on one place to put our shoes, so they were forever underfoot. They could go in a chest.
But I couldn’t just run to West Marine and pick a sea chest off the shelf. I had to dig out the ruler, saw, and sandpaper and build my own, just as seamen of yore were expected to do. What better way to spend a winter’s evening than surrounded by sawdust?
Constructing a sea chest is straightforward and can be done with simple tools. It’s basically a box, but one with a few design features that have been incorporated over the ages.
Sea chest features
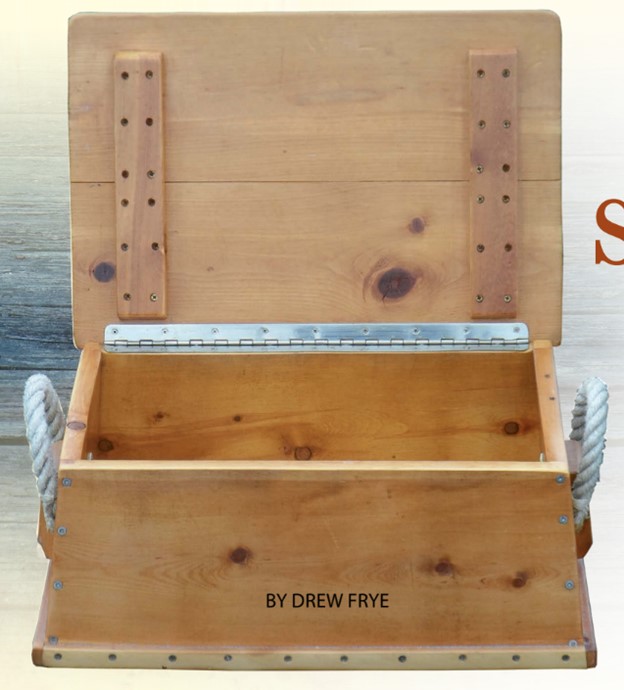
Taper – A sea chest is wider at the bottom than the top, which makes it very stable. The taper allows the handles to be attached where they are accessible when the chest is jammed tight against a bulkhead, and they won’t scratch that bulkhead if the chest slides about. The lid will open in a tight space without binding at the back or on the sides. A trim strip at the bottom provides additional side relief and takes the wear.
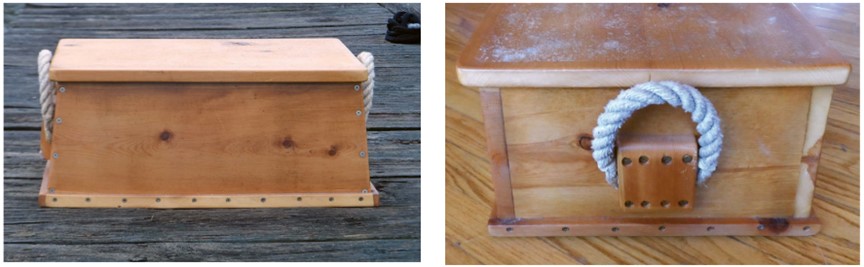
Rope handles – Rope is not damaged by smashing into things and not damaging to anything it strikes, whether the chest is sliding about or being carried. Sailors would often demonstrate their marlinspike skills by making handles with ornate fancy work.
Hinges – Strap hinges are traditional, but a piano hinge fits better, is strong, and I had a cut-off.
Lid cleats – The boards that make up the lid are held together with cleats that are fastened to the underside of the lid and carefully beveled to lock the lid in place when closed. Even with the hinge removed, the closed lid should not shift even a fraction of an inch.
Construction
A sea chest can be built any size to fit a need. My chest is roughly 20 inches wide, 13 1/2 inches deep, and 8 inches high. I used nominal 1 x 8 lumber for everything except the bottom, for which I used 1/4-inch plywood. The actual width of a 1 x 8 board is 7 1/4 inches, so that is the height of my chest sides (the thickness is 3/4 inch).
To create the bottom-to-top taper characteristic of sea chests, I cut all four side boards as trapezoids. I made no miter cuts or lap joints and found that, when using dimensional lumber in this way, a table saw can be useful but is not required. Because I planned to paint the chest, I made no special effort to hide fasteners but focused on building it strong enough for regular use as a step.
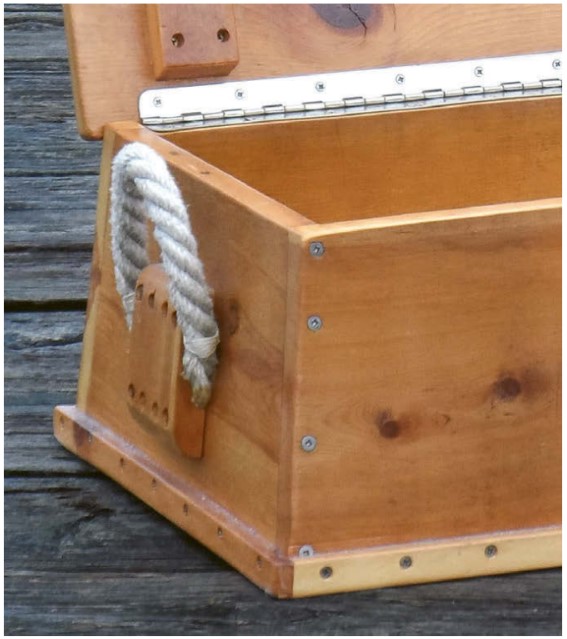
I was mindful of protruding hardware. While a few scratches didn’t matter on a whaling ship, they show up on a small boat. For example, the handles were traditionally attached with exposed rivets, but I substituted countersunk brass bolts. In fact, I countersunk all the fasteners. On the inside of the chest, I smoothed all the hardware with a Dremel tool so there would be nothing to snag our shoes.
Assembly
I started by connecting the front and back (the long sides) of the chest to the ends with 1 5/8-inch stainless-steel deck screws. I pre-drilled and countersunk the holes to ensure the boards pulled up nicely. Before screwing them together, I squared-up all four sides on a flat floor; I didn’t want a rocker.
Next, I attached the floor with countersunk 3/4-inch #6 brass screws. Then, because the slope of the sides of my chest is slightly different from that of the front and back, and to make the top flat for the lid, I leveled the top edge with a disk sander. This was not necessary where the sides meet the floor because I later covered that joint with a trim strip. But because the sea chest was to be used as a step, it was important that the top be flat and well fitted.
I made the lid from two 1 x 8 boards held together by 1 x 2 cleats on the underside. I cut the cleats to be the same length as the front-to-back span of the chest interior and beveled their ends about 20 degrees to prevent them from binding when the lid is opened and closed. I clamped the two lid boards tightly before attaching the cleats using countersunk 3/4-inch #6 screws and wood glue. When finished, the joint was nearly invisible.
Once the glue dried, I cut the lid to its final size — it extends about 1/2 inch over each side. I could have used a single wider board for the lid, but it would have been more likely to warp and would still have required the cleats for strength and stability.
Before attaching the hinge, I shaved about 3/16 inch (the exact thickness of the hinge) off the top edge of the back of the box so the hinge would be recessed. This allows the lid to sit directly on the sides of the chest and minimizes stress on the hinge when we use the chest as a step. I also took care to true the lid to the top, to prevent the hinge from working loose over time.
To hide the joint between the plywood bottom and the sides of the chest, I ripped 3/8-inch trim from the 3/4-inch lumber. I pre-drilled the trim pieces and attached them using 3/4-inch #6 brass screws.
Rope handles
The handles I made are rather plain and there are certainly other ways to accomplish this. I cut a 3- x 4- x 3/4-inch block for each side of the chest, clamped the two blocks together, and drilled three evenly spaced 1/2-inch holes lengthwise through the joint to give me three half-round grooves in each block.
To make the handles, I started with two 15-inch lengths of old 3/4-inch three-strand rope. I whipped each length twice, about 3 inches from each end (leaving a 9-inch span between the whippings), then unlaid both ends of each length. I now had three 3-inch strands I could pinch between the grooved blocks and the chest sides.
After pre-drilling a handle block for eight 1/2-inch #6 machine screws, I overlapped the strands in the grooves and applied tape to hold them while I attached the block to the side of the chest. Inside the box, I cut the bolts flush with the nuts and polished them with a Dremel tool. In retrospect, the nuts could have been countersunk.
The handles are strong, comfortable, non-scratching, and compact enough to fit the narrow space I had to work with. I don’t possess fancy marlinspike skills, but if I did, this would be a fine place to showcase them.
Finishing
Before finishing the sea chest, I trued all of the corners and laps with a disk sander and a 150-grit disk. I followed that with a finish sander, working down to 220-grit. Well-rounded corners are part of the look and are safer on a boat than sharp corners.
Traditionally, sea chests were painted a muted color and only the inside of the lid would be decorated and bright. A tray was sometimes added to hold smaller items. Paint best withstood hard knocks, while the interior was the one place on board a sailor could express his personality through decoration. However, Laura preferred ours be varnished, and it works, I think. I can always paint it later; going from varnish to paint is more reasonable than the reverse.
A welcome addition
After two weeks of use, I added a salted varnish finish to the top of the lid, as the surface was too slick for use as a step. I simply masked the area, laid on a heavy coat of varnish, and sprinkled it liberally with coarse salt. After the varnish was dry, I washed off the excess salt with water. This treatment does not hide the natural finish and is easily sanded smooth for refinishing.
The result of an evening’s work is a functional and nautical addition that fits well on board any boat, from traditional to very modern. A sea chest like this might even make a nice gift for a special sailor friend or shipmate.
Drew Frye cruises Chesapeake Bay and the mid-Atlantic coast aboard his 34-foot catamaran Shoal Survivor, searching for out-of-the-way corners known only by locals. A chemical engineer by training and a 40-year climber and 30-year sailor by inclination, he brings a mix of experiences to solving boating problems and writing about them.
Thank you to Sailrite Enterprises, Inc., for providing free access to back issues of Good Old Boat through intellectual property rights. Sailrite.com